Fuzzing The Un-Fuzzable Using Debugging and Browser Bruter — Part 1
By Jafar Pathan
18 min read

The Problem Statement Solved by Browser Bruter
We are unable to fuzz web application whose HTTP body is encrypted, preventing us from fuzzing them directly using traditional methods.
To address this, we developed the Browser Bruter tool, which allows us to fuzz web applications directly. Read more here.
The Problem Introduced by Browser Bruter
However, this solution introduces a new problem. As the complexity of the web application increases (due to dynamic elements, UI, and front-end input validation), the Browser Bruter becomes less efficient. We refer to this as the Curse of Front-End.
To illustrate this issue, I will demonstrate fuzzing a complex web form using Browser Bruter.
A Curse of Front-End
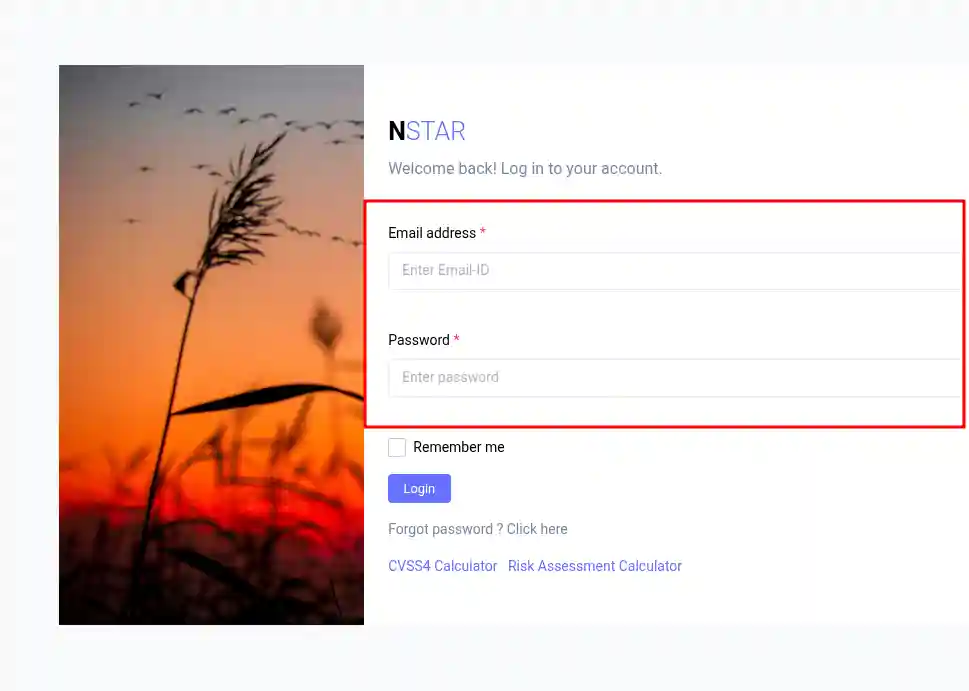
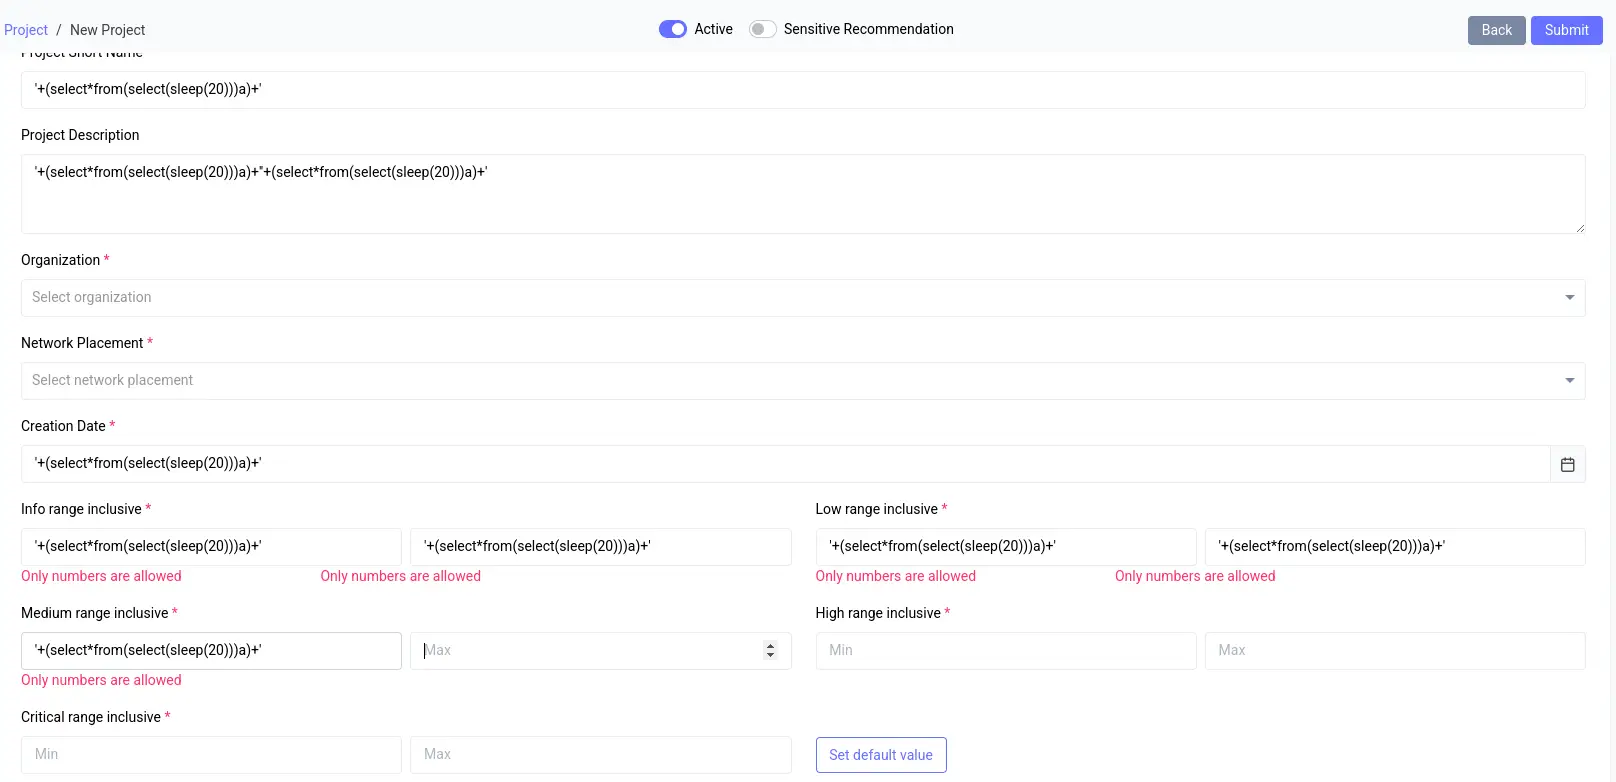
First, let’s analyze our target to better understand what we are dealing with. Below is the target form we will fuzz using Browser Bruter.
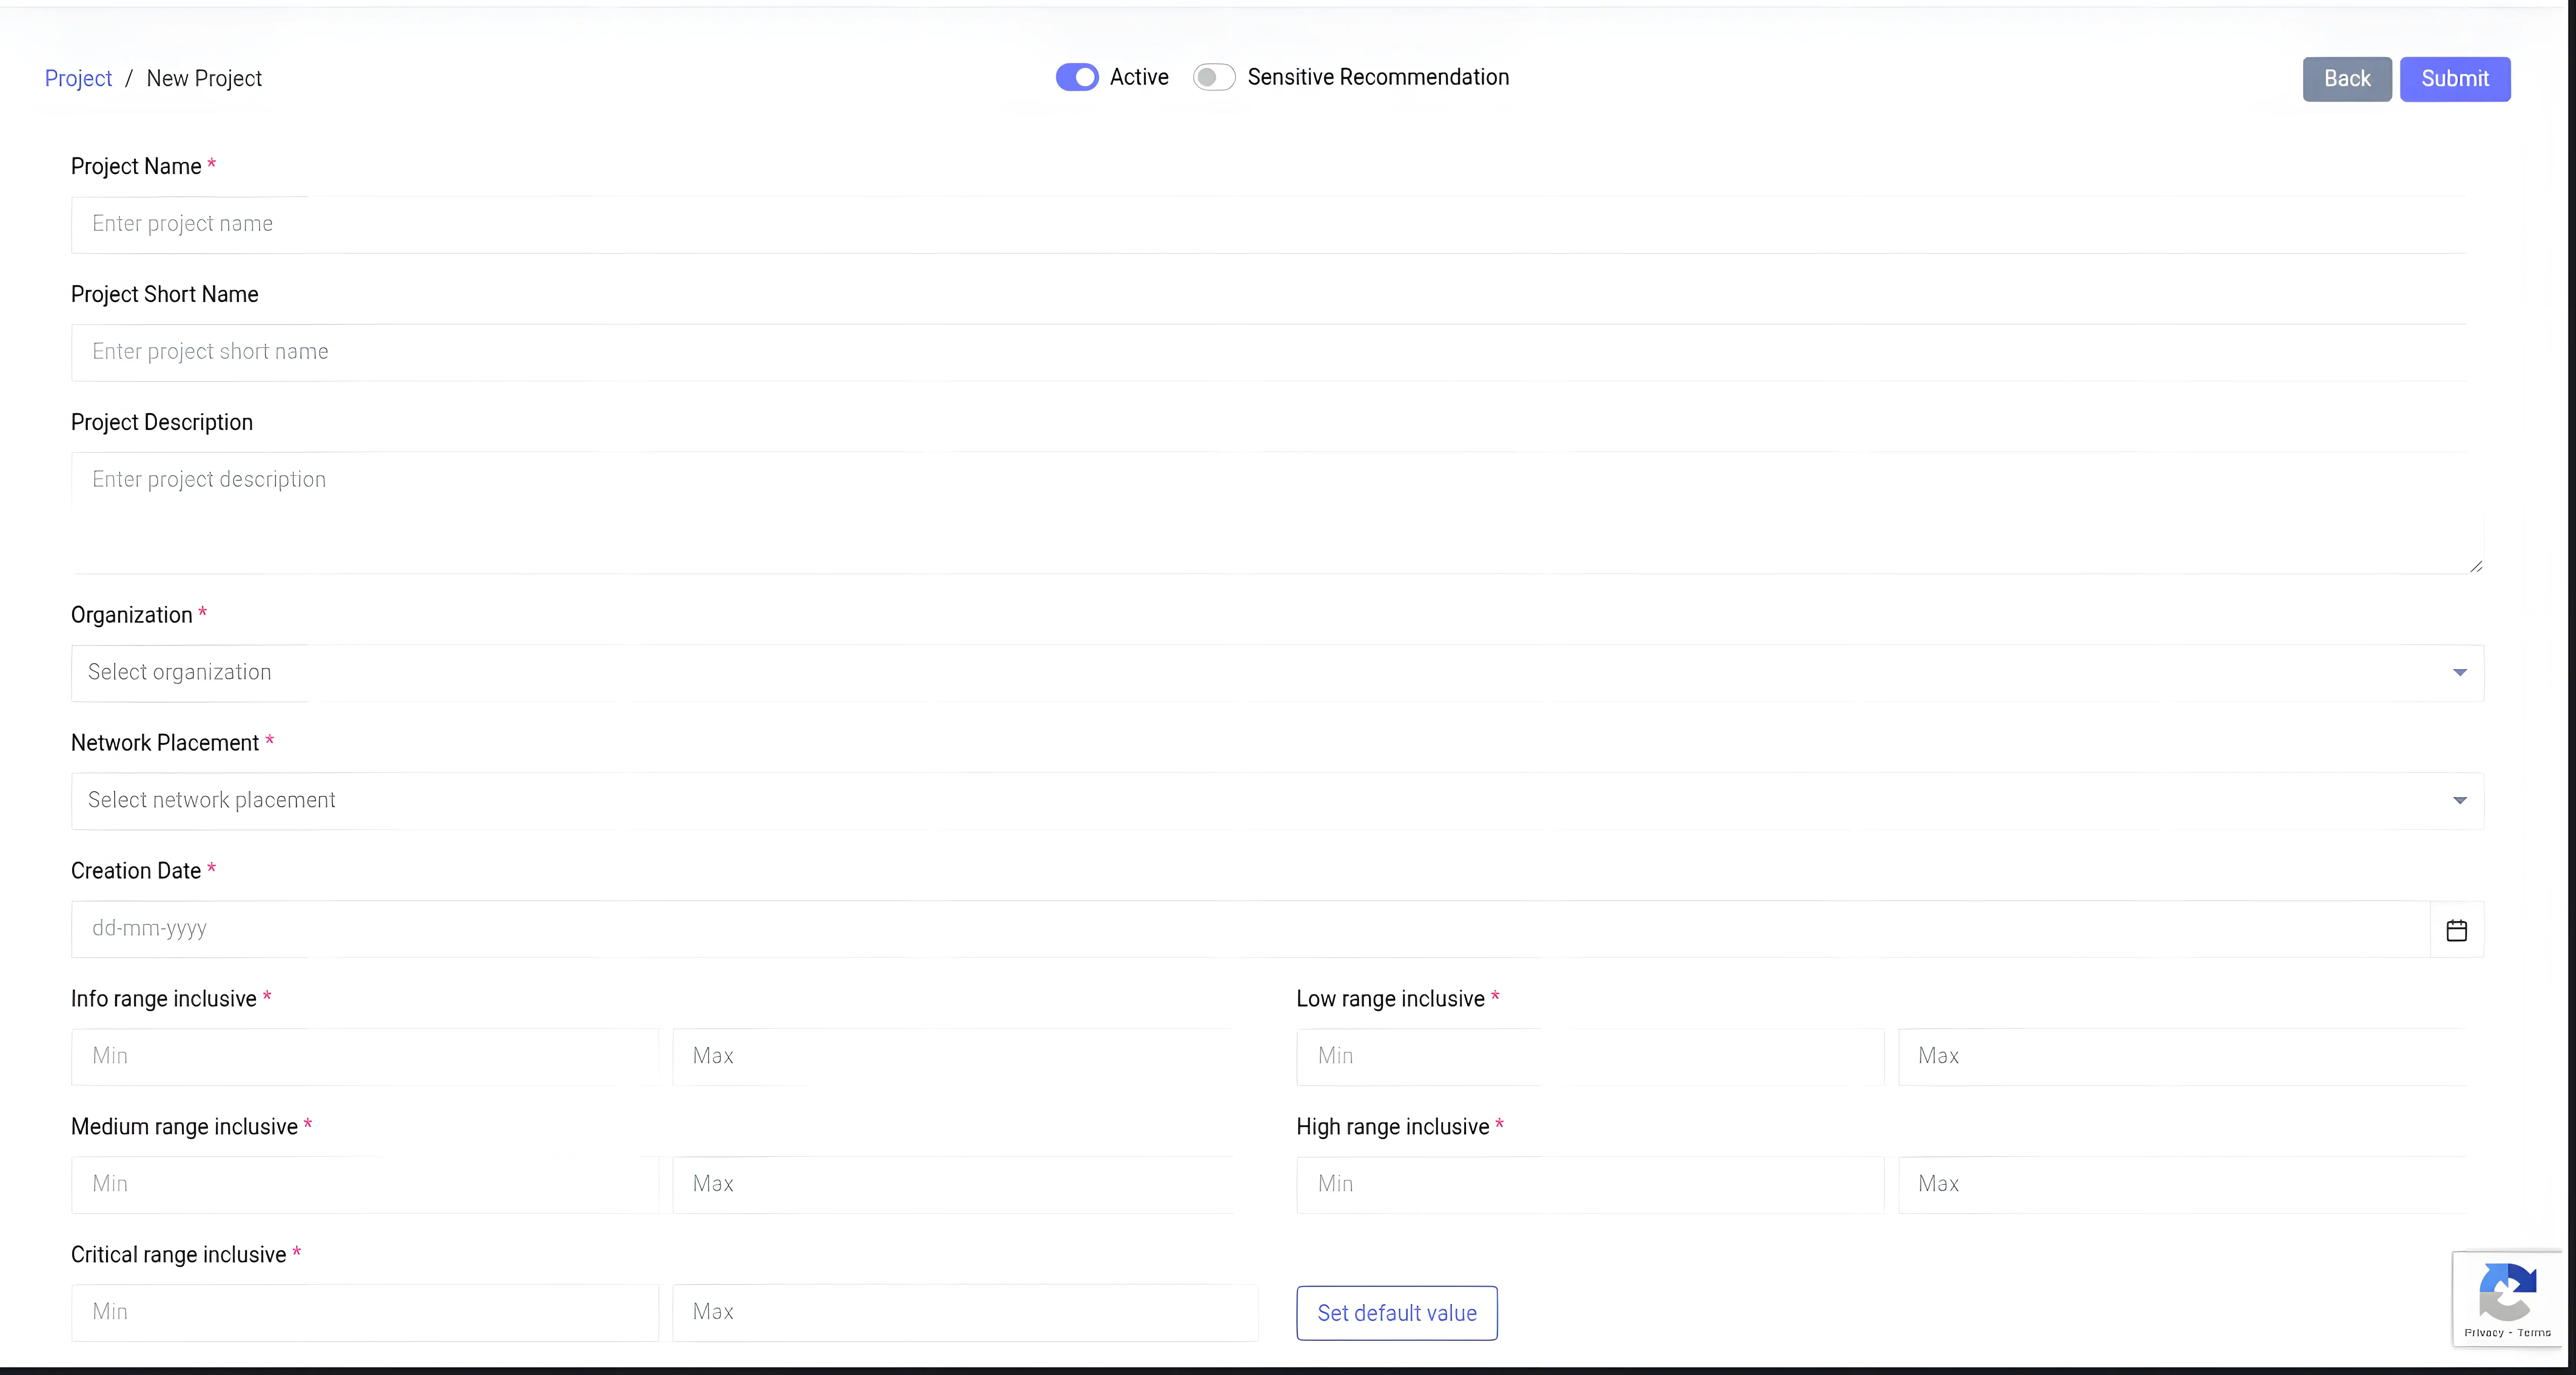
It is a form used to add or create a project. It is complex and contains dozens of options. Let’s review them one by one.
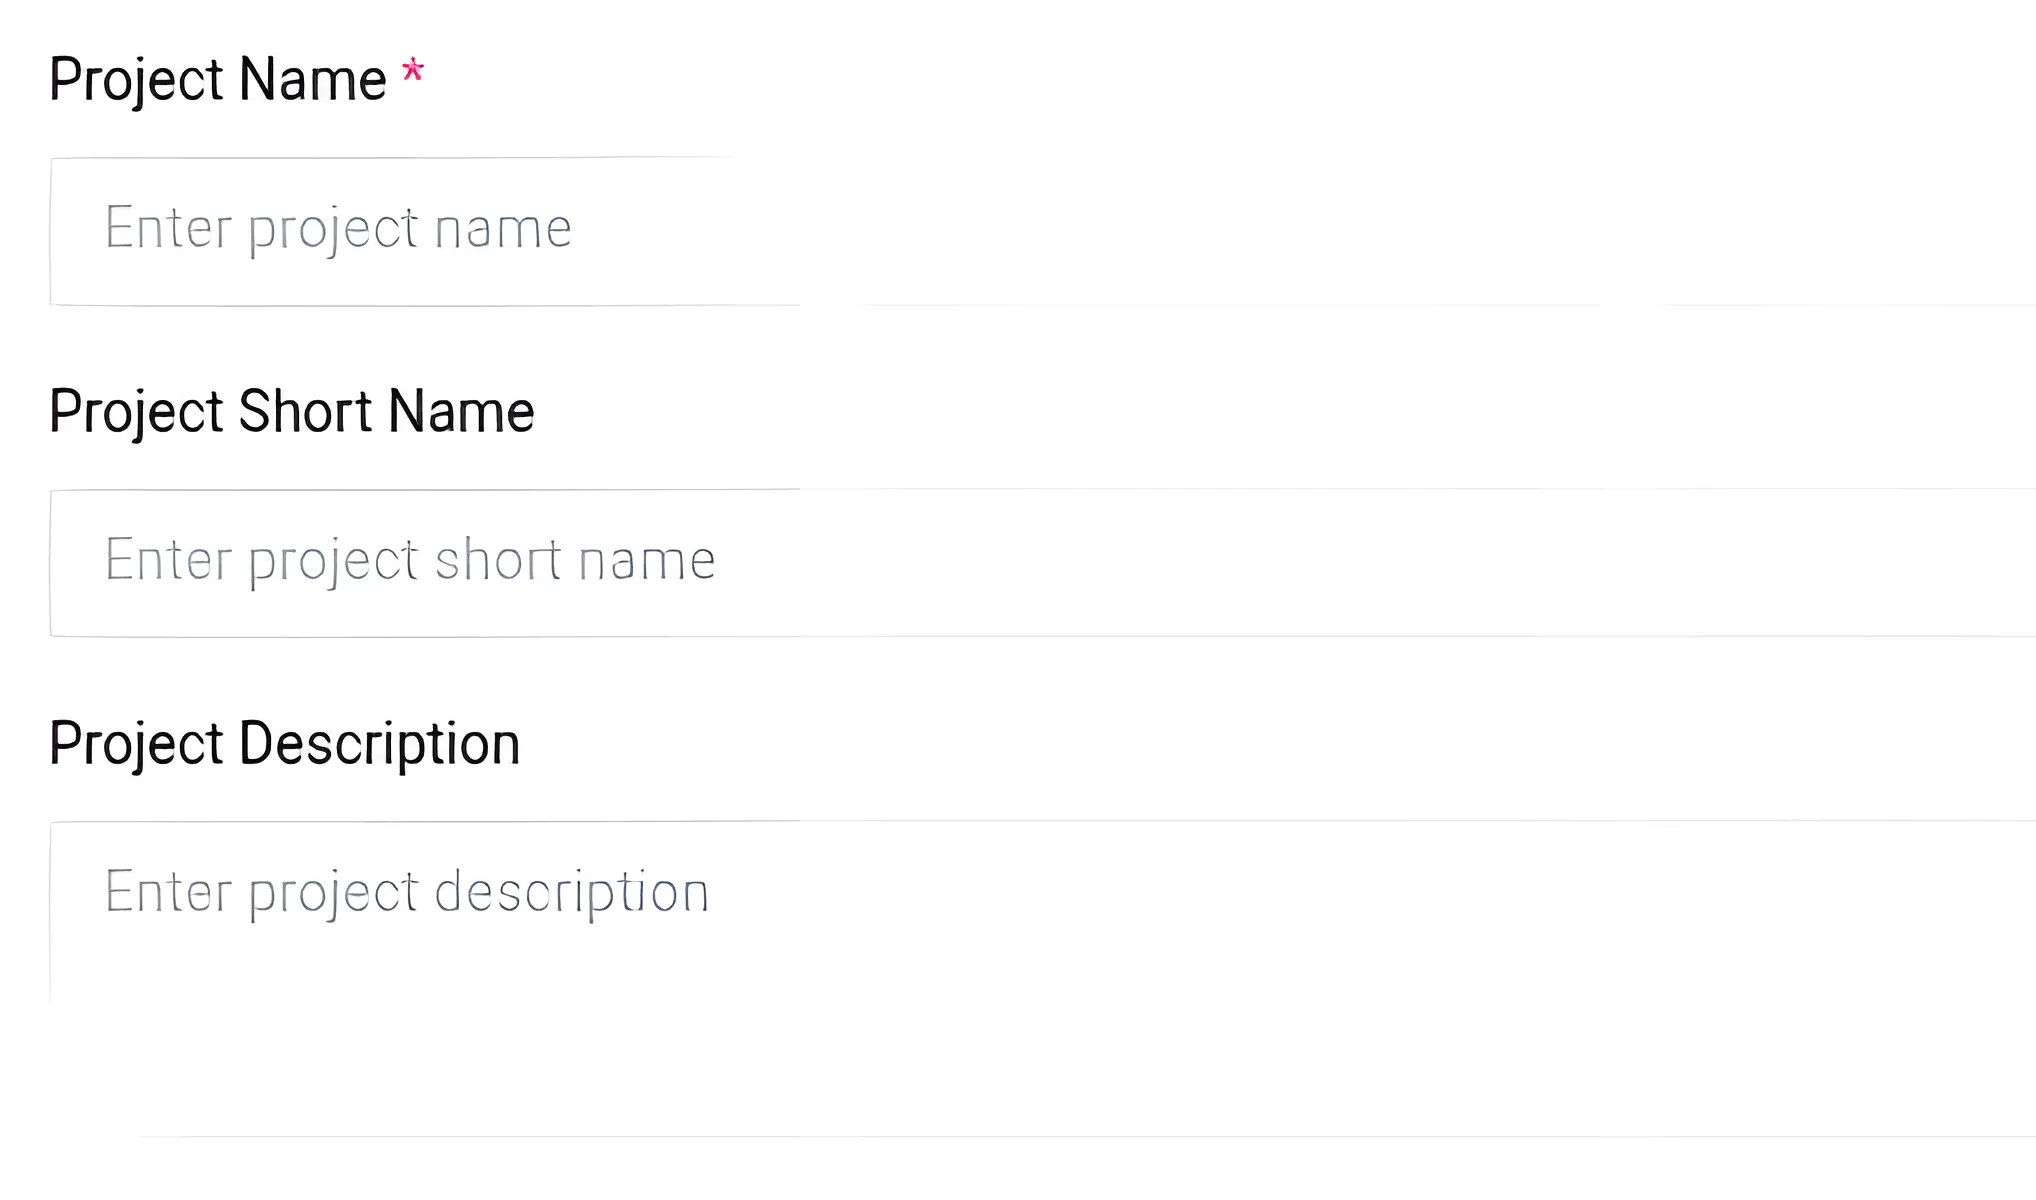
The first three options are:
- Project Name
- Project Short Name
- Project Description
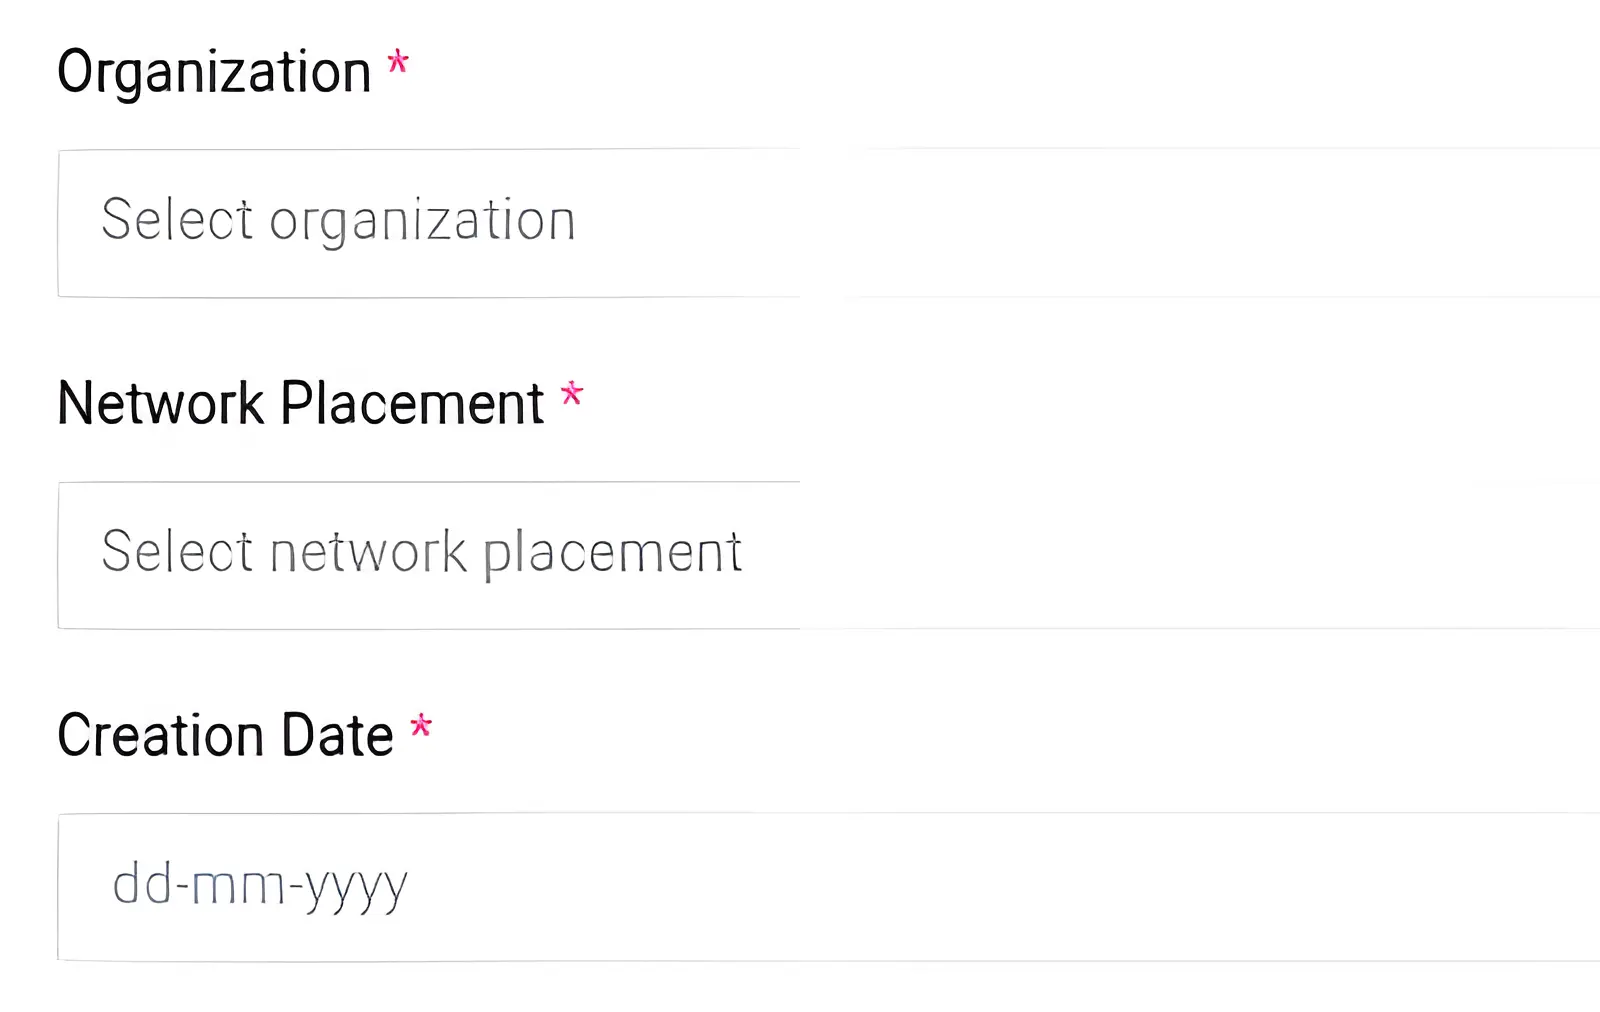
The next three options are:
- Organization
- Network Placement
- Creation Date


Next, there are various numerical values specifying some sort of range. Finally, there are two switches and a Submit button at the top of the page.

Let’s enter some random values, fill out the form, and submit it to observe the HTTP traffic.
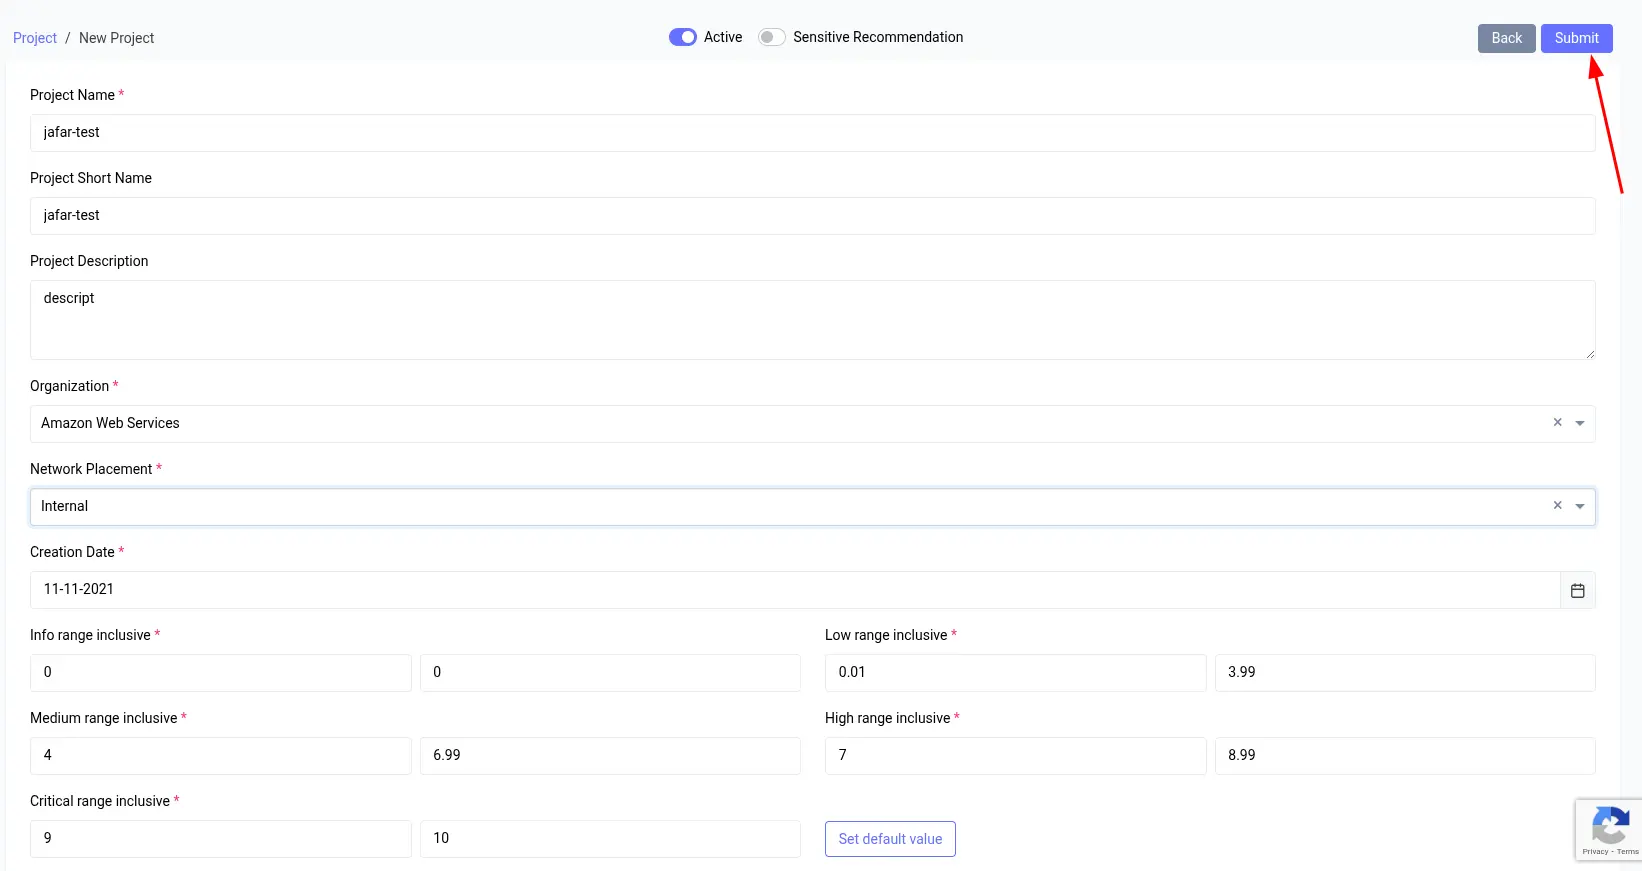
After filling out the form, I will click the Submit button, as shown in the image above.
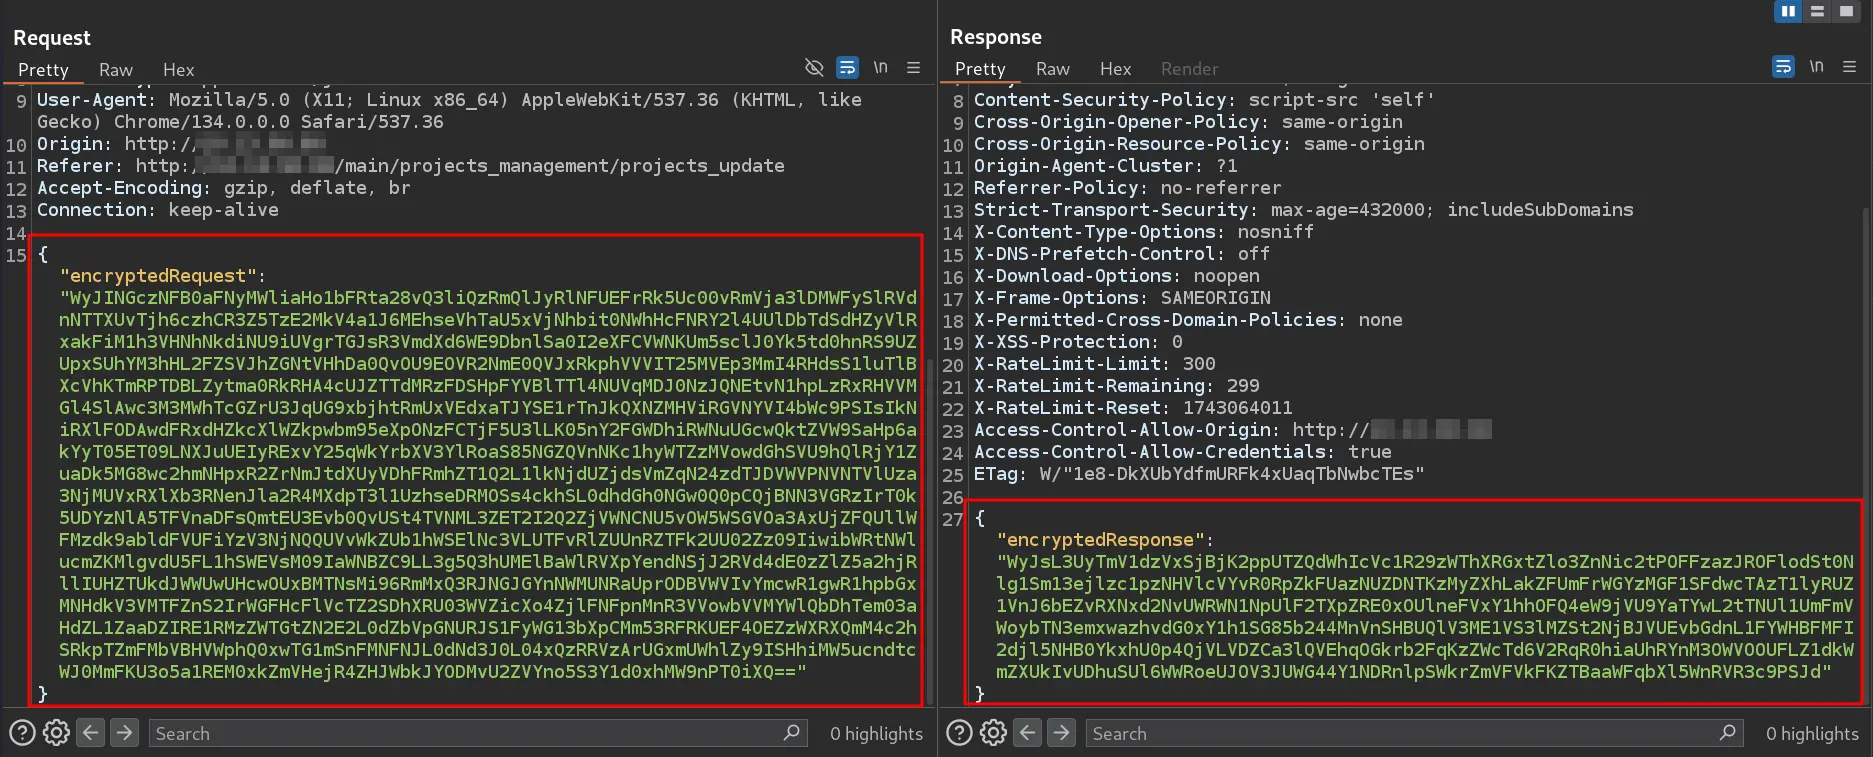
The image above shows the HTTP request of the form we submitted earlier. We can observe that the traffic is encrypted and non-human-readable, making it extremely difficult or nearly impossible to fuzz this web form using traditional methods (e.g., raw Burp Intruder).
In this scenario, we must use Browser Bruter to fuzz the form. But there’s a twist.
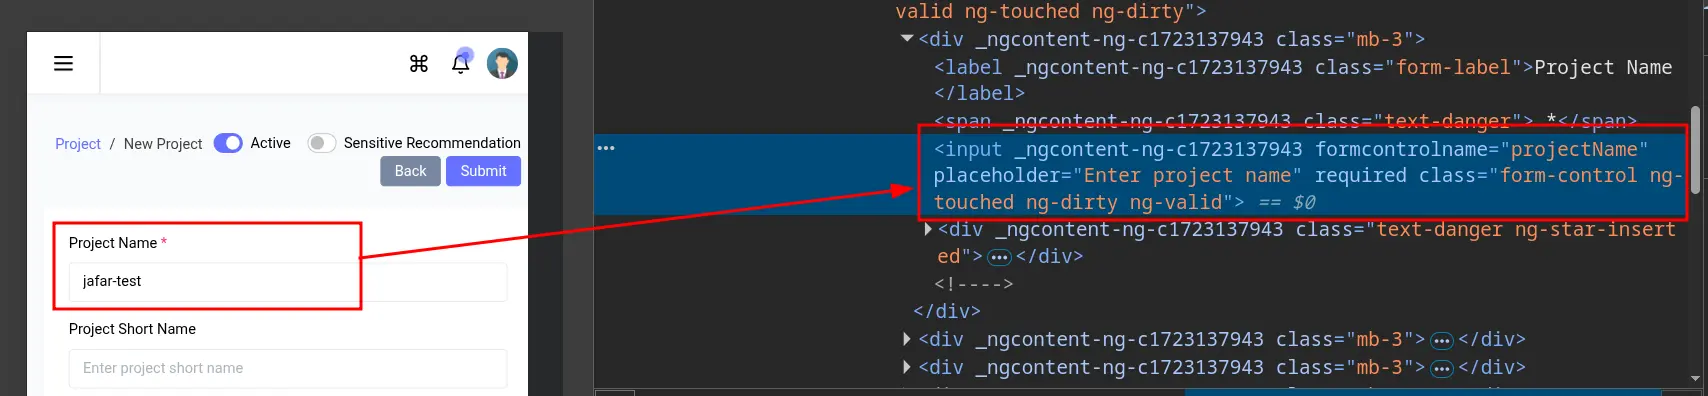
First of all, as we can see, the input fields do not have any id or name attributes that we can supply to Browser Bruter for fuzzing. Although they have class attributes, the class values are shared by other elements, making them unusable for uniquely identifying the target elements.
Thus, the first issue is encryption, which is why we are using Browser Bruter. However, when using Browser Bruter, we encounter our first roadblock: element identification.
Fortunately, Browser Bruter has a feature to handle this — the ++ operator in the --elements option.
In this case, we can use ++ as follows to identify the element:
--elements projectName++formcontrolname
And voilà! Browser Bruter will easily identify the element and successfully fuzz it.
Both the Project Short Name and Project Description elements also have the formcontrolname attribute, so their syntax will be:
projectShortName++formcontrolname,projectDesc++formcontrolname
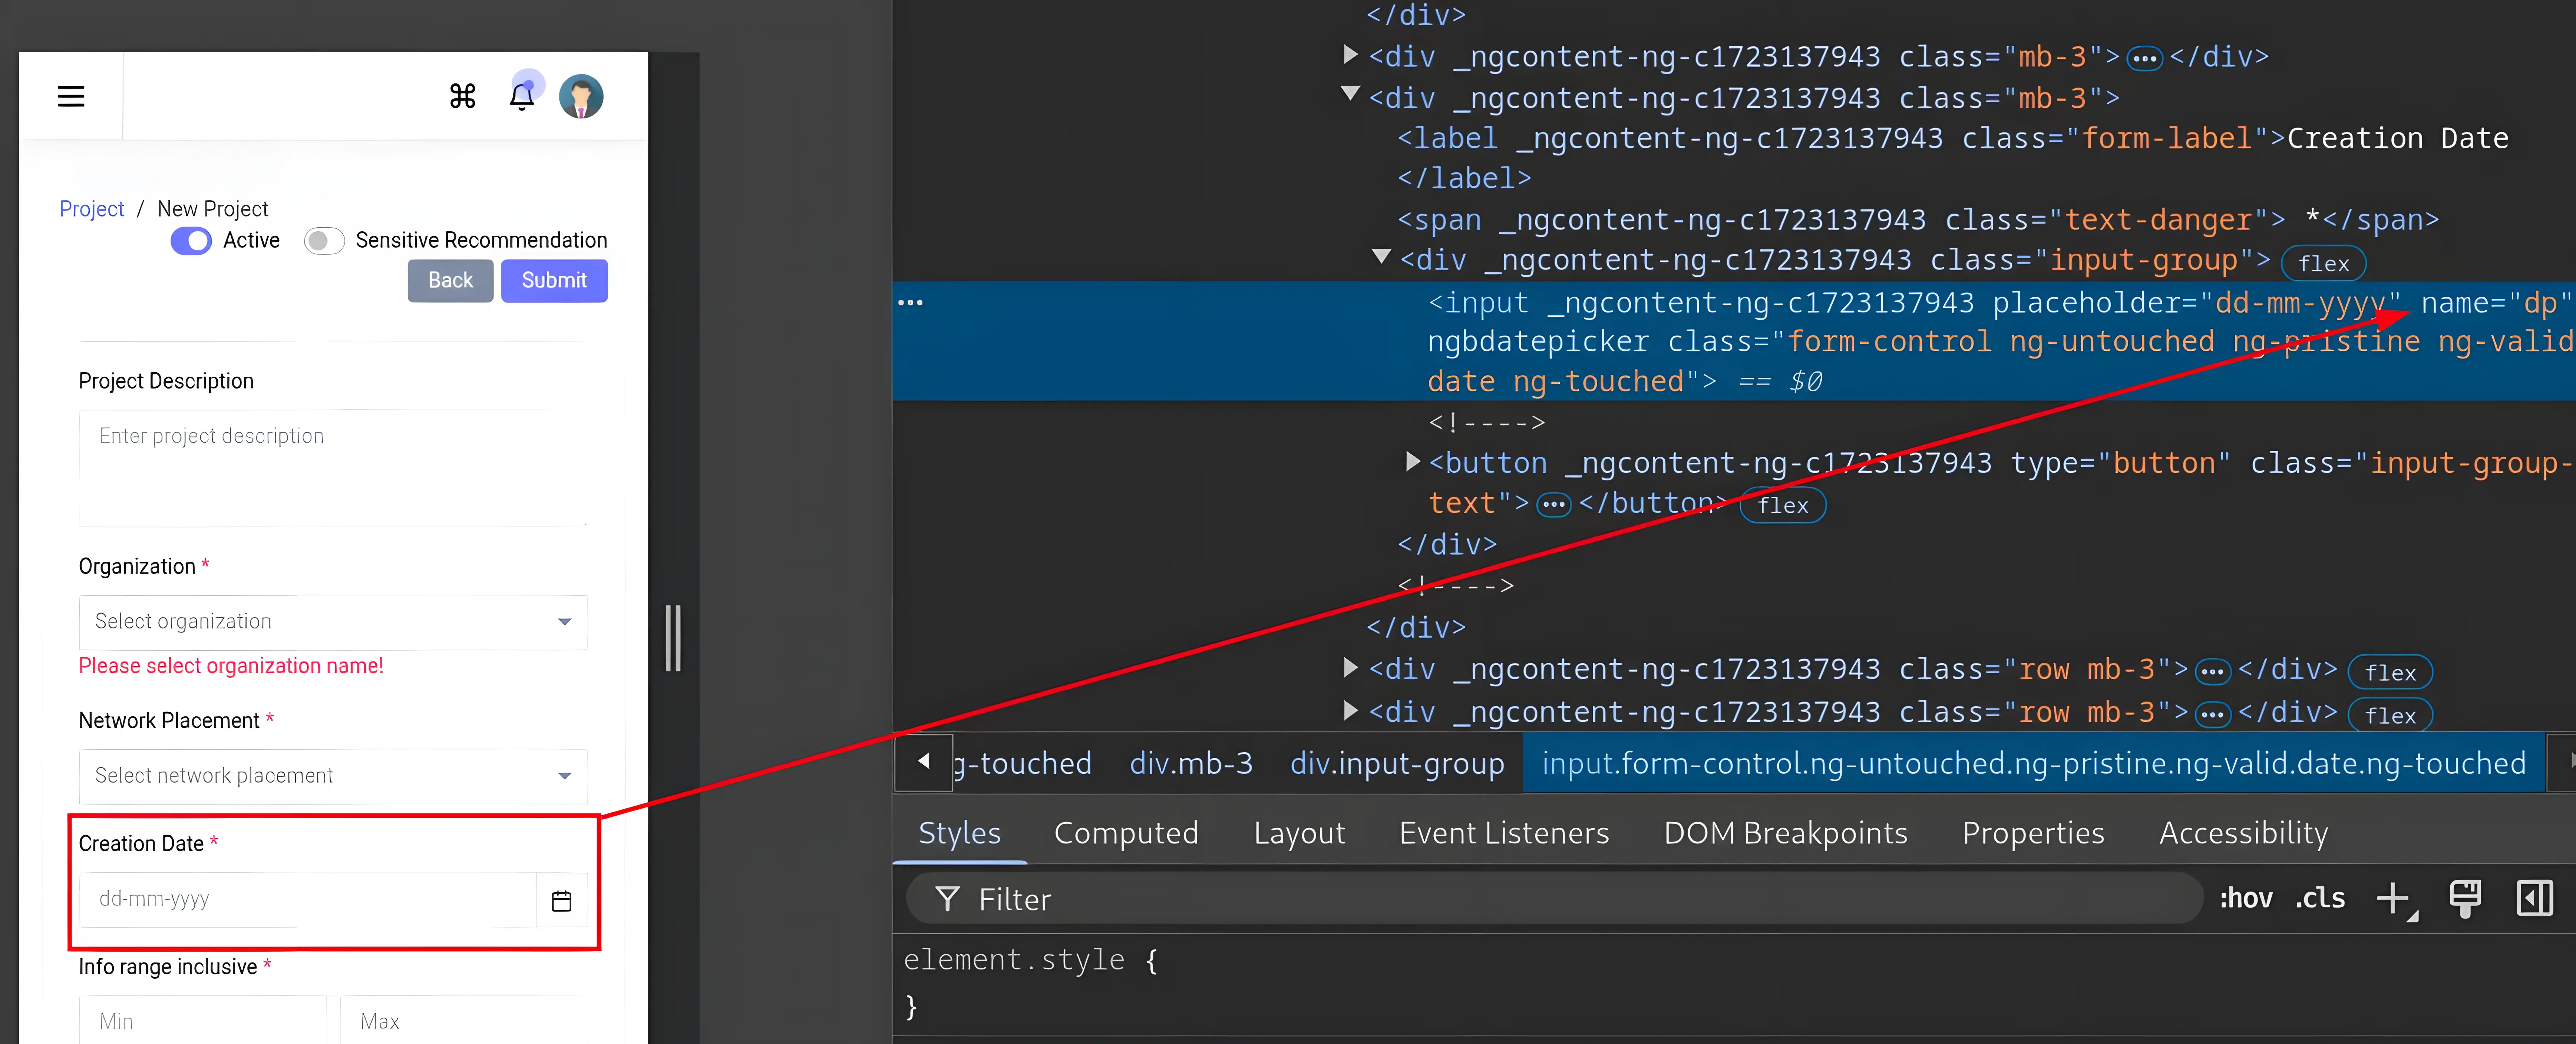
The Creation Date element has a name attribute (name="dp"), so we don't need to use the ++ operator to specify a custom identifier.
So far, our --elements command line has been built as follows:
--elements projectName++formcontrolname,projectShortName++formcontrolname,projectDesc++formcontrolname,dp
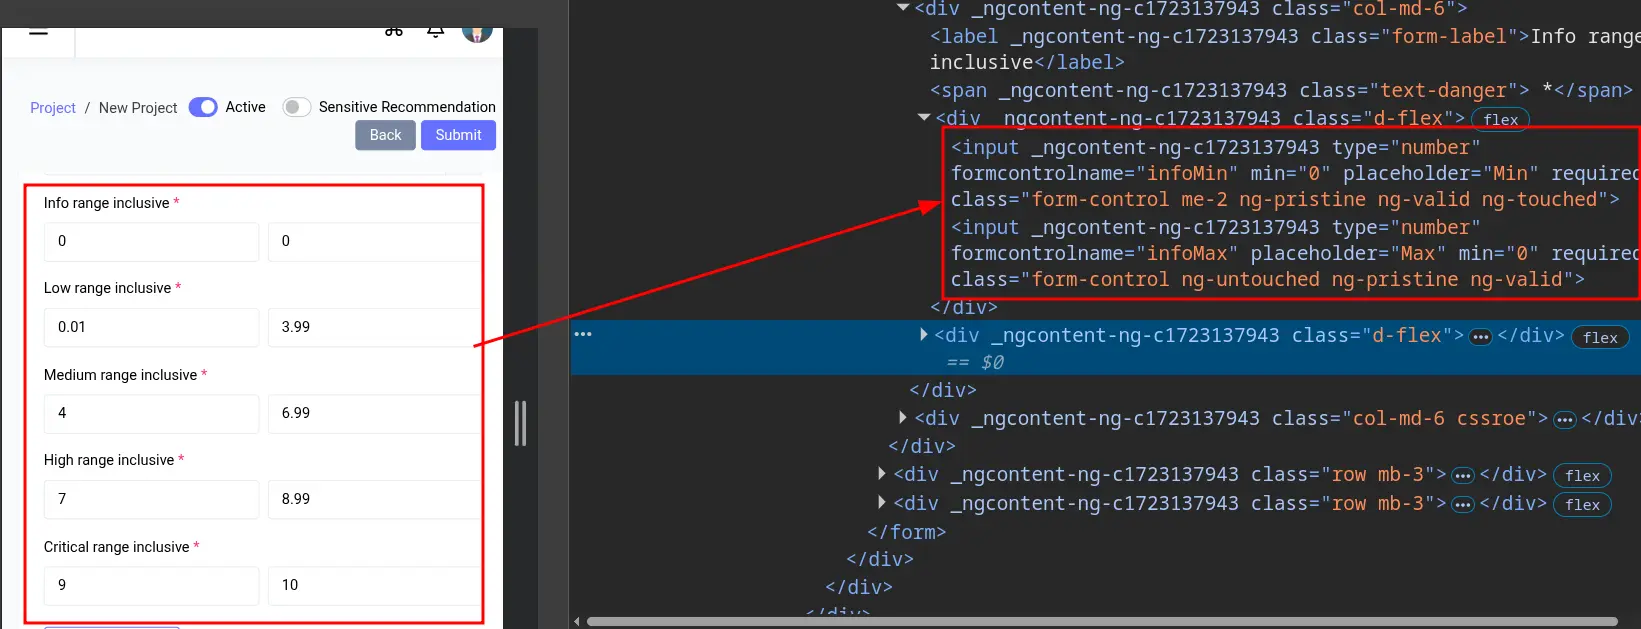
The numerical fields also have the formcontrolname attribute. Let me add them to our command as well:
--elements projectName++formcontrolname,projectShortName++formcontrolname,projectDesc++formcontrolname,dp,infoMin++formcontrolname,infoMax++formcontrolname,lowMin++formcontrolname,lowMax++formcontrolname,mediumMin++formcontrolname,mediumMax++formcontrolname,highMin++formcontrolname,highMax++formcontrolname,criticalMin++formcontrolname,criticalMax++formcontrolname
The Organization and Network Placement are exceptions.

They are <ng-select> elements, which take input from a text field (<input>), but the value must be selected from a list of available options.
We can specify their identifier using the formcontrolname attribute of <ng-select>. However, the issue is that they do not take values directly from the input field but rather from the list of available options, which are dynamically generated when the dropdown is opened, as shown in the image below.
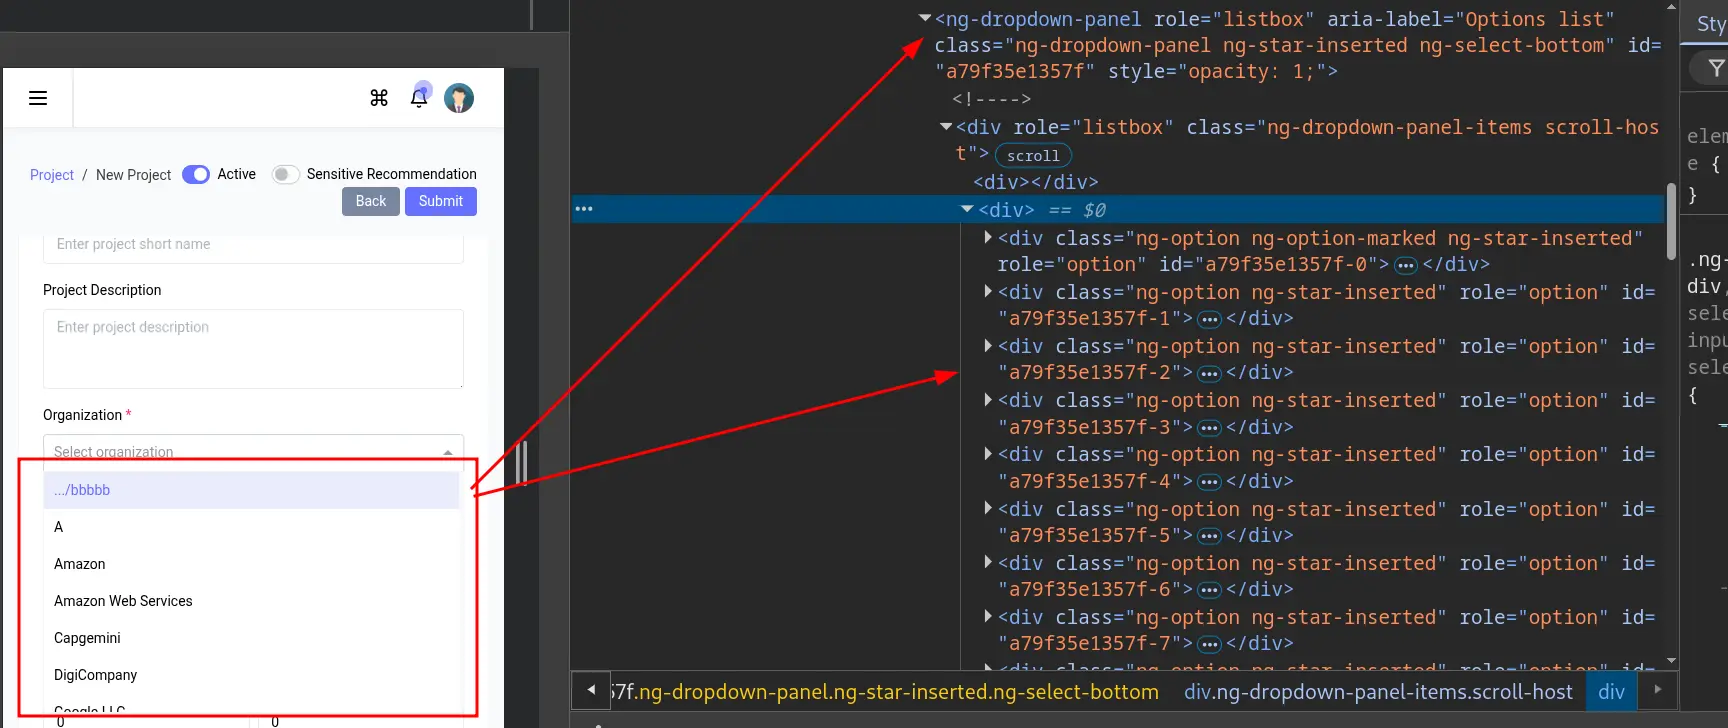
All of this code is generated dynamically after clicking the dropdown menu.
This makes it nearly impossible to fuzz, because although we can fuzz the <ng-select> element, the web application only considers values from the dynamically generated list as valid.
Since this list is created on the fly, we cannot specify these elements prior to their generation, as doing so will throw an error like element does not exist.
We could still tackle this using JavaScript, Python, and navigation techniques, but it would be complex. Additionally, front-end input validation will likely render our fuzzing efforts useless for the <ng-select> element.
We’ll explore an alternative solution later on. For now, let’s proceed with building the command.
Even though we know it won’t work, let’s still use the formcontrolname attribute to identify these <ng-select> elements and observe what happens.
--elements projectName++formcontrolname,projectShortName++formcontrolname,projectDesc++formcontrolname,dp,infoMin++formcontrolname,infoMax++formcontrolname,lowMin++formcontrolname,lowMax++formcontrolname,mediumMin++formcontrolname,mediumMax++formcontrolname,highMin++formcontrolname,highMax++formcontrolname,criticalMin++formcontrolname,criticalMax++formcontrolname,orgName++formcontrolname,nwPlacementName++formcontrolname
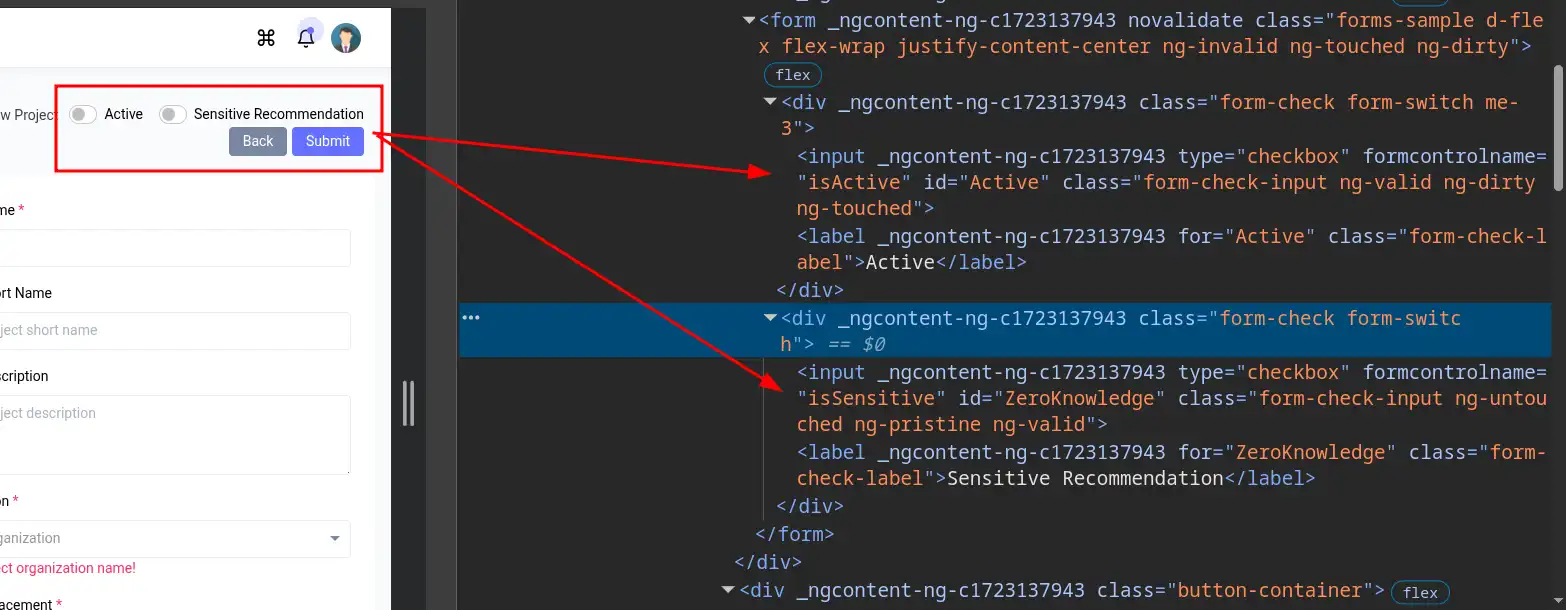
Let me specify the two remaining radio buttons using their id attributes:
--elements projectName++formcontrolname,projectShortName++formcontrolname,projectDesc++formcontrolname,dp,infoMin++formcontrolname,infoMax++formcontrolname,lowMin++formcontrolname,lowMax++formcontrolname,mediumMin++formcontrolname,mediumMax++formcontrolname,highMin++formcontrolname,highMax++formcontrolname,criticalMin++formcontrolname,criticalMax++formcontrolname,orgName++formcontrolname,nwPlacementName++formcontrolname,Active,ZeroKnowledge
Our --elements command is now ready. Next, we need to specify the other required options:
--button
--target
--payloads
--attack
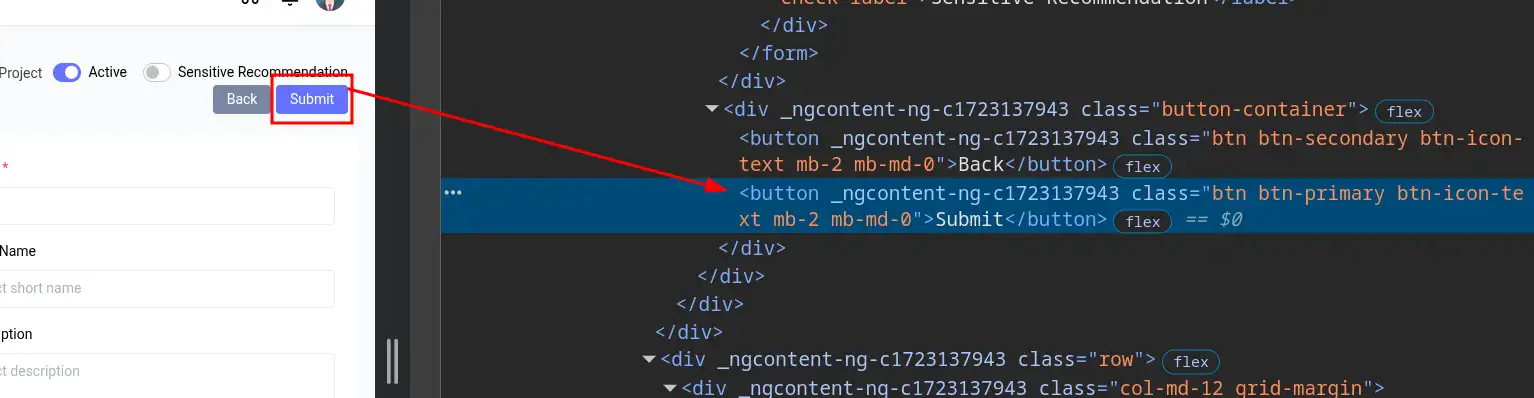
To specify the Submit button, I can use the class attribute.
As we can see, the Submit button has the class btn-primary, while the other button has a different class. This allows Browser Bruter to easily identify the Submit button.
For the attack mode, I will use Battering Ram, which is option number 2.
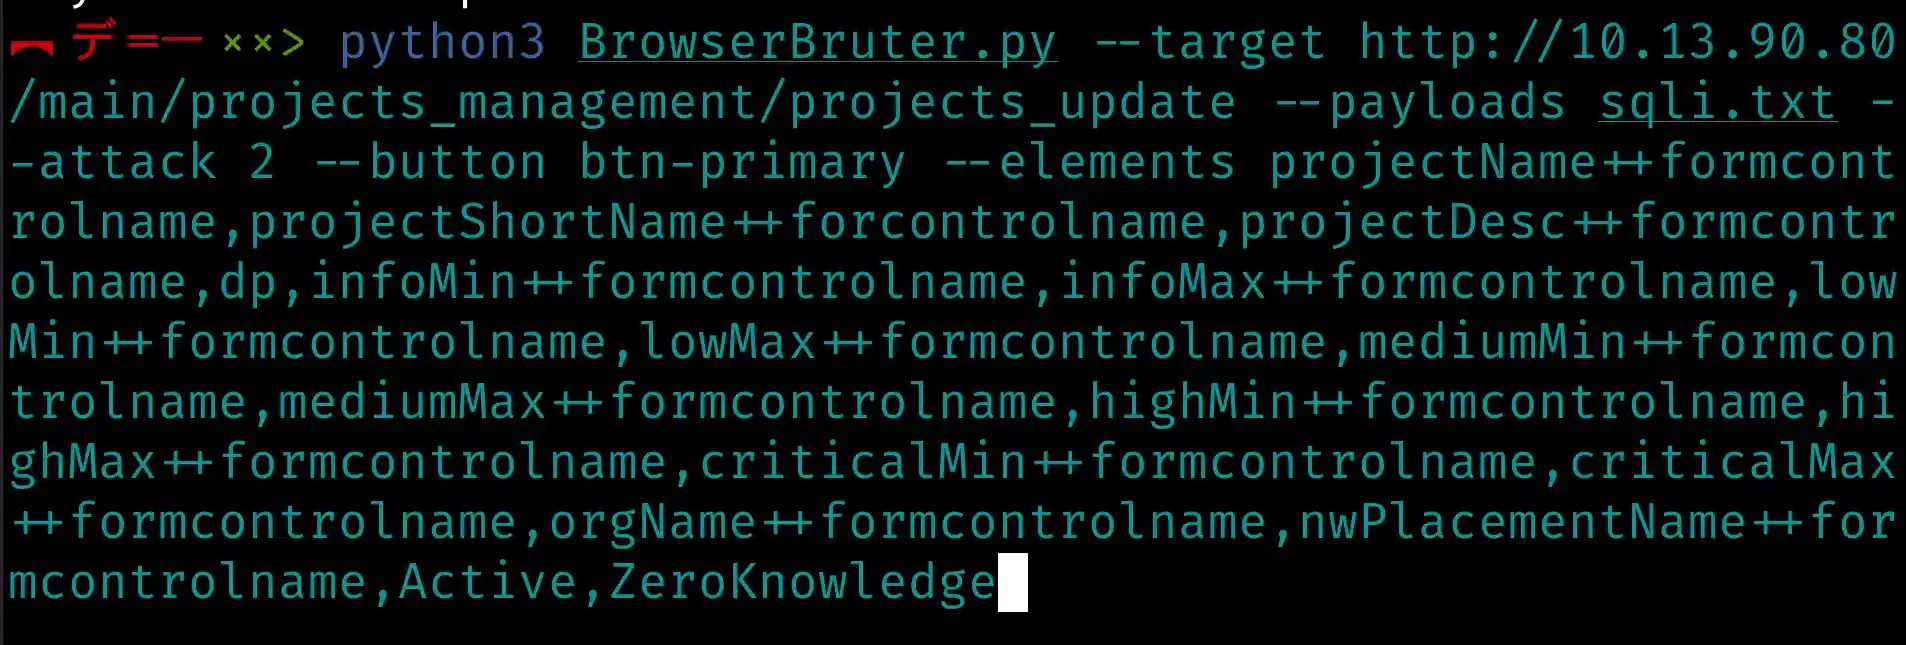
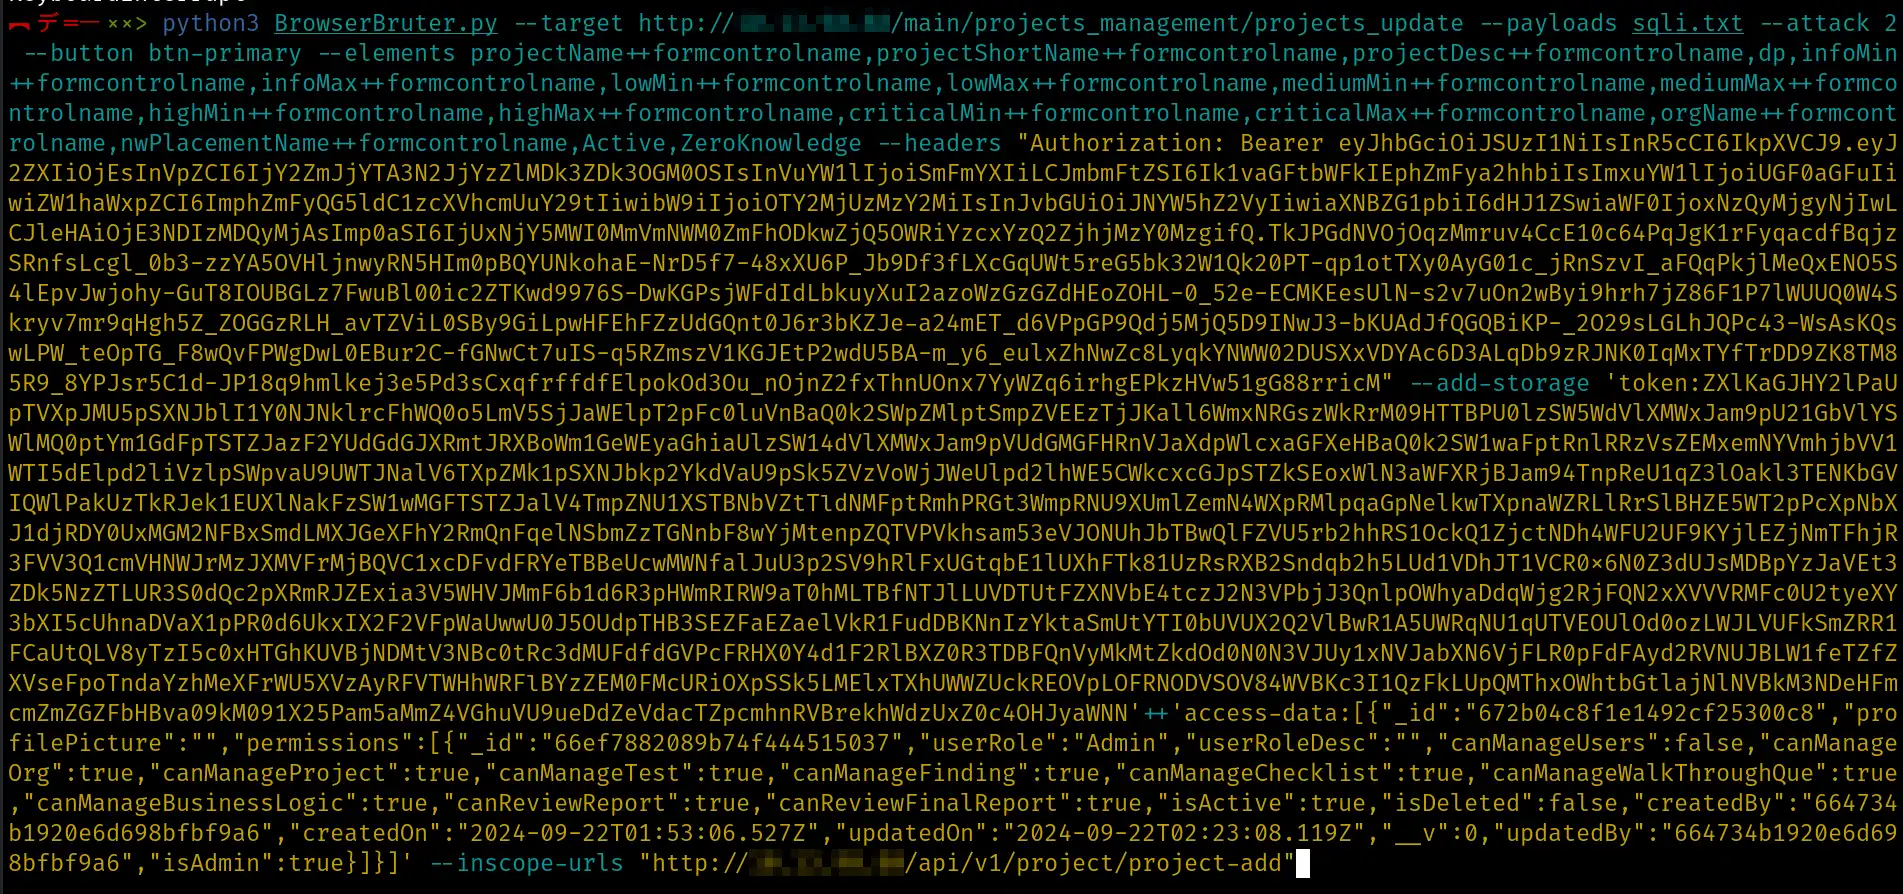
The image above shows our final command so far.
Let’s run it and observe the outcome of Browser Bruter.
python3 BrowserBruter.py --target http://x.x.x.x/main/projects_management/projects_update --payloads sqli.txt --attack 2 --button btn-primary --elements projectName++formcontrolname,projectShortName++formcontrolname,projectDesc++formcontrolname,dp,infoMin++formcontrolname,infoMax++formcontrolname,lowMin++formcontrolname,lowMax++formcontrolname,mediumMin++formcontrolname,mediumMax++formcontrolname,highMin++formcontrolname,highMax++formcontrolname,criticalMin++formcontrolname,criticalMax++formcontrolname,orgName++formcontrolname,nwPlacementName++formcontrolname,Active,ZeroKnowledge
We are stuck at the Login Screen and have encountered the following error:
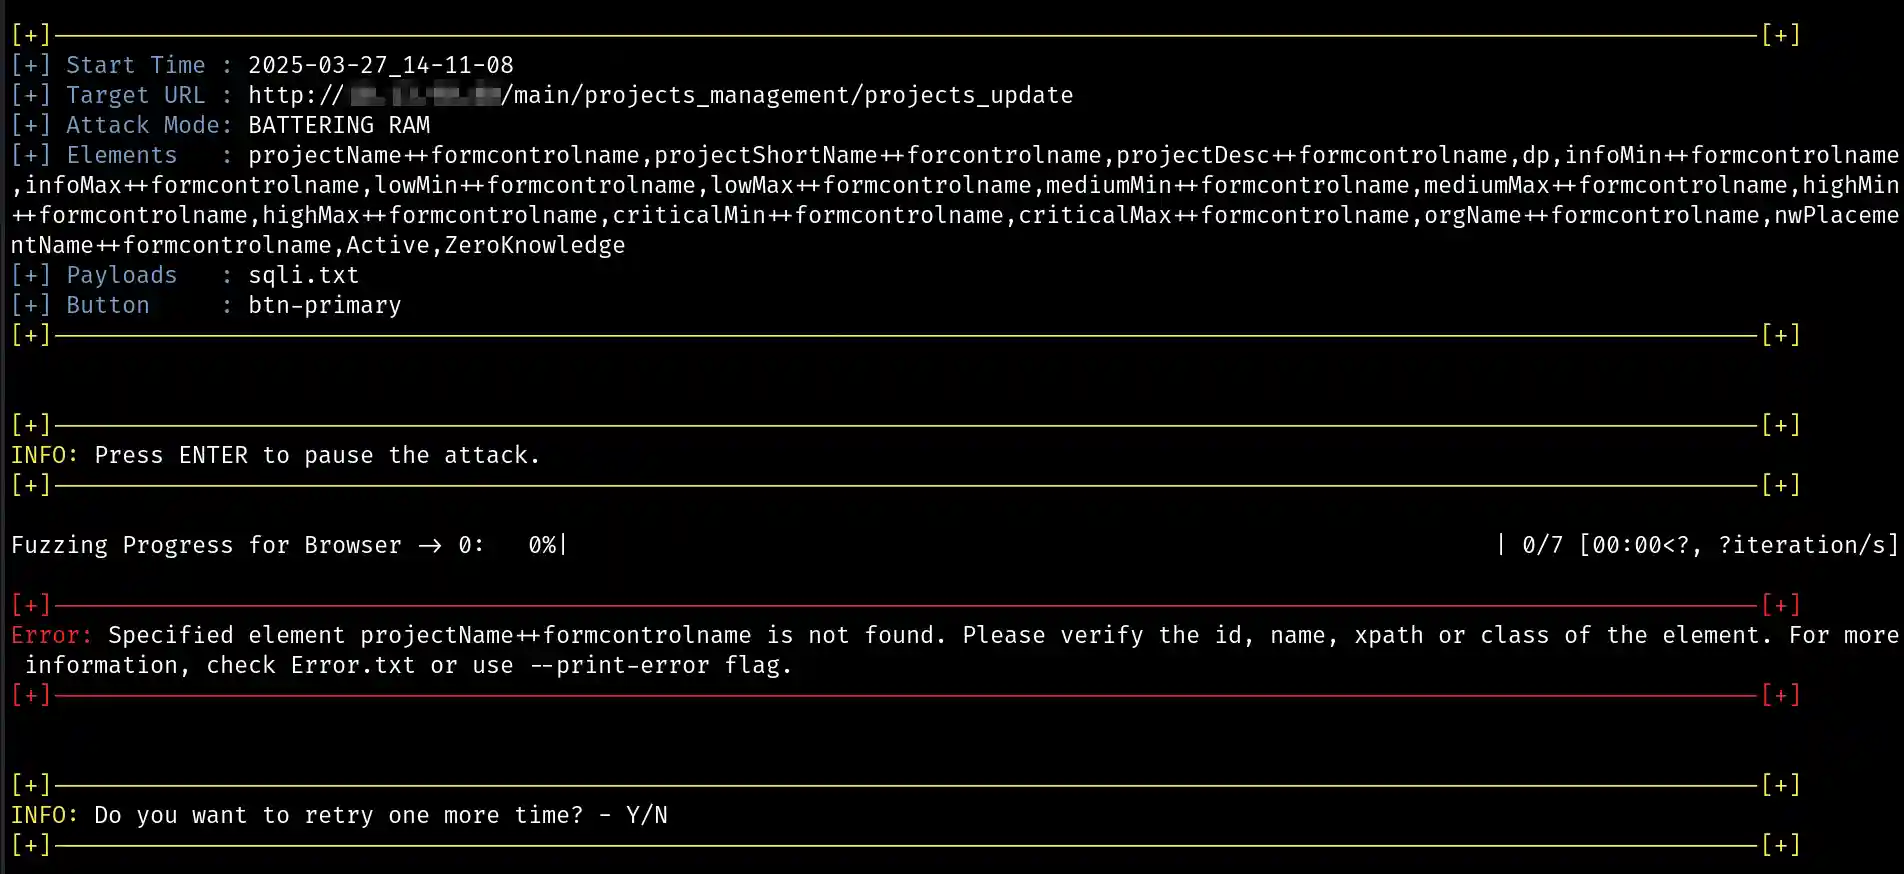
This happens because we are not handling authentication.
The target form requires authentication to load, so we need to utilize the authentication handling module of Browser Bruter to tackle this.
After conducting Enumeration, I found that we need two types of authentication.
The first is for the API, which we can observe in the HTTP traffic, as shown in the image below.
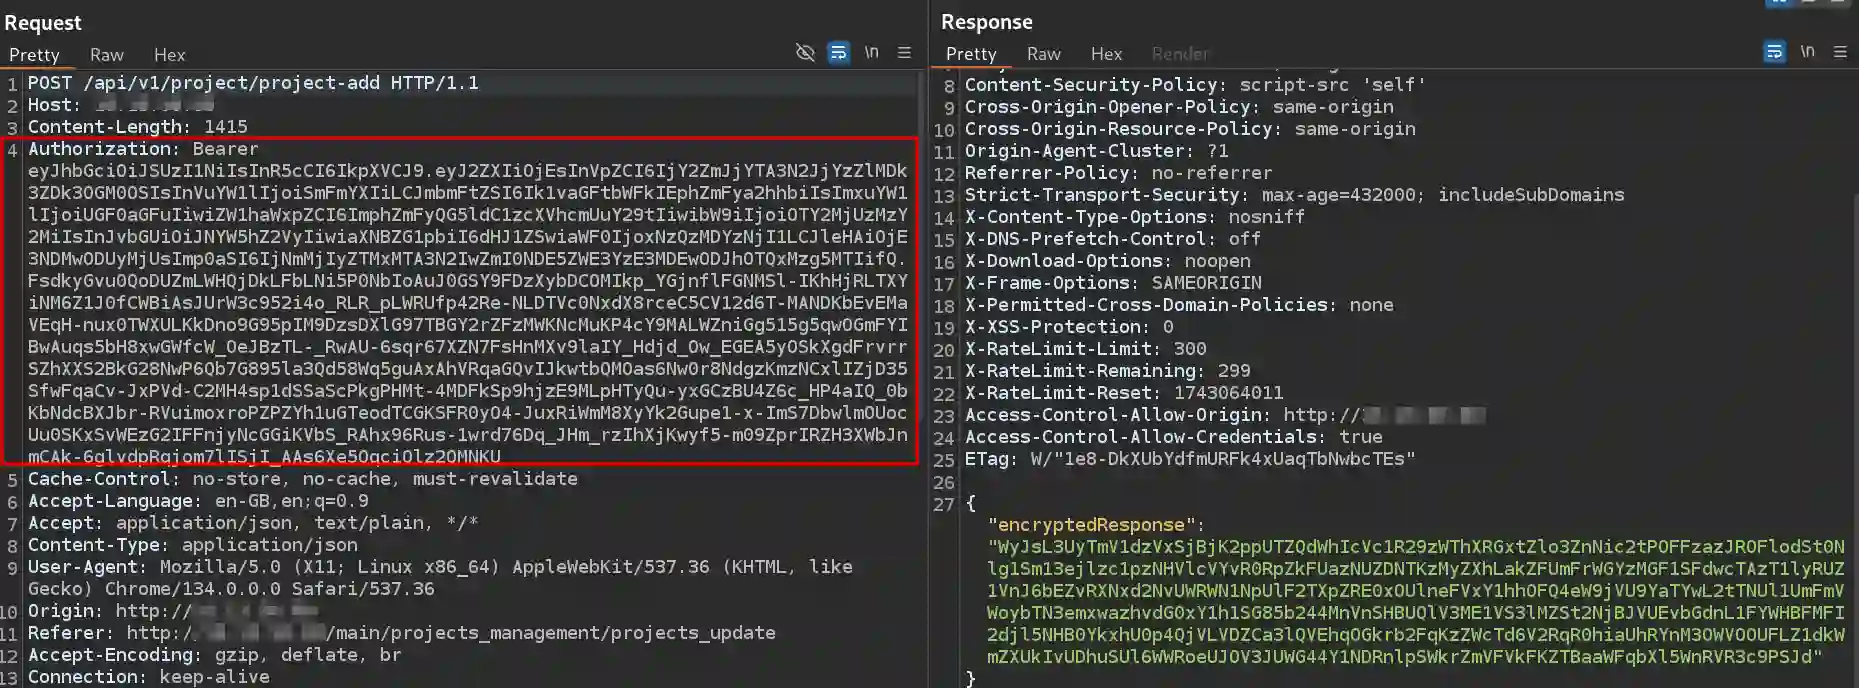
We need to add this Authorization header to successfully call the APIs.
The second authentication method is trickier to identify, but after some analysis, I observed that the token is stored in local storage.
Both of these can be easily achieved using the --headers and --add-storage options of Browser Bruter without much effort.
So, our command will now look like this:
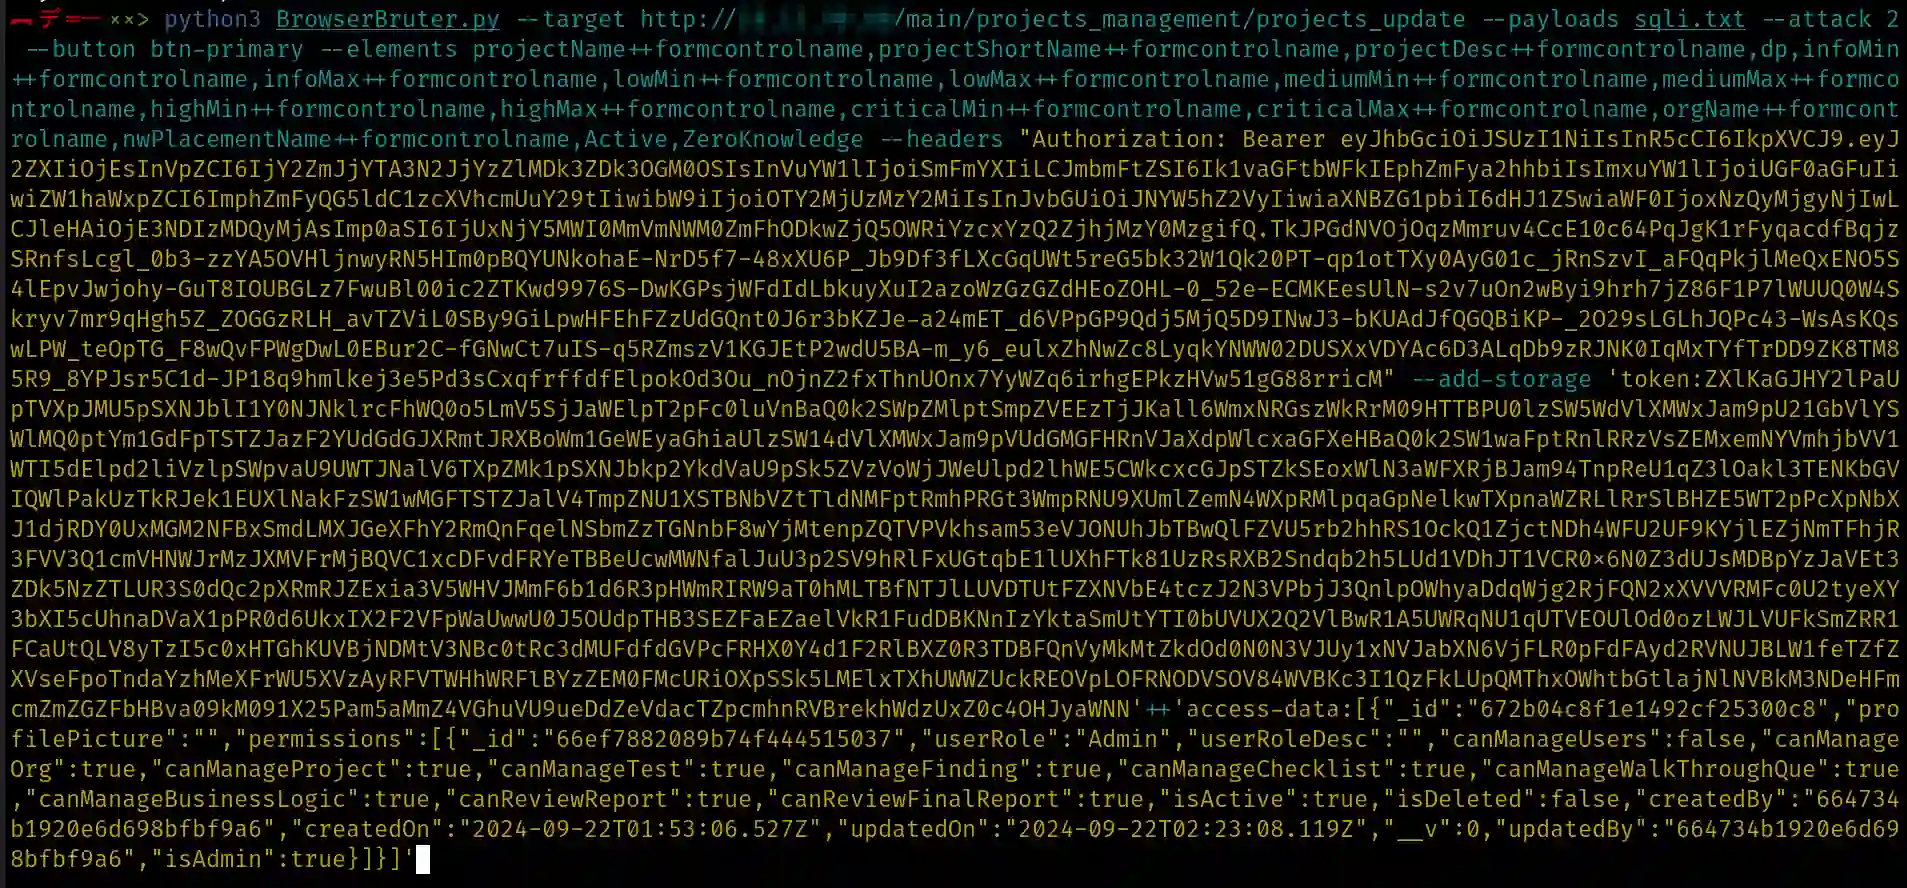
python3 BrowserBruter.py --target http://x.x.x.x/main/projects_management/projects_update --payloads sqli.txt --attack 2 --button btn-primary --elements projectName++formcontrolname,projectShortName++formcontrolname,projectDesc++formcontrolname,dp,infoMin++formcontrolname,infoMax++formcontrolname,lowMin++formcontrolname,lowMax++formcontrolname,mediumMin++formcontrolname,mediumMax++formcontrolname,highMin++formcontrolname,highMax++formcontrolname,criticalMin++formcontrolname,criticalMax++formcontrolname,orgName++formcontrolname,nwPlacementName++formcontrolname,Active,ZeroKnowledge --headers "Authorization: Bearer eyJhbGciOiJSUzI1NiIsInR5cCI6IkpXVCJ9.eyJ2ZXIiOjEsInVpZCI6IjY2ZmJjYTA3N2JjYzZlMDk3ZDk3OGM0OSIsInVuYW1lIjoiSmFmYXIiLCJmbmFtZSI6Ik1vaGFtbWFkIEphZmFya2hhbiIsImxuYW1lIjoiUGF0aGFuIiwiZW1haWxpZCI6ImphZmFyQG5ldC1zcXVhcmUuY29tIiwibW9iIjoiOTY2MjUzMzY2MiIsInJvbGUiOiJNYW5hZ2VyIiwiaXNBZG1pbiI6dHJ1ZSwiaWF0IjoxNzQyMjgyNjIwLCJleHAiOjE3NDIzMDQyMjAsImp0aSI6IjUxNjY5MWI0MmVmNWM0ZmFhODkwZjQ5OWRiYzcxYzQ2ZjhjMzY0MzgifQ.TkJPGdNVOjOqzMmruv4CcE10c64PqJgK1rFyqacdfBqjzSRnfsLcgl_0b3-zzYA5OVHljnwyRN5HIm0pBQYUNkohaE-NrD5f7-48xXU6P_Jb9Df3fLXcGqUWt5reG5bk32W1Qk20PT-qp1otTXy0AyG01c_jRnSzvI_aFQqPkjlMeQxENO5S4lEpvJwjohy-GuT8IOUBGLz7FwuBl00ic2ZTKwd9976S-DwKGPsjWFdIdLbkuyXuI2azoWzGzGZdHEoZOHL-0_52e-ECMKEesUlN-s2v7uOn2wByi9hrh7jZ86F1P7lWUUQ0W4Skryv7mr9qHgh5Z_ZOGGzRLH_avTZViL0SBy9GiLpwHFEhFZzUdGQnt0J6r3bKZJe-a24mET_d6VPpGP9Qdj5MjQ5D9INwJ3-bKUAdJfQGQBiKP-_2O29sLGLhJQPc43-WsAsKQswLPW_teOpTG_F8wQvFPWgDwL0EBur2C-fGNwCt7uIS-q5RZmszV1KGJEtP2wdU5BA-m_y6_eulxZhNwZc8LyqkYNWW02DUSXxVDYAc6D3ALqDb9zRJNK0IqMxTYfTrDD9ZK8TM85R9_8YPJsr5C1d-JP18q9hmlkej3e5Pd3sCxqfrffdfElpokOd3Ou_nOjnZ2fxThnUOnx7YyWZq6irhgEPkzHVw51gG88rricM" --add-storage 'token:ZXlKaGJHY2lPaUpTVXpJMU5pSXNJblI1Y0NJNklrcFhWQ0o5LmV5SjJaWElpT2pFc0luVnBaQ0k2SWpZMlptSmpZVEEzTjJKall6WmxNRGszWkRrM09HTTBPU0lzSW5WdVlXMWxJam9pU21GbVlYSWlMQ0ptYm1GdFpTSTZJazF2YUdGdGJXRmtJRXBoWm1GeWEyaGhiaUlzSW14dVlXMWxJam9pVUdGMGFHRnVJaXdpWlcxaGFXeHBaQ0k2SW1waFptRnlRRzVsZEMxemNYVmhjbVV1WTI5dElpd2liVzlpSWpvaU9UWTJNalV6TXpZMk1pSXNJbkp2YkdVaU9pSk5ZVzVoWjJWeUlpd2lhWE5CWkcxcGJpSTZkSEoxWlN3aWFXRjBJam94TnpReU1qZ3lOakl3TENKbGVIQWlPakUzTkRJek1EUXlNakFzSW1wMGFTSTZJalV4TmpZNU1XSTBNbVZtTldNMFptRmhPRGt3WmpRNU9XUmlZemN4WXpRMlpqaGpNelkwTXpnaWZRLlRrSlBHZE5WT2pPcXpNbXJ1djRDY0UxMGM2NFBxSmdLMXJGeXFhY2RmQnFqelNSbmZzTGNnbF8wYjMtenpZQTVPVkhsam53eVJONUhJbTBwQlFZVU5rb2hhRS1OckQ1ZjctNDh4WFU2UF9KYjlEZjNmTFhjR3FVV3Q1cmVHNWJrMzJXMVFrMjBQVC1xcDFvdFRYeTBBeUcwMWNfalJuU3p2SV9hRlFxUGtqbE1lUXhFTk81UzRsRXB2Sndqb2h5LUd1VDhJT1VCR0x6N0Z3dUJsMDBpYzJaVEt3ZDk5NzZTLUR3S0dQc2pXRmRJZExia3V5WHVJMmF6b1d6R3pHWmRIRW9aT0hMLTBfNTJlLUVDTUtFZXNVbE4tczJ2N3VPbjJ3QnlpOWhyaDdqWjg2RjFQN2xXVVVRMFc0U2tyeXY3bXI5cUhnaDVaX1pPR0d6UkxIX2F2VFpWaUwwU0J5OUdpTHB3SEZFaEZaelVkR1FudDBKNnIzYktaSmUtYTI0bUVUX2Q2VlBwR1A5UWRqNU1qUTVEOUlOd0ozLWJLVUFkSmZRR1FCaUtQLV8yTzI5c0xHTGhKUVBjNDMtV3NBc0tRc3dMUFdfdGVPcFRHX0Y4d1F2RlBXZ0R3TDBFQnVyMkMtZkdOd0N0N3VJUy1xNVJabXN6VjFLR0pFdFAyd2RVNUJBLW1feTZfZXVseFpoTndaYzhMeXFrWU5XVzAyRFVTWHhWRFlBYzZEM0FMcURiOXpSSk5LMElxTXhUWWZUckREOVpLOFRNODVSOV84WVBKc3I1QzFkLUpQMThxOWhtbGtlajNlNVBkM3NDeHFmcmZmZGZFbHBva09kM091X25Pam5aMmZ4VGhuVU9ueDdZeVdacTZpcmhnRVBrekhWdzUxZ0c4OHJyaWNN'++'access-data:[{"_id":"672b04c8f1e1492cf25300c8","profilePicture":"","permissions":[{"_id":"66ef7882089b74f444515037","userRole":"Admin","userRoleDesc":"","canManageUsers":false,"canManageOrg":true,"canManageProject":true,"canManageTest":true,"canManageFinding":true,"canManageChecklist":true,"canManageWalkThroughQue":true,"canManageBusinessLogic":true,"canReviewReport":true,"canReviewFinalReport":true,"isActive":true,"isDeleted":false,"createdBy":"664734b1920e6d698bfbf9a6","createdOn":"2024-09-22T01:53:06.527Z","updatedOn":"2024-09-22T02:23:08.119Z","__v":0,"updatedBy":"664734b1920e6d698bfbf9a6","isAdmin":true}]}]'
After reviewing the image above, I can see that Browser Bruter has successfully identified all the elements.
However, I am also seeing red error messages, indicating that the web application’s frontend input validation is rejecting my payloads.
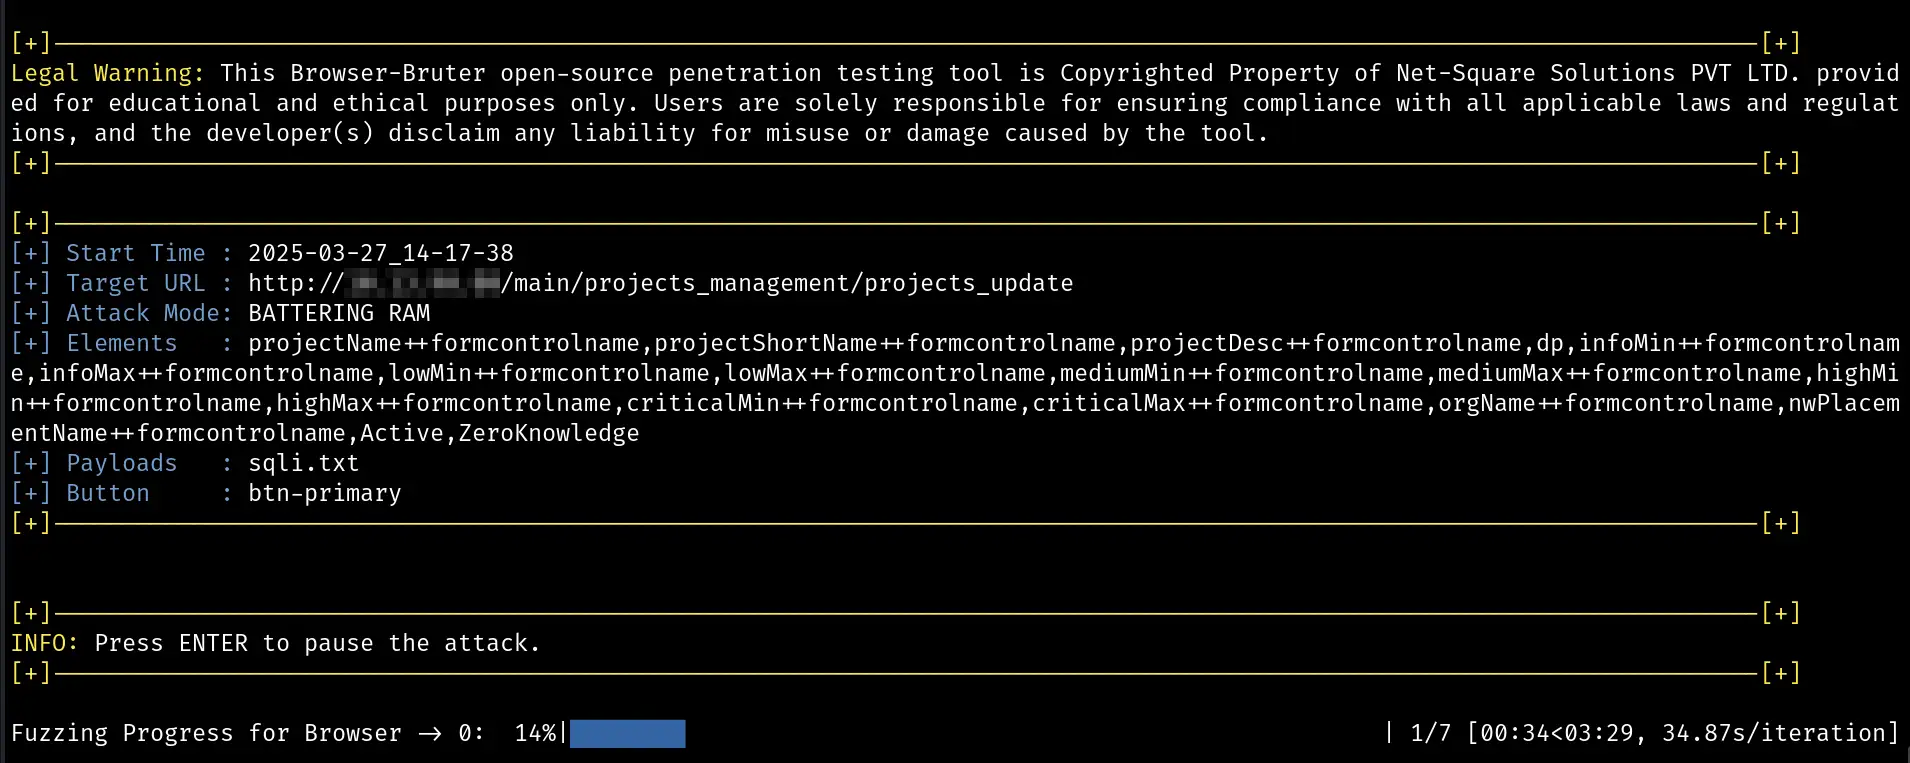
The attack is in progress, so let’s wait for it to finish.
Once it’s done, we’ll further observe the output of our attack to see what is happening.
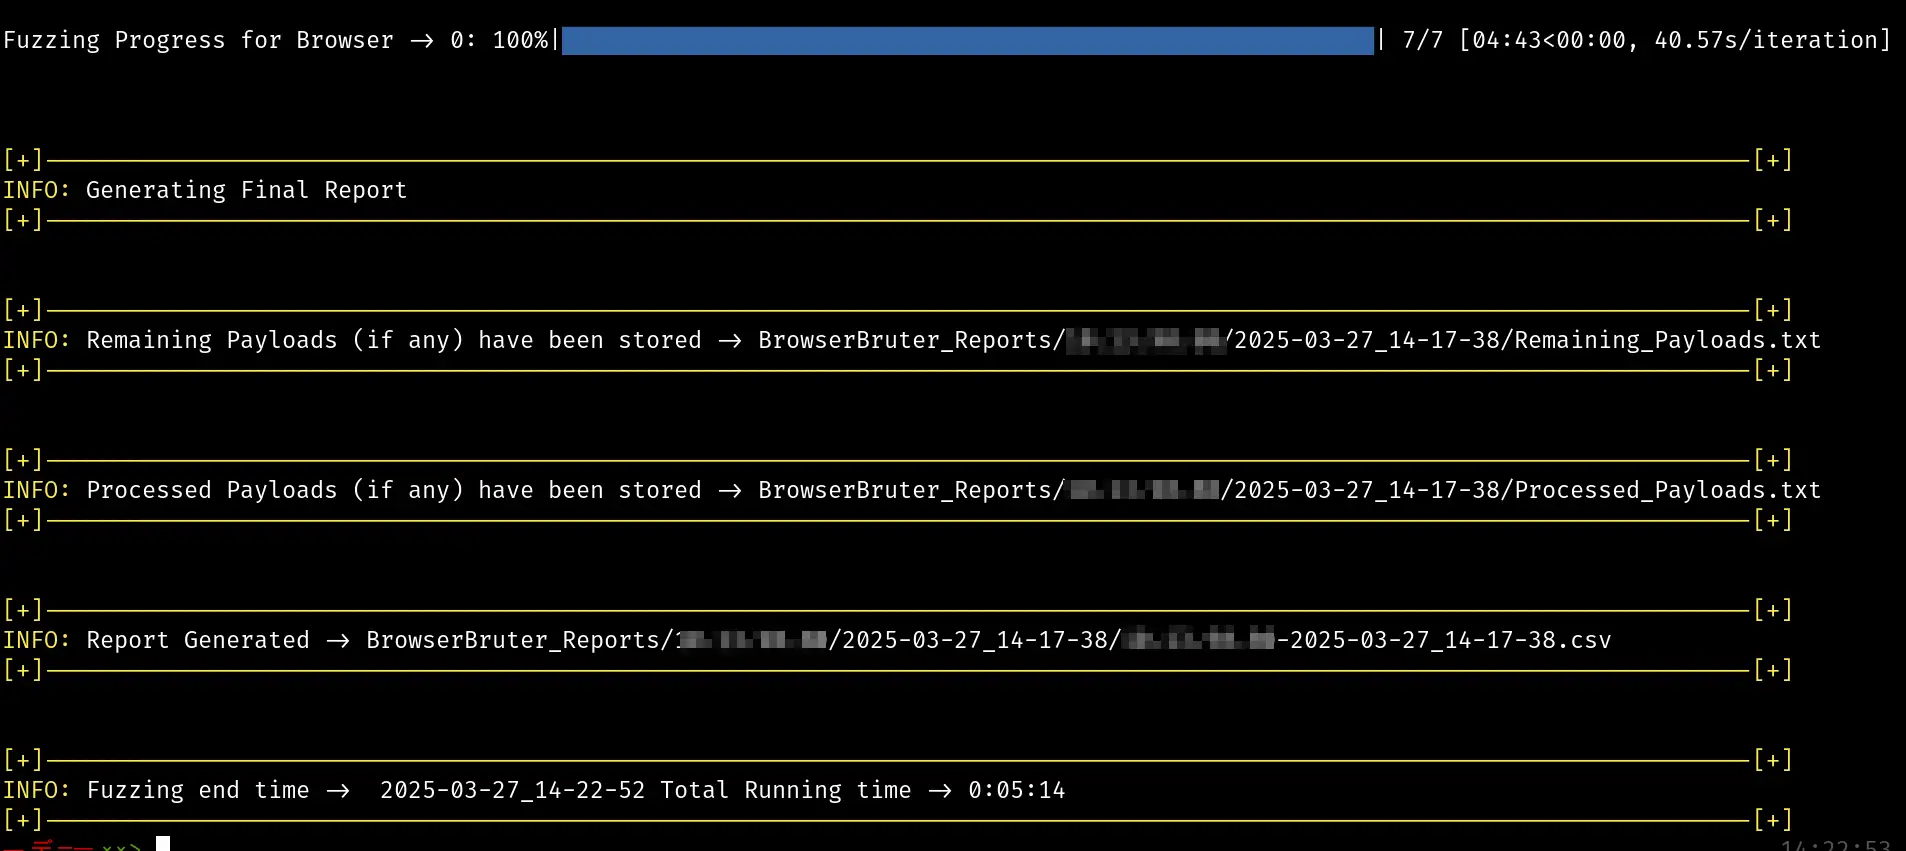
The attack has finished. Let’s analyze the report using the ReportExplorer tool.
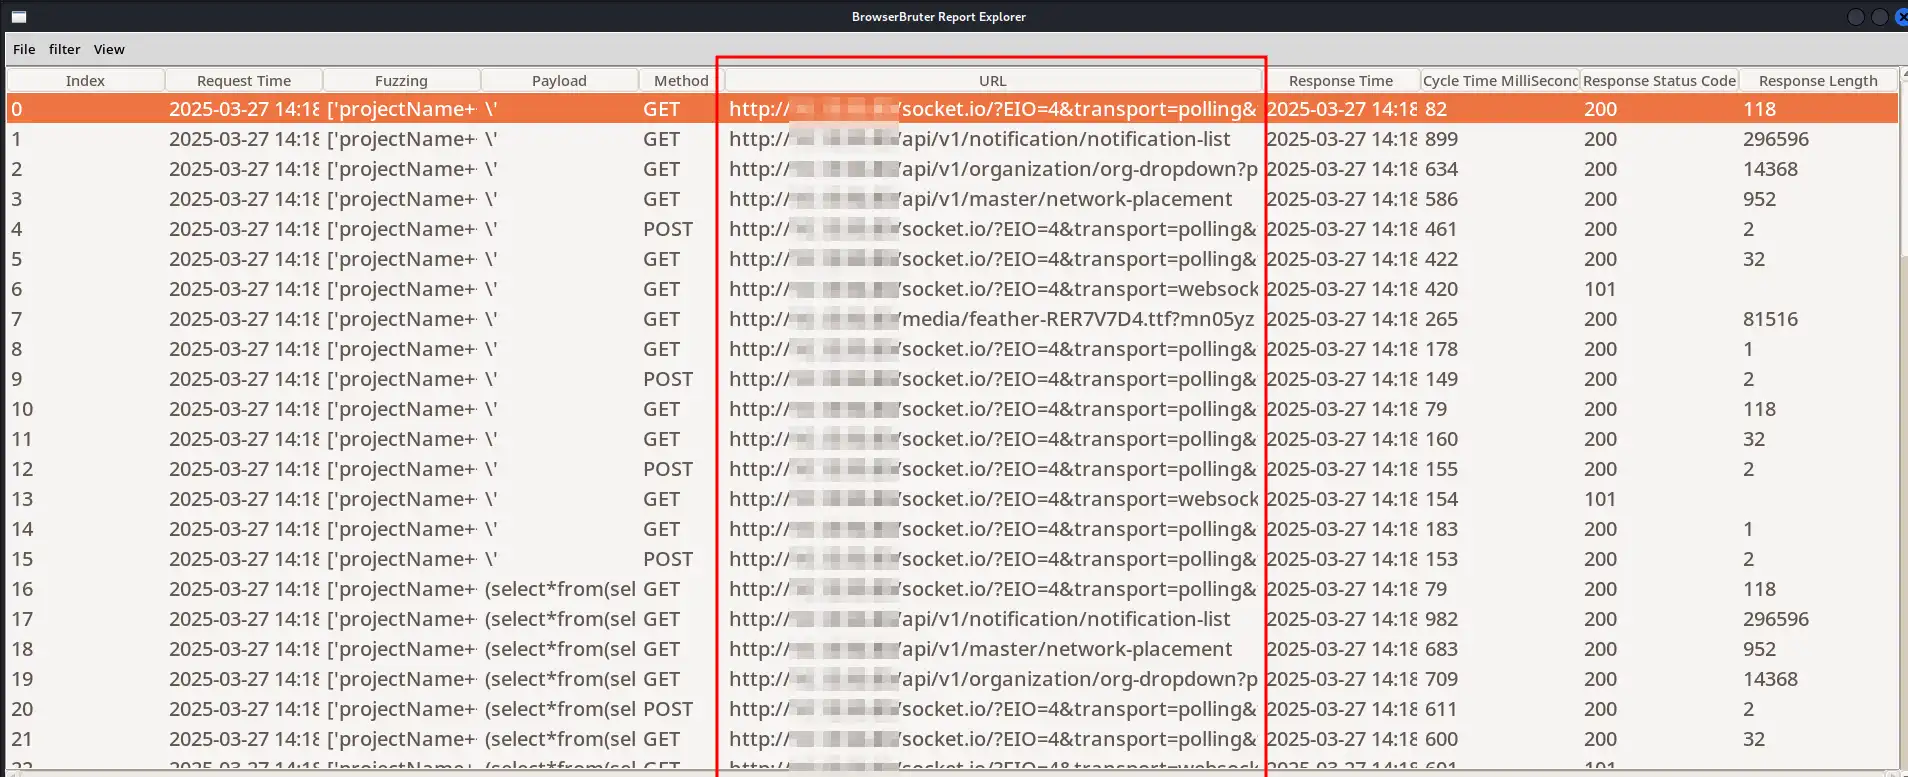
First of all, the report is useless. Why? Because it contains junk traffic.
Browser Bruter does not remove such traffic by default, as in most cases you need to analyze the entire traffic. However, in this case, we don’t need the junk traffic.
If you recall from our first HTTP request/response sample, as shown below:

When we submit the data the Post API call has been made to following endpoint -> /api/v1/project/project-add
So, I can filter my traffic using this endpoint with the filter option available in ReportExplorer, or I can use the --inscope-urls option to remove the junk traffic and keep only the traffic that matters to me.
Now, our command will be as follows:
--inscope-urls "http://x.x.x.x/api/v1/project/project-add"
Now, let’s re-run Browser Bruter with only limited traffic in the report.
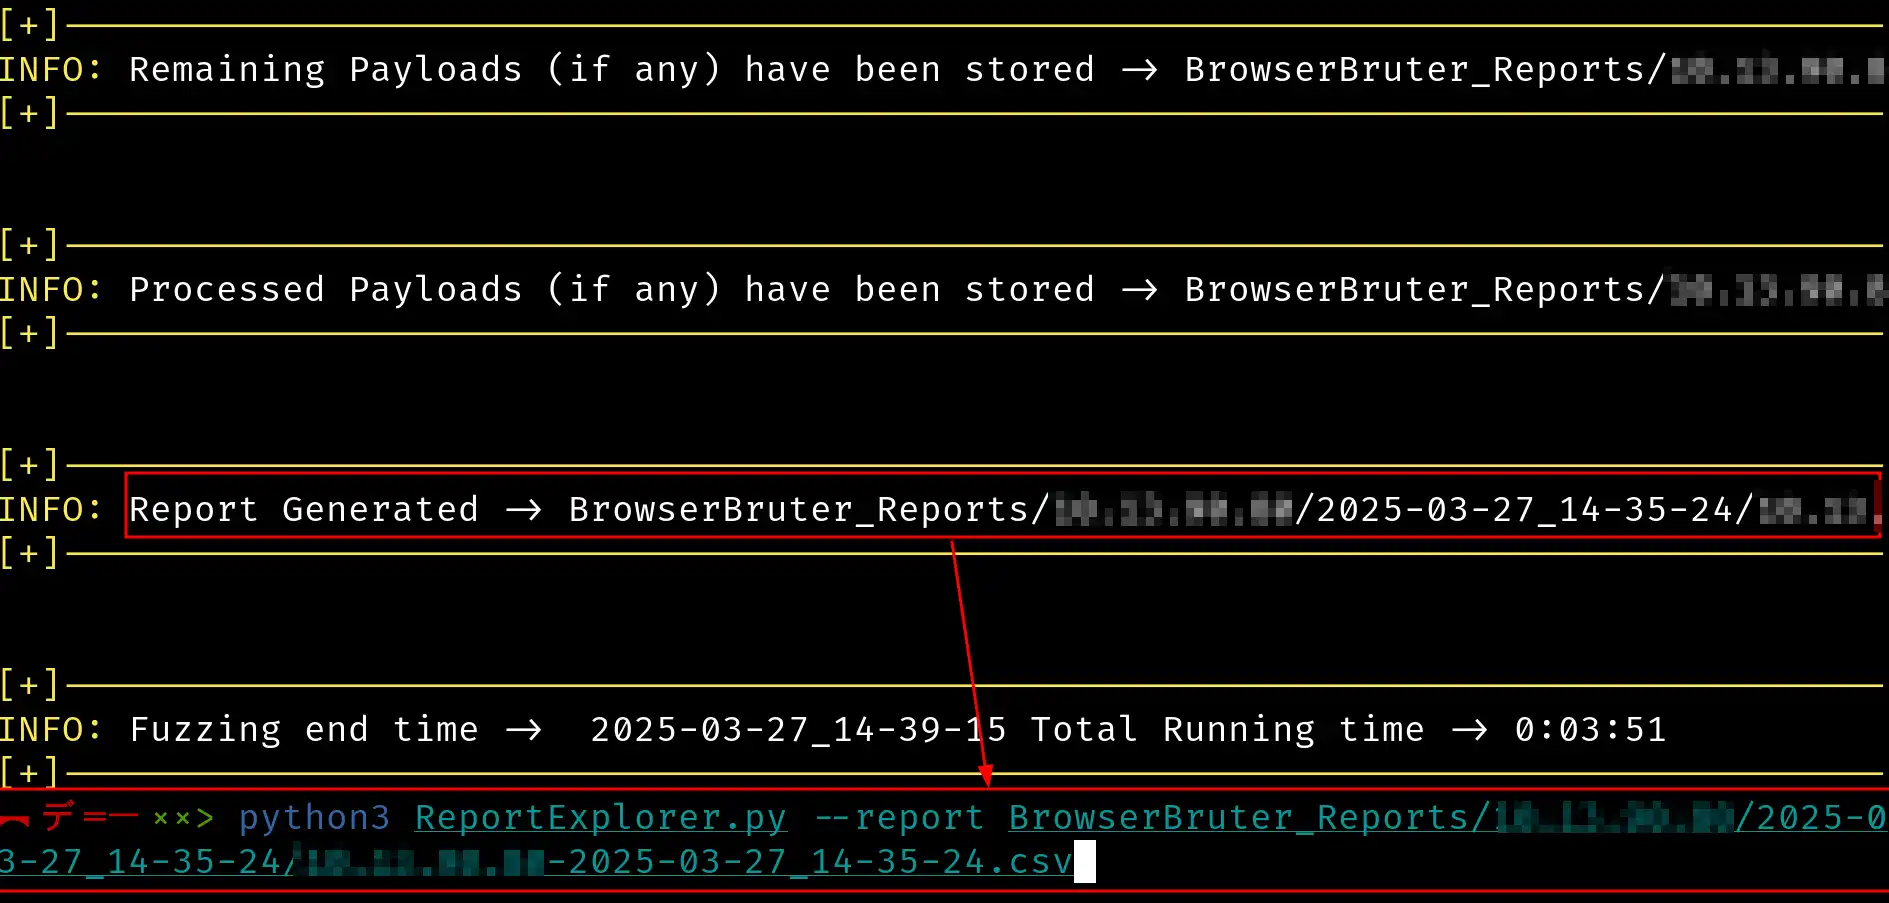
After the attack is finished, let me open the report using the following command:
ReportExplorer.py --report path/to/report
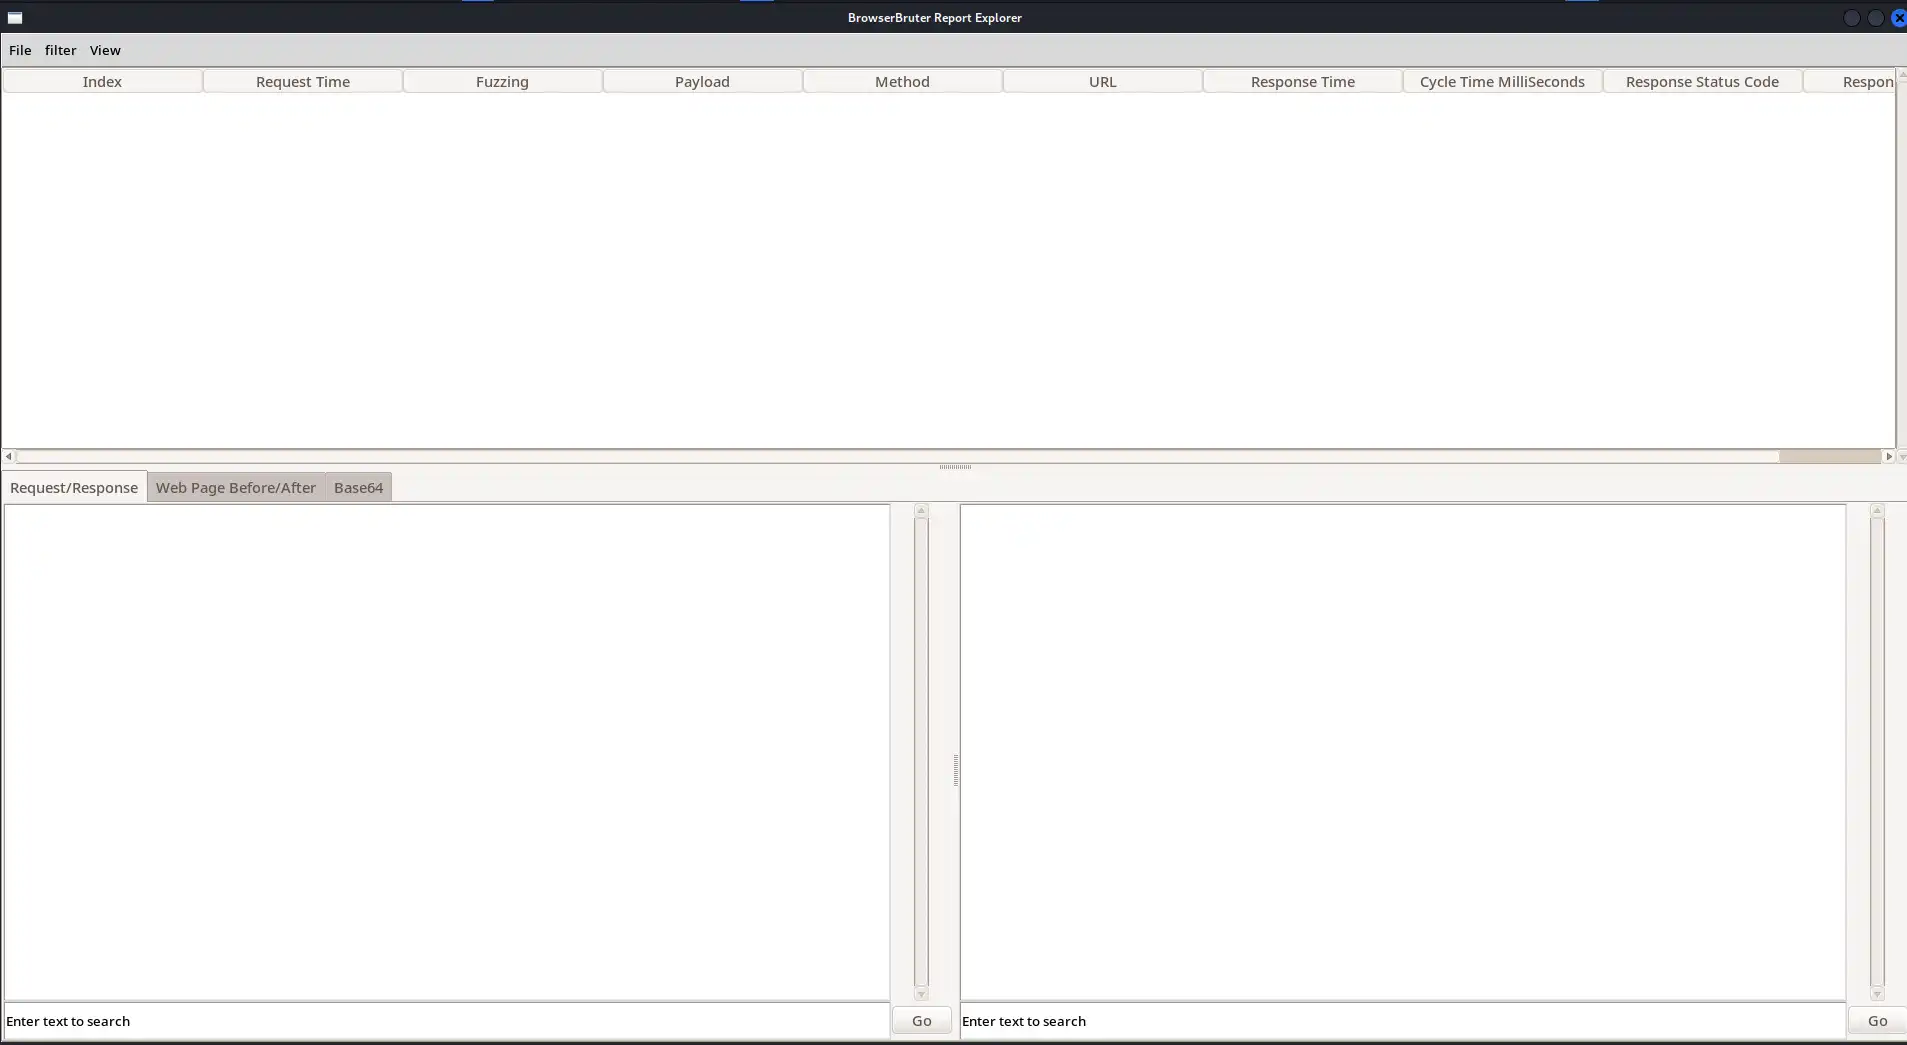
Surprisingly, the report is empty! Hmm, what happened here?
Let me use the --proxy option of Browser Bruter (we can also use the --verbose option)
to analyze the traffic using Burp Suite in real time:
python3 BrowserBruter.py --target http://x.x.x.x/main/projects_management/projects_update --payloads sqli.txt --attack 2 --button btn-primary --elements projectName++formcontrolname,projectShortName++formcontrolname,projectDesc++formcontrolname,dp,infoMin++formcontrolname,infoMax++formcontrolname,lowMin++formcontrolname,lowMax++formcontrolname,mediumMin++formcontrolname,mediumMax++formcontrolname,highMin++formcontrolname,highMax++formcontrolname,criticalMin++formcontrolname,criticalMax++formcontrolname,orgName++formcontrolname,nwPlacementName++formcontrolname,Active,ZeroKnowledge --headers "Authorization: Bearer eyJhbGciOiJSUzI1NiIsInR5cCI6IkpXVCJ9.eyJ2ZXIiOjEsInVpZCI6IjY2ZmJjYTA3N2JjYzZlMDk3ZDk3OGM0OSIsInVuYW1lIjoiSmFmYXIiLCJmbmFtZSI6Ik1vaGFtbWFkIEphZmFya2hhbiIsImxuYW1lIjoiUGF0aGFuIiwiZW1haWxpZCI6ImphZmFyQG5ldC1zcXVhcmUuY29tIiwibW9iIjoiOTY2MjUzMzY2MiIsInJvbGUiOiJNYW5hZ2VyIiwiaXNBZG1pbiI6dHJ1ZSwiaWF0IjoxNzQyMjgyNjIwLCJleHAiOjE3NDIzMDQyMjAsImp0aSI6IjUxNjY5MWI0MmVmNWM0ZmFhODkwZjQ5OWRiYzcxYzQ2ZjhjMzY0MzgifQ.TkJPGdNVOjOqzMmruv4CcE10c64PqJgK1rFyqacdfBqjzSRnfsLcgl_0b3-zzYA5OVHljnwyRN5HIm0pBQYUNkohaE-NrD5f7-48xXU6P_Jb9Df3fLXcGqUWt5reG5bk32W1Qk20PT-qp1otTXy0AyG01c_jRnSzvI_aFQqPkjlMeQxENO5S4lEpvJwjohy-GuT8IOUBGLz7FwuBl00ic2ZTKwd9976S-DwKGPsjWFdIdLbkuyXuI2azoWzGzGZdHEoZOHL-0_52e-ECMKEesUlN-s2v7uOn2wByi9hrh7jZ86F1P7lWUUQ0W4Skryv7mr9qHgh5Z_ZOGGzRLH_avTZViL0SBy9GiLpwHFEhFZzUdGQnt0J6r3bKZJe-a24mET_d6VPpGP9Qdj5MjQ5D9INwJ3-bKUAdJfQGQBiKP-_2O29sLGLhJQPc43-WsAsKQswLPW_teOpTG_F8wQvFPWgDwL0EBur2C-fGNwCt7uIS-q5RZmszV1KGJEtP2wdU5BA-m_y6_eulxZhNwZc8LyqkYNWW02DUSXxVDYAc6D3ALqDb9zRJNK0IqMxTYfTrDD9ZK8TM85R9_8YPJsr5C1d-JP18q9hmlkej3e5Pd3sCxqfrffdfElpokOd3Ou_nOjnZ2fxThnUOnx7YyWZq6irhgEPkzHVw51gG88rricM" --add-storage 'token:ZXlKaGJHY2lPaUpTVXpJMU5pSXNJblI1Y0NJNklrcFhWQ0o5LmV5SjJaWElpT2pFc0luVnBaQ0k2SWpZMlptSmpZVEEzTjJKall6WmxNRGszWkRrM09HTTBPU0lzSW5WdVlXMWxJam9pU21GbVlYSWlMQ0ptYm1GdFpTSTZJazF2YUdGdGJXRmtJRXBoWm1GeWEyaGhiaUlzSW14dVlXMWxJam9pVUdGMGFHRnVJaXdpWlcxaGFXeHBaQ0k2SW1waFptRnlRRzVsZEMxemNYVmhjbVV1WTI5dElpd2liVzlpSWpvaU9UWTJNalV6TXpZMk1pSXNJbkp2YkdVaU9pSk5ZVzVoWjJWeUlpd2lhWE5CWkcxcGJpSTZkSEoxWlN3aWFXRjBJam94TnpReU1qZ3lOakl3TENKbGVIQWlPakUzTkRJek1EUXlNakFzSW1wMGFTSTZJalV4TmpZNU1XSTBNbVZtTldNMFptRmhPRGt3WmpRNU9XUmlZemN4WXpRMlpqaGpNelkwTXpnaWZRLlRrSlBHZE5WT2pPcXpNbXJ1djRDY0UxMGM2NFBxSmdLMXJGeXFhY2RmQnFqelNSbmZzTGNnbF8wYjMtenpZQTVPVkhsam53eVJONUhJbTBwQlFZVU5rb2hhRS1OckQ1ZjctNDh4WFU2UF9KYjlEZjNmTFhjR3FVV3Q1cmVHNWJrMzJXMVFrMjBQVC1xcDFvdFRYeTBBeUcwMWNfalJuU3p2SV9hRlFxUGtqbE1lUXhFTk81UzRsRXB2Sndqb2h5LUd1VDhJT1VCR0x6N0Z3dUJsMDBpYzJaVEt3ZDk5NzZTLUR3S0dQc2pXRmRJZExia3V5WHVJMmF6b1d6R3pHWmRIRW9aT0hMLTBfNTJlLUVDTUtFZXNVbE4tczJ2N3VPbjJ3QnlpOWhyaDdqWjg2RjFQN2xXVVVRMFc0U2tyeXY3bXI5cUhnaDVaX1pPR0d6UkxIX2F2VFpWaUwwU0J5OUdpTHB3SEZFaEZaelVkR1FudDBKNnIzYktaSmUtYTI0bUVUX2Q2VlBwR1A5UWRqNU1qUTVEOUlOd0ozLWJLVUFkSmZRR1FCaUtQLV8yTzI5c0xHTGhKUVBjNDMtV3NBc0tRc3dMUFdfdGVPcFRHX0Y4d1F2RlBXZ0R3TDBFQnVyMkMtZkdOd0N0N3VJUy1xNVJabXN6VjFLR0pFdFAyd2RVNUJBLW1feTZfZXVseFpoTndaYzhMeXFrWU5XVzAyRFVTWHhWRFlBYzZEM0FMcURiOXpSSk5LMElxTXhUWWZUckREOVpLOFRNODVSOV84WVBKc3I1QzFkLUpQMThxOWhtbGtlajNlNVBkM3NDeHFmcmZmZGZFbHBva09kM091X25Pam5aMmZ4VGhuVU9ueDdZeVdacTZpcmhnRVBrekhWdzUxZ0c4OHJyaWNN'++'access-data:[{"_id":"672b04c8f1e1492cf25300c8","profilePicture":"","permissions":[{"_id":"66ef7882089b74f444515037","userRole":"Admin","userRoleDesc":"","canManageUsers":false,"canManageOrg":true,"canManageProject":true,"canManageTest":true,"canManageFinding":true,"canManageChecklist":true,"canManageWalkThroughQue":true,"canManageBusinessLogic":true,"canReviewReport":true,"canReviewFinalReport":true,"isActive":true,"isDeleted":false,"createdBy":"664734b1920e6d698bfbf9a6","createdOn":"2024-09-22T01:53:06.527Z","updatedOn":"2024-09-22T02:23:08.119Z","__v":0,"updatedBy":"664734b1920e6d698bfbf9a6","isAdmin":true}]}]' --inscope-urls "http://x.x.x.x/api/v1/project/project-add" --proxy http://127.0.0.1:8080/
The image below shows the observation of traffic from Burp Suite.
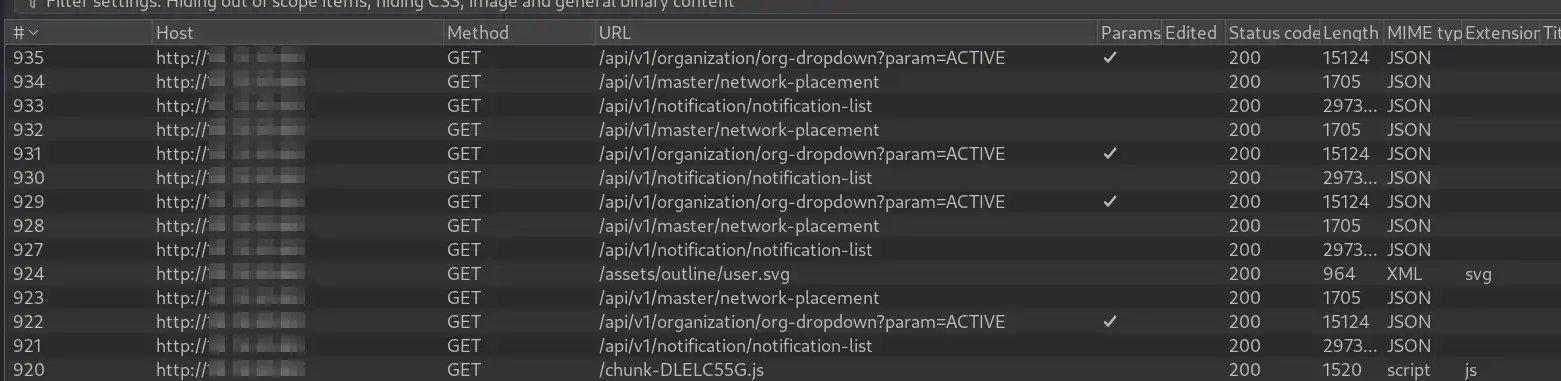
I cannot see the API call endpoint used to submit the form’s values. So, what does this mean?
Remember I mentioned earlier that the front-end is not liking our payloads? Guess what — it turns out that the front-end is preventing the form from being submitted due to the payloads.
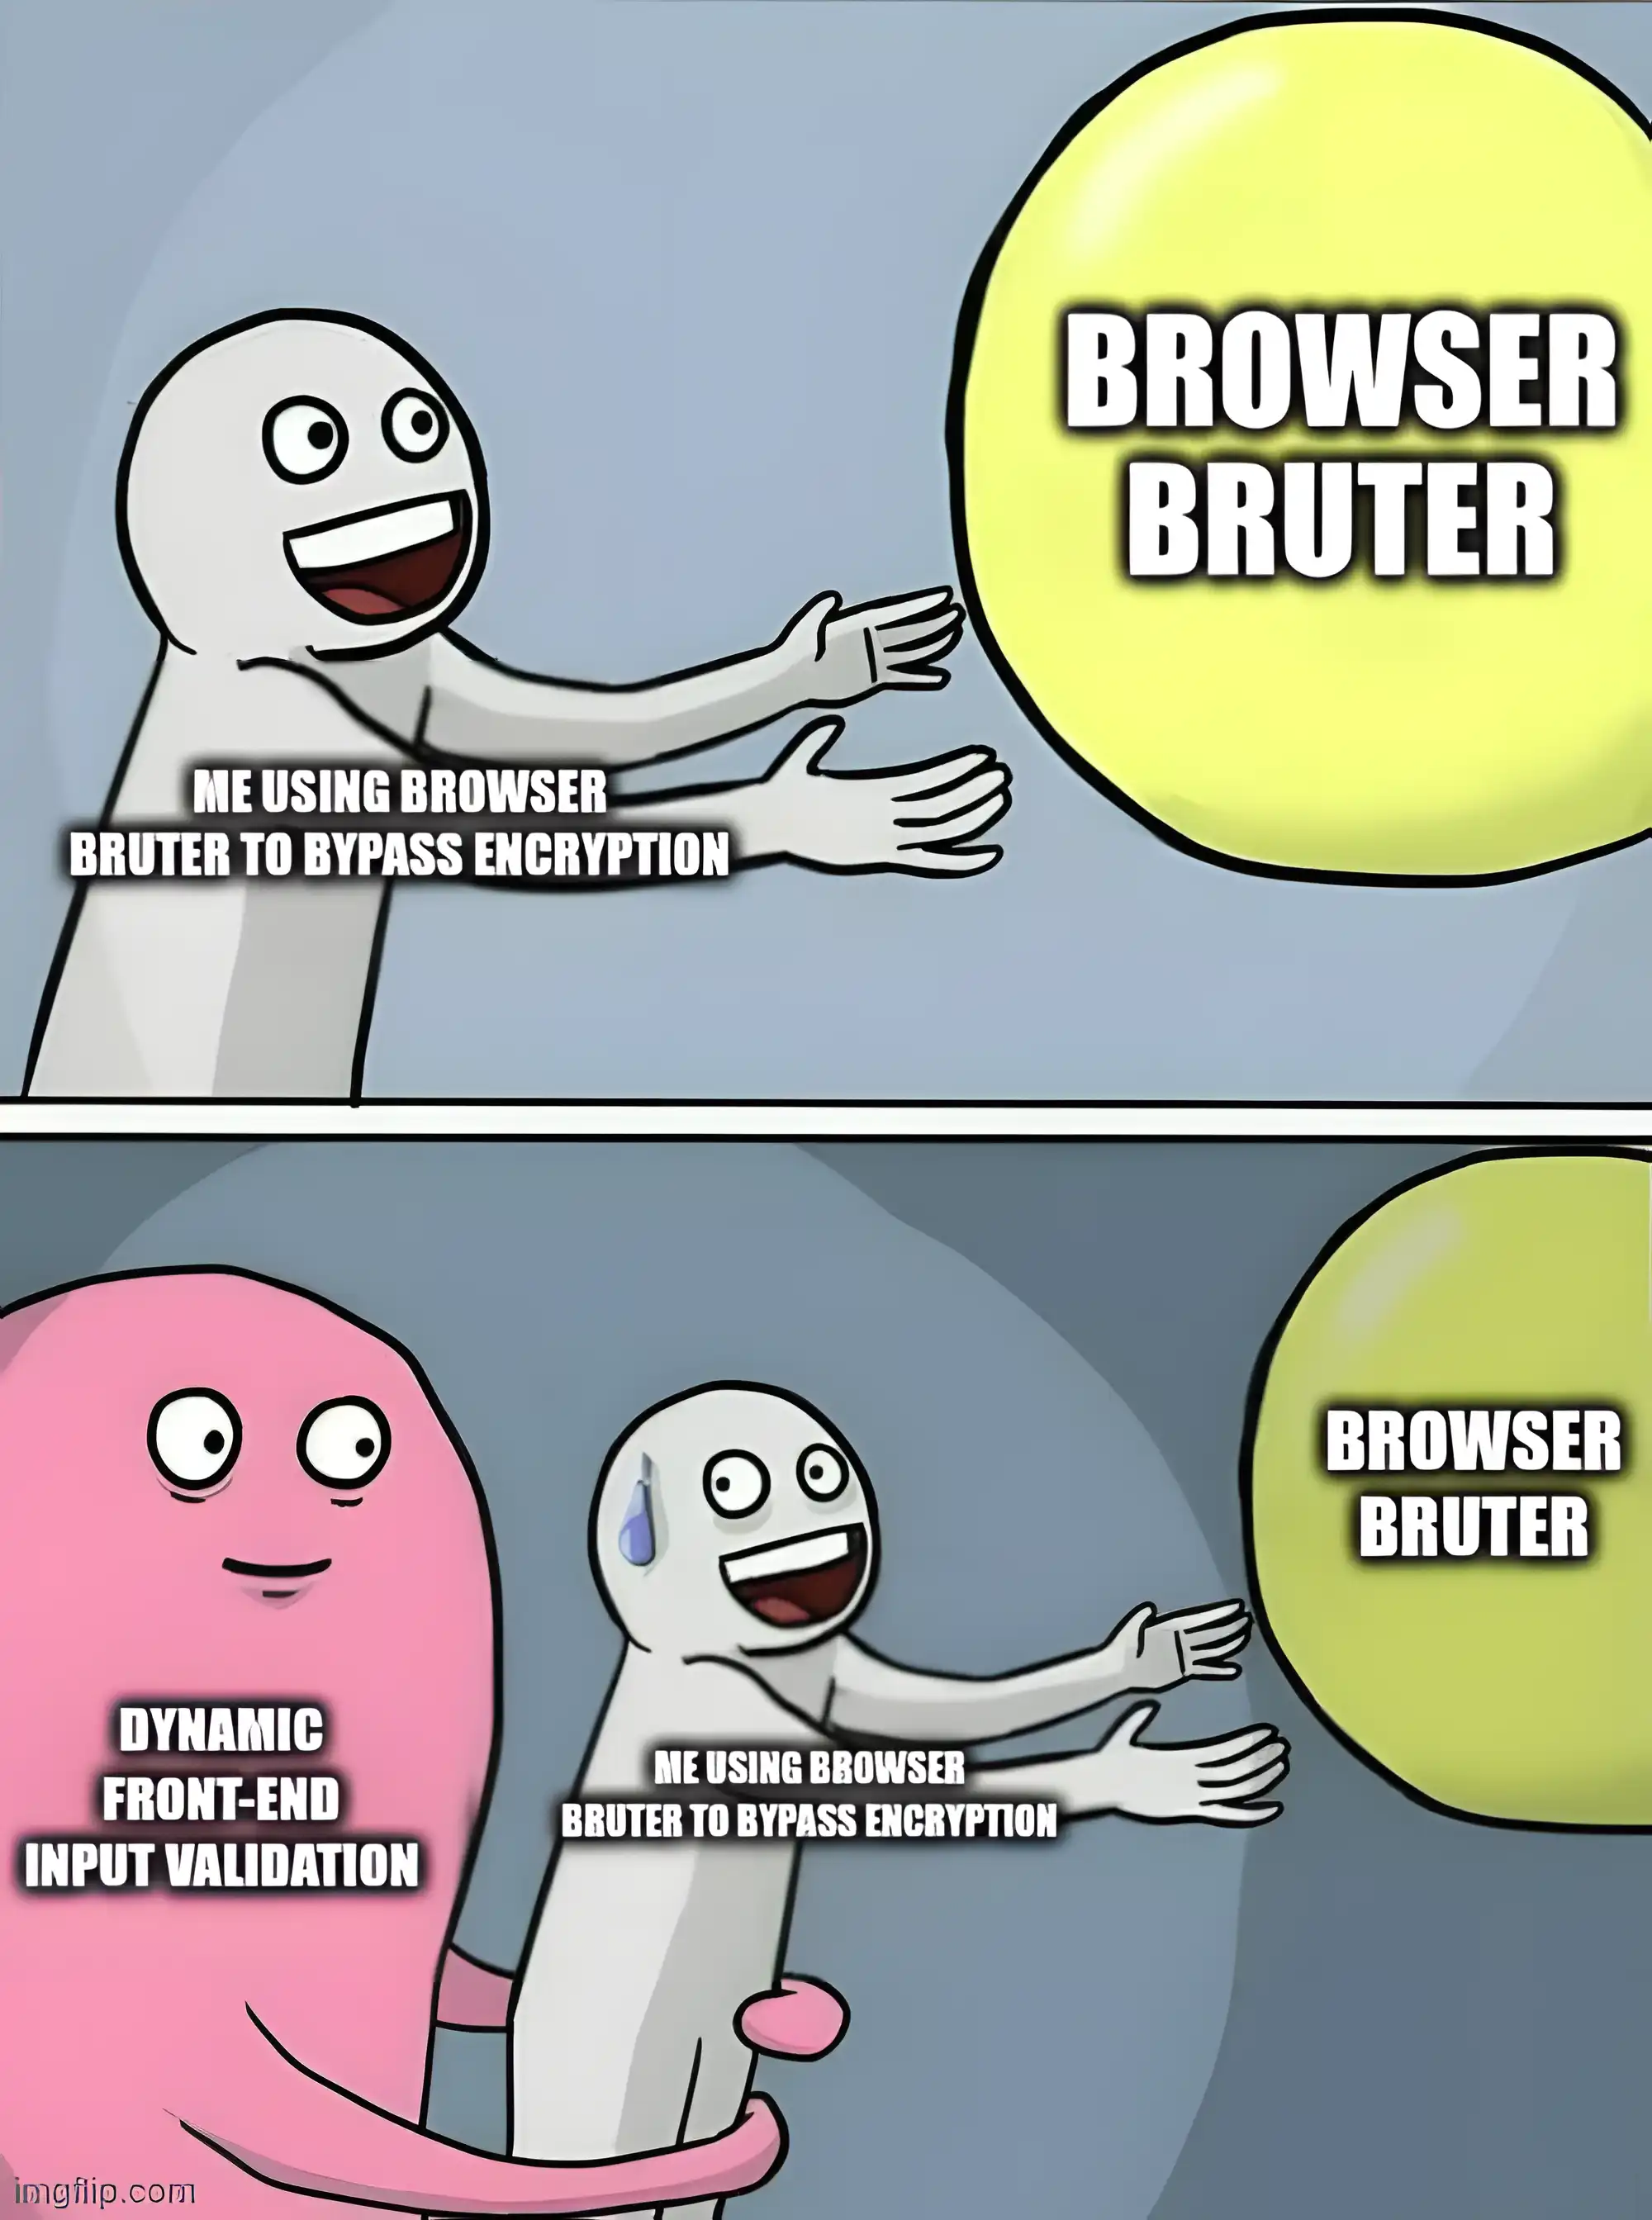
We can summarize our situation as shown in the image below: 🙁
Possible Solutions
Now, it is possible to use JavaScript, Python, and other techniques to bypass such restrictions.
But the real question is: Are you willing to invest so much time just to fuzz a single web form?
Some might agree if this is the only form they need to fuzz and there are no other tasks at hand.
However, let’s explore the possible solutions available to us.
Using JavaScript:
We can develop custom JavaScript to remove input validations from the front end.
To succeed with this approach, you first need to identify the input validation logic.
One way to do this is by searching for elements or error messages in the .js files, as shown here.
However, keep in mind that different web applications will have different validation logics.
A single method won’t work for all cases — you’ll need to brainstorm and analyze the code to identify the validation logic.
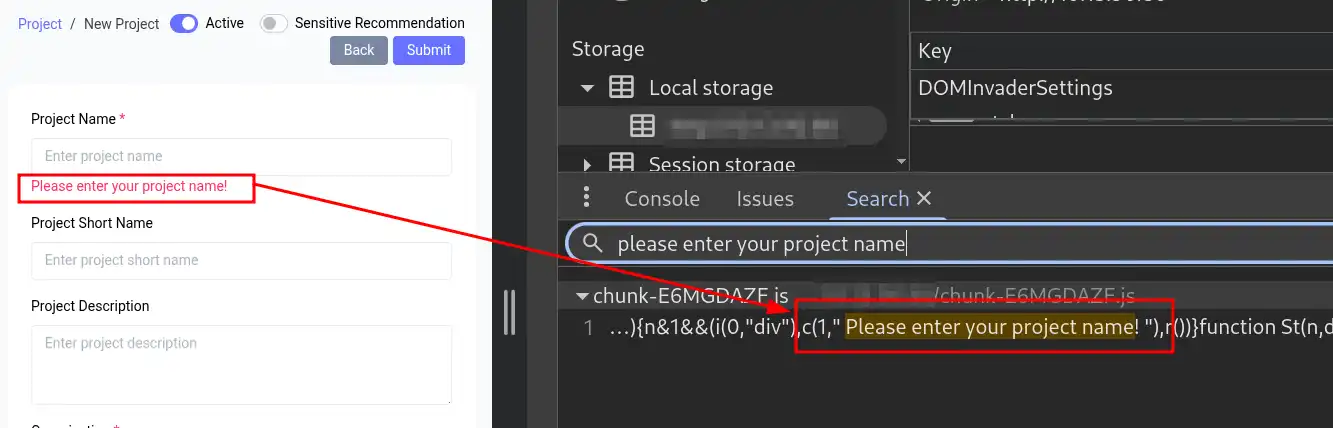
Fortunately, after a quick search in the image above, I came across the following .js file containing all input validation functions.
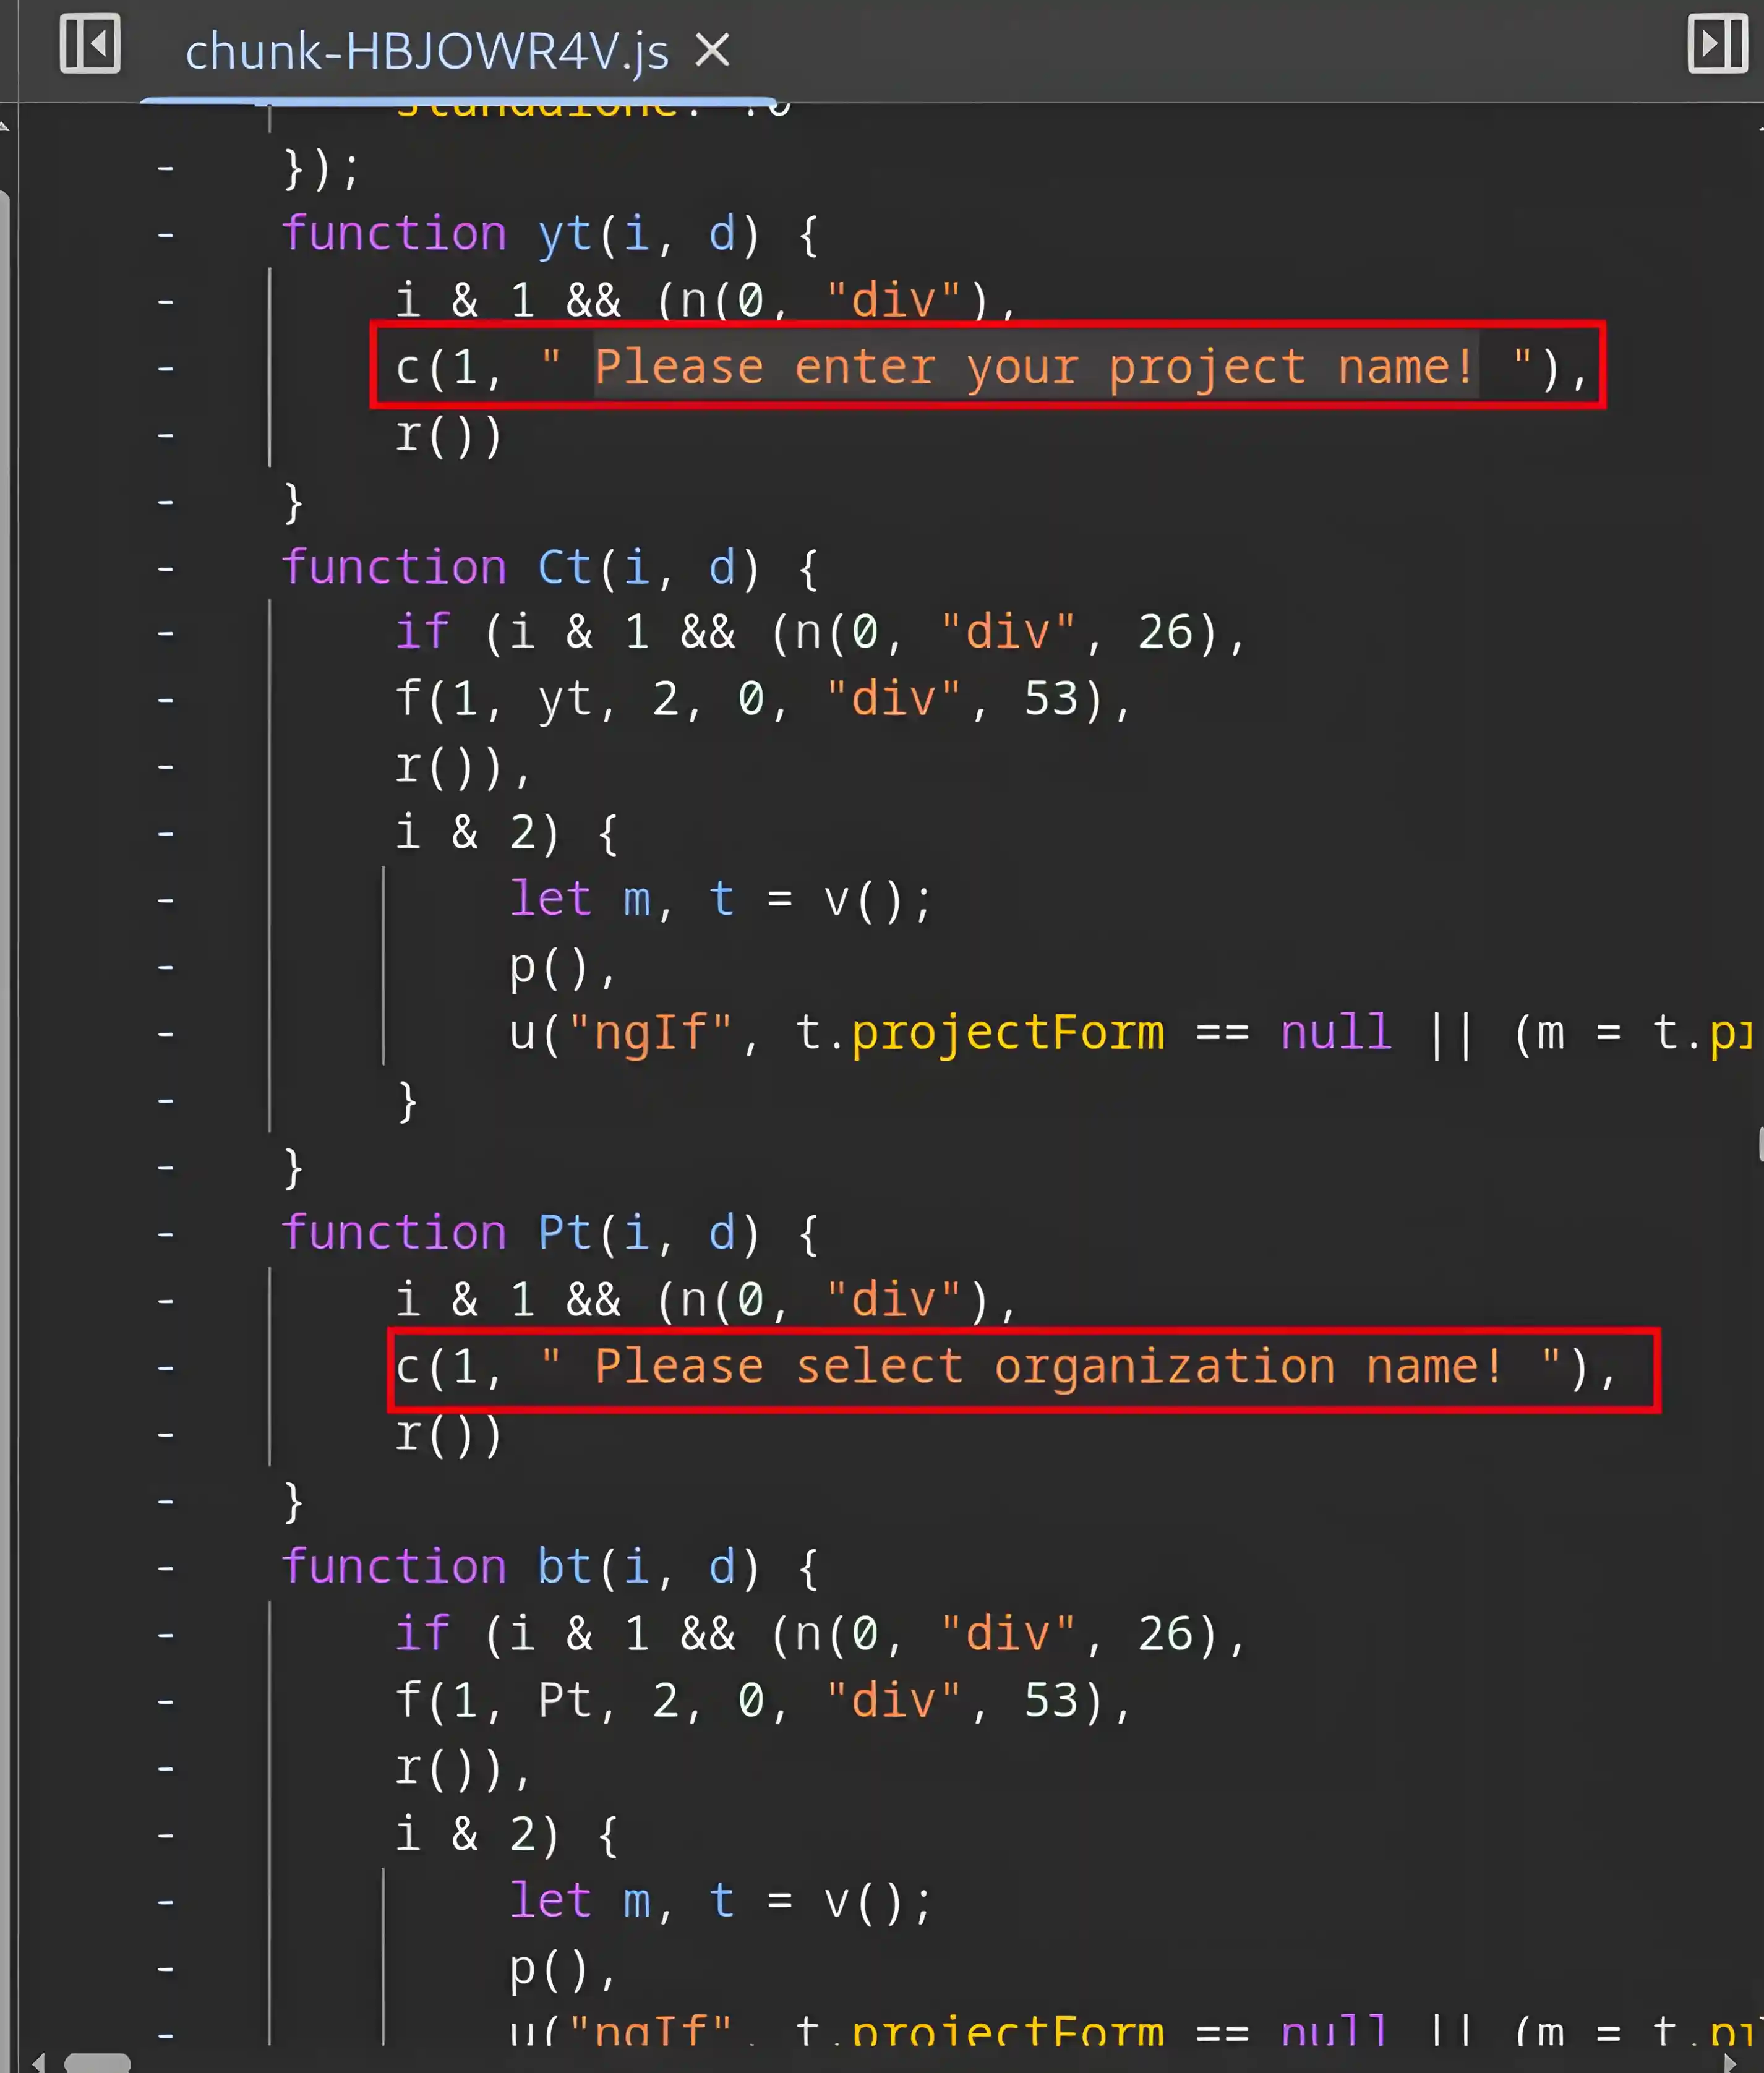
Now, what I can do is modify this .js file to remove the input validation. (One way to do this is by making the validation functions always return true or a positive value.)
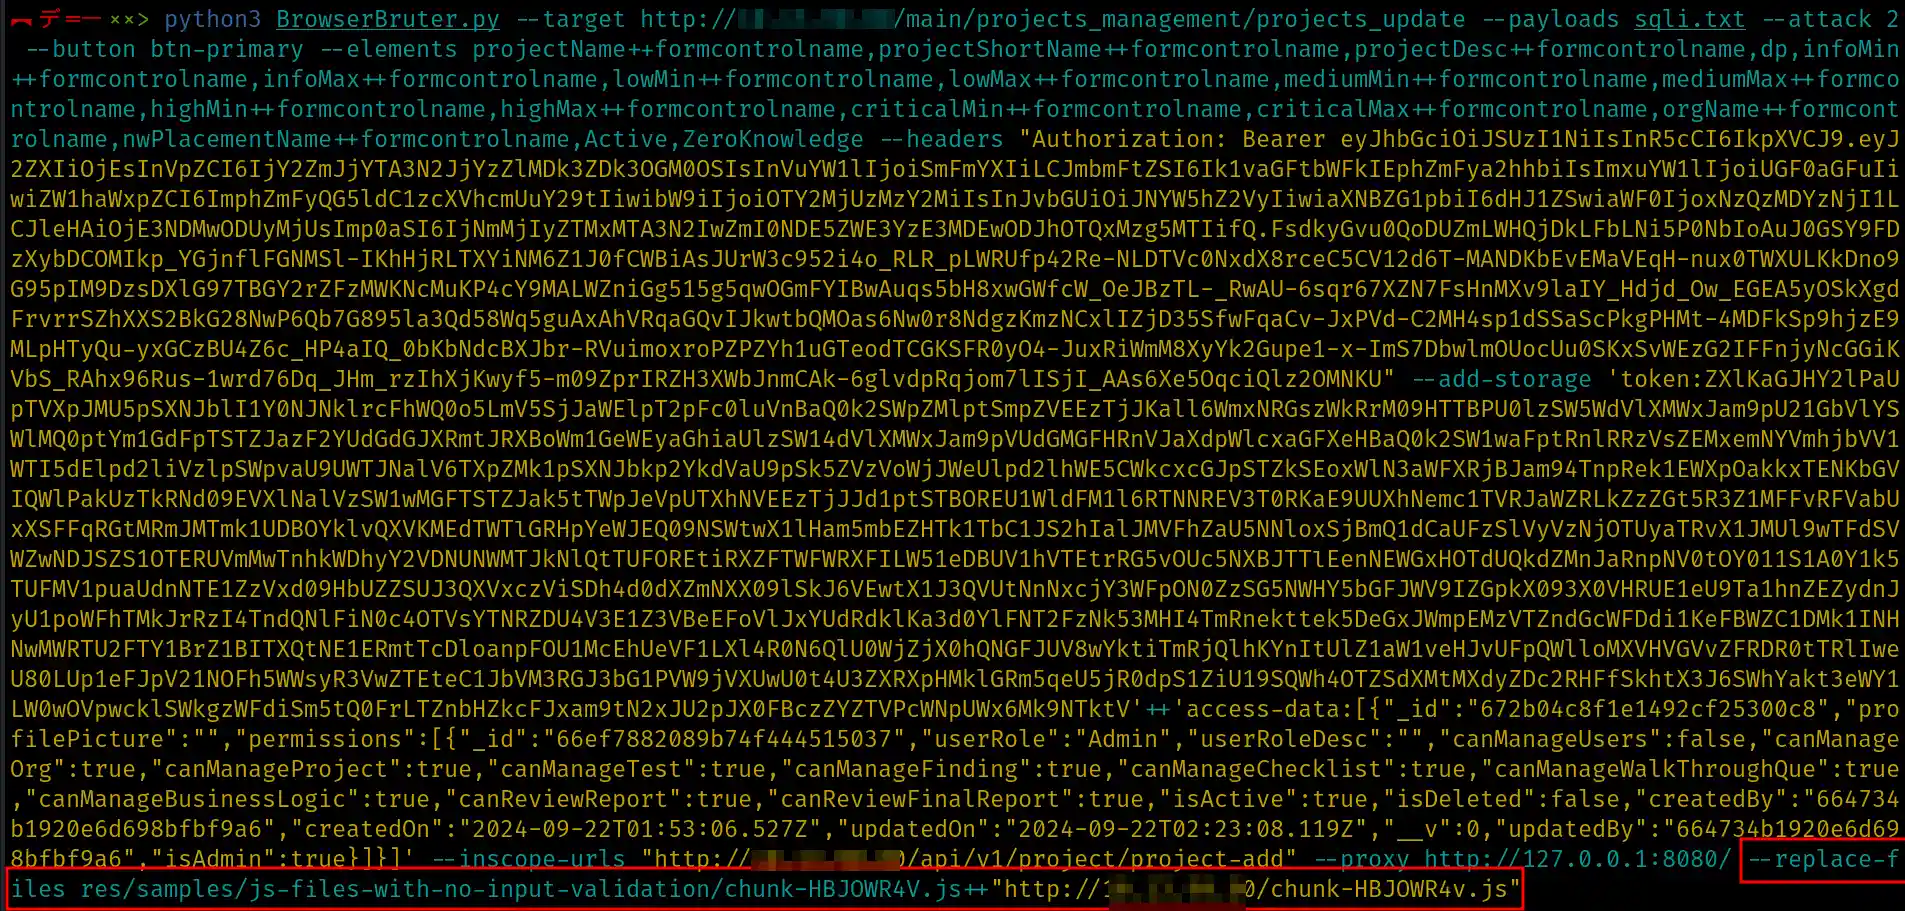
Next, I will replace the original file with my custom .js file
using the --replace-files option, as shown below:
But the question remains the same: What if there are other input validations as well? For example:
- Before encryption
- Before building the HTTP request
- Or at any other stage
In such cases:
- How many files will you replace?
- How many hours will you spend just to remove a single input validation,
- only to encounter another one right after?(And trust me, this often happens.)
Similarly, we could also utilize the Python Scripting Engine to remove input validations, but the question will remain the same: Isn’t there a more efficient way?
Now, let’s pretend we manage to bypass the input validation. How much time will Browser Bruter take to perform all these operations? Including:
- Navigation (if required)
- Multiple validations
- And everything in between
All of this combined becomes a curse for Browser Bruter to work efficiently.
Instead of solving the encryption problem, we end up solving the input validation problem just to submit the form 😔
🤔 But what if there is no web form at all?
What if the web application sends a POST request directly to the server without any user interaction and you want to fuzz that request using Browser Bruter? What will you do then?
To solve this issue and free Browser Bruter from such curses, let me introduce you to a new layer of fuzzing the web application: Fuzzing via Debugging
The Fuzzing via Debugging of Browser Bruter

We have named this module the Debug Kraken. Let’s wake up this Debug kraken from its deep-sea nap and make it unleash havoc on the front-end.
What is it?
The Fuzzing via Debugging module of Browser Bruter allows you to specify debug breakpoints where the web application will pause execution. It then enables you to perform operations such as:
- Setting variable values.
- Modifying data.
- Flipping flags, and more.
The beauty of this method lies in its simplicity — it can achieve in minutes what would typically require days of effort.
How to use it?
The Fuzzing via Debugging module of Browser Bruter currently offers two switches (with more under development):
- --debug: Specifies the location in the code where you want to set a breakpoint.
- --debug-code: Allows you to provide Python code that will execute at the breakpoint. This is used to perform operations, such as altering the values of JavaScript object properties.
How does it work?
First, you need to identify the line of code that:
- Executes after all input validation and other roadblocks you want to bypass.
- Executes just before the HTTP request is built, ensuring you can modify the variables or objects that will be sent to the server in the request body.
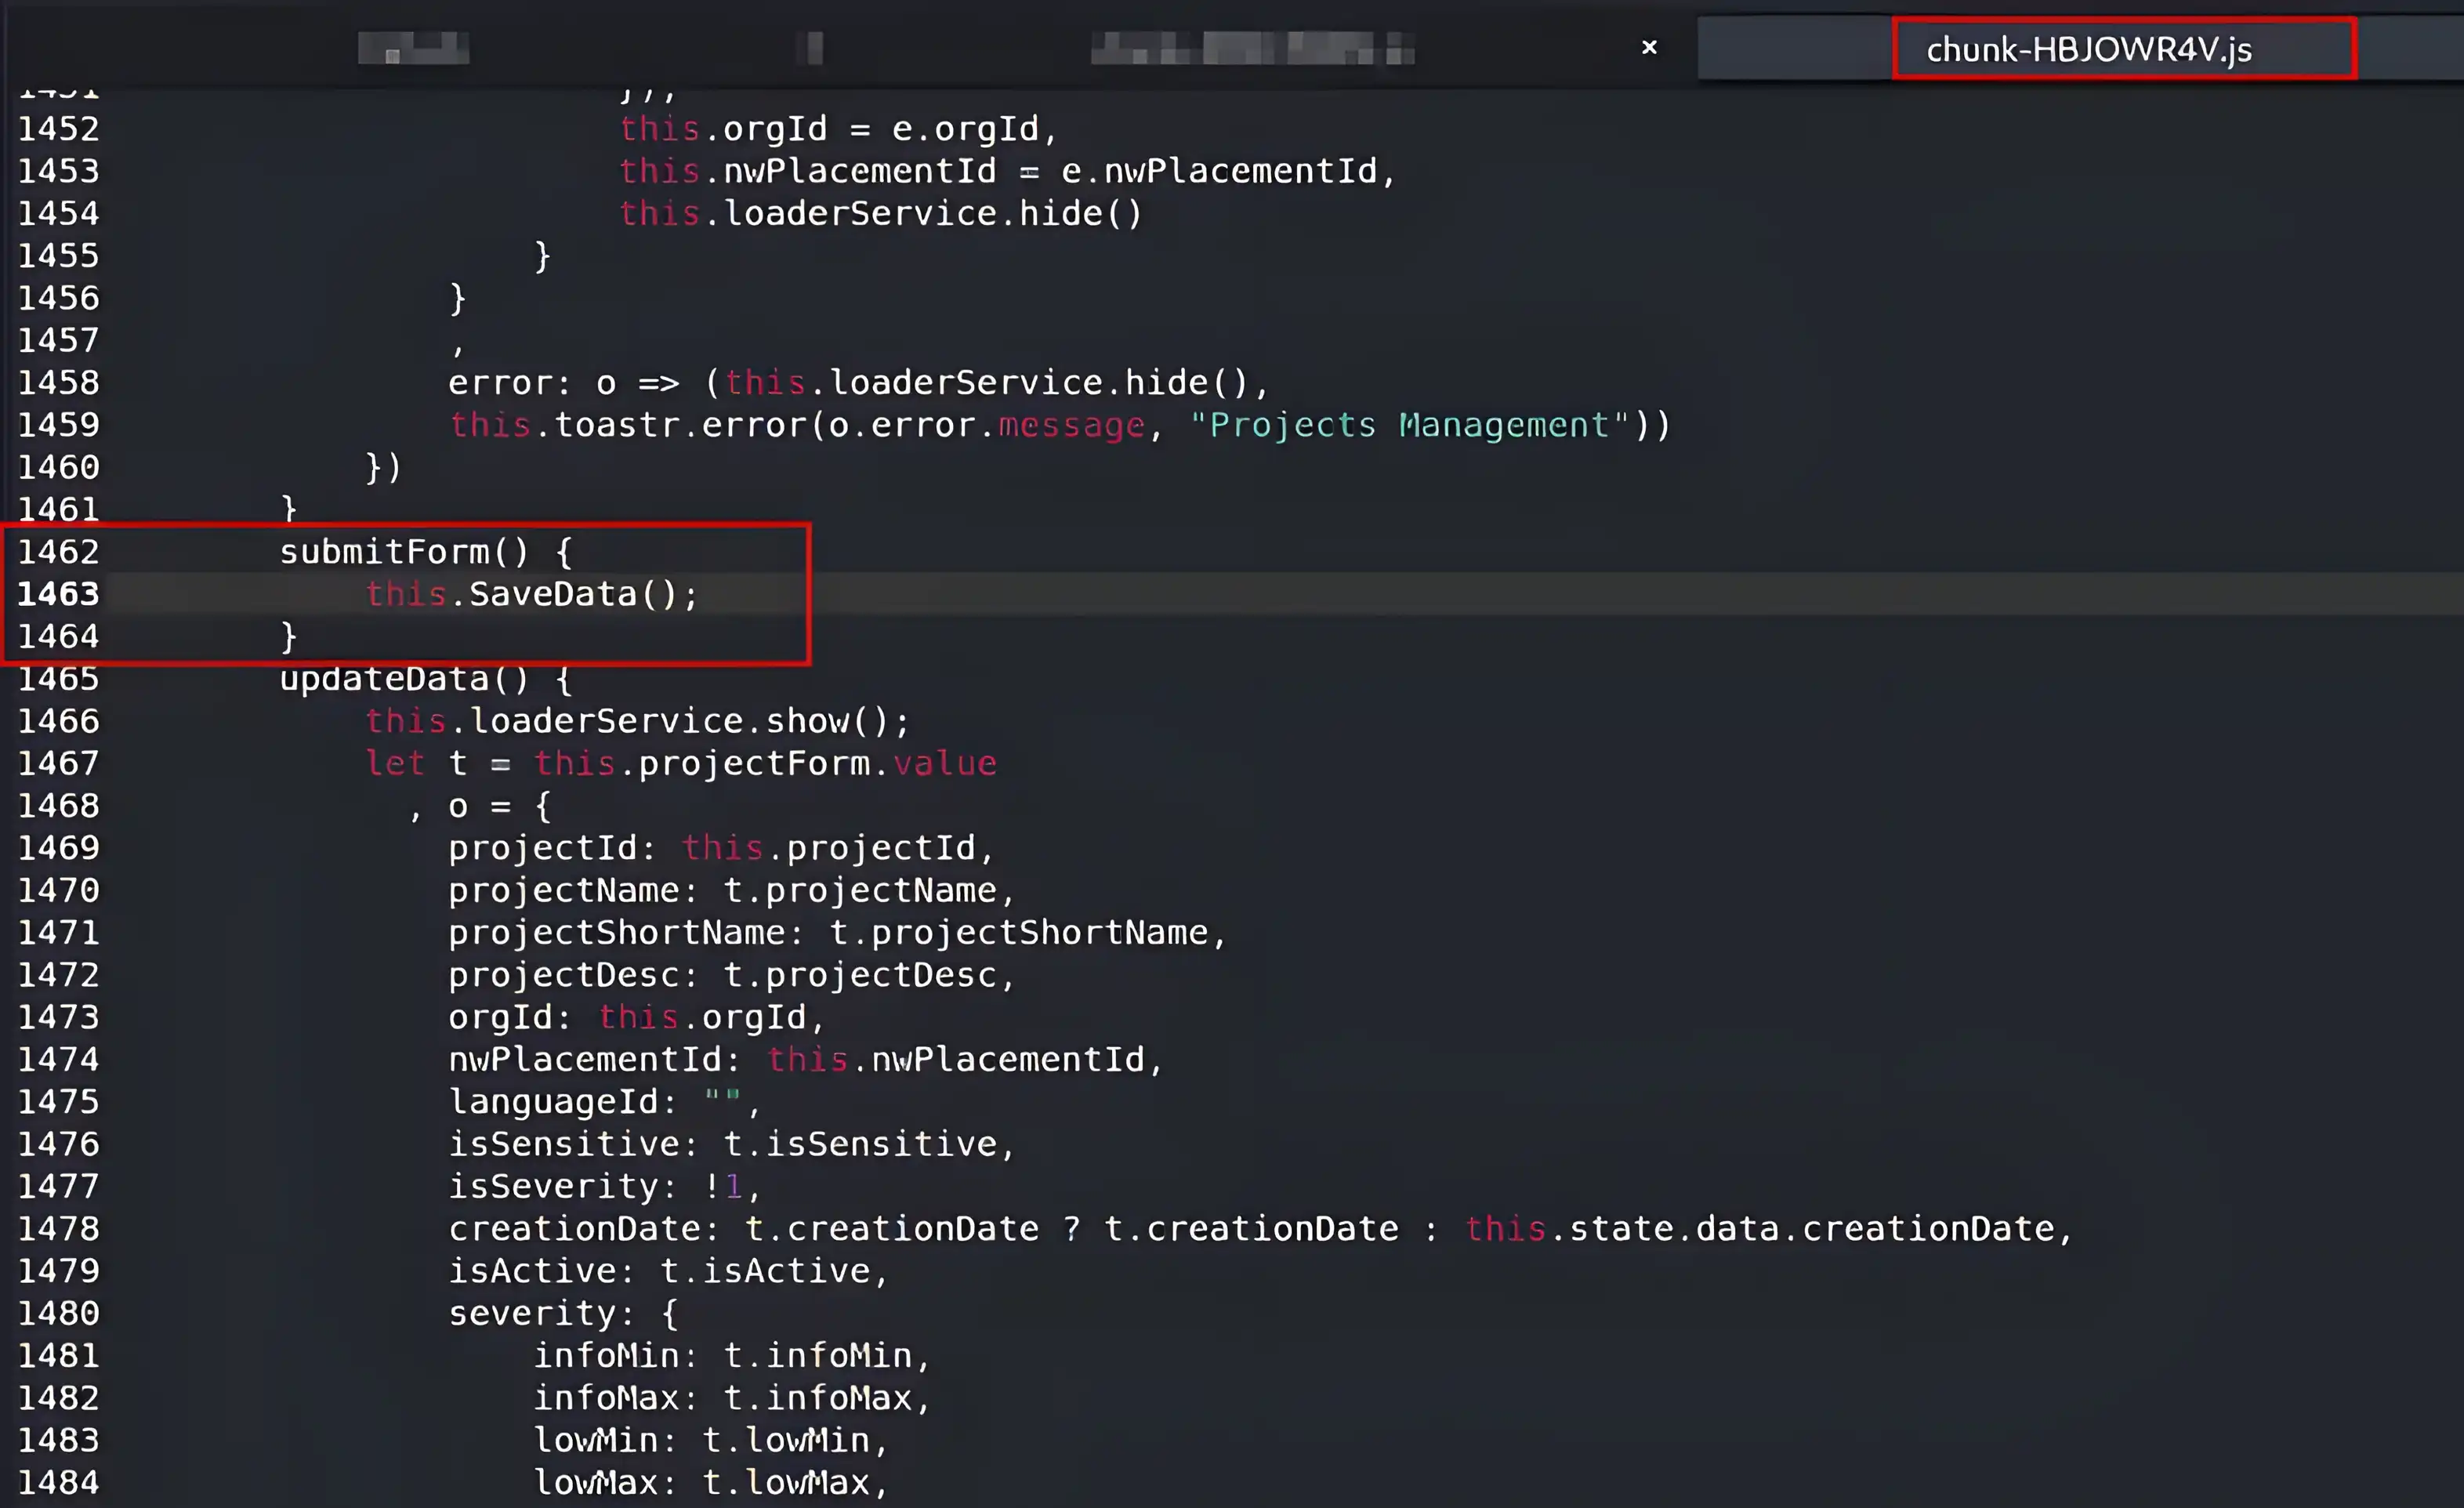
In our target example, we have identified the relevant line of code, as shown below:
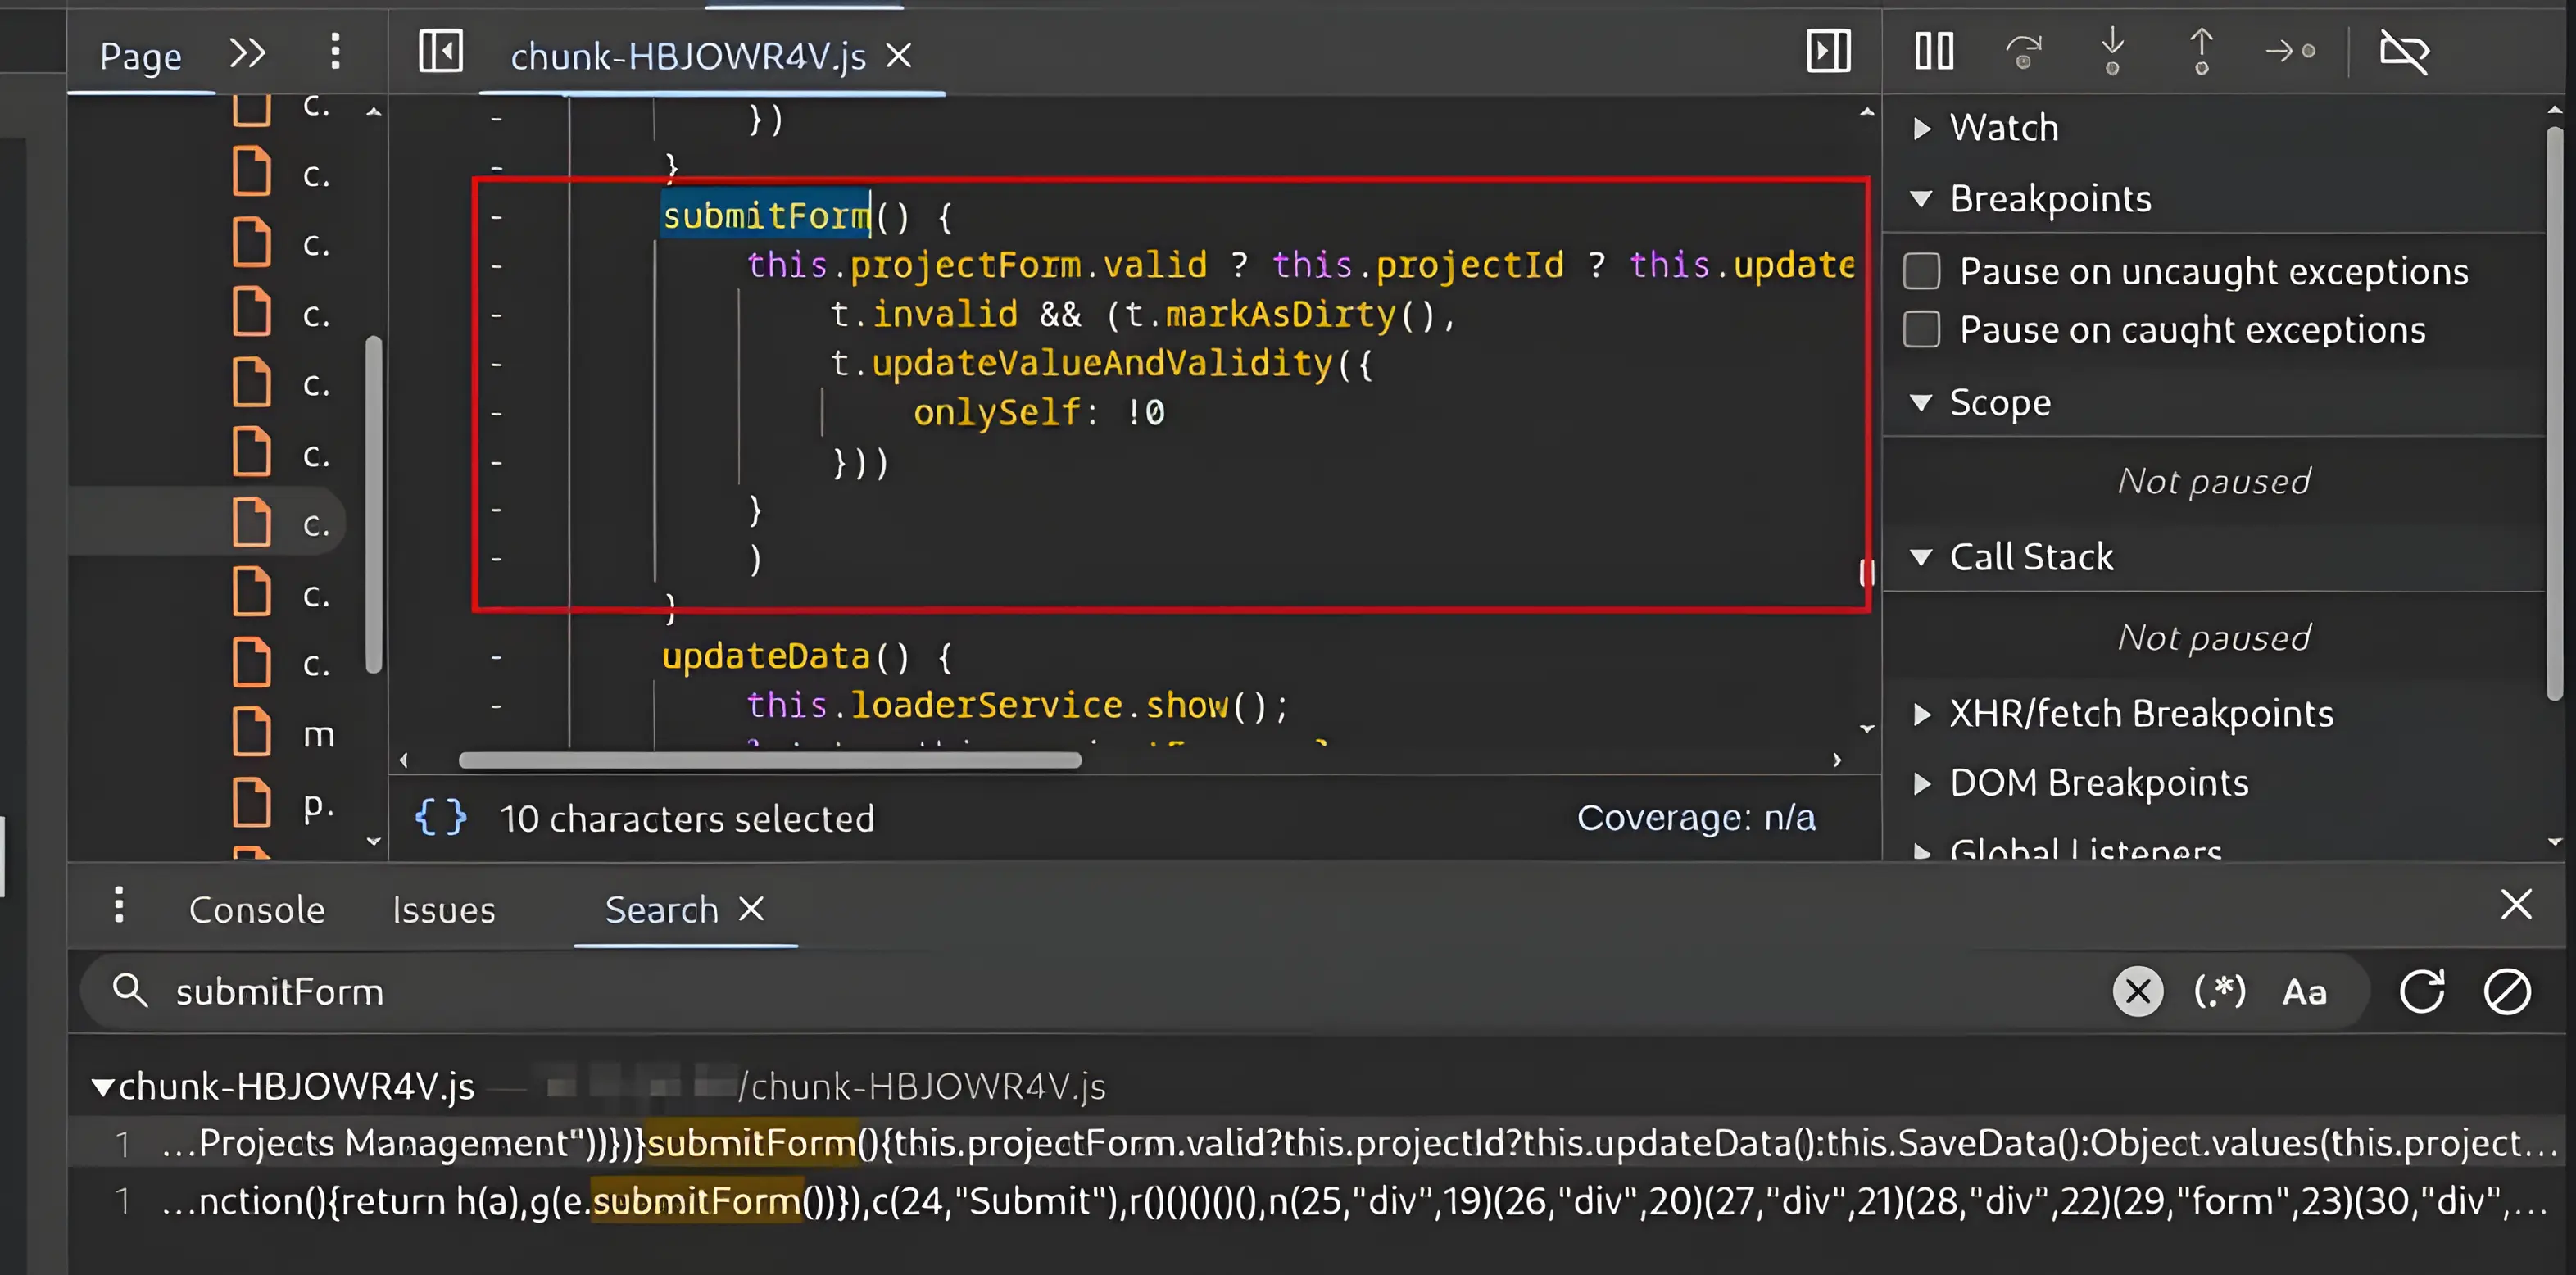
I searched for submitform and found the result shown above.
You can also use similar common search terms (e.g., sendRequest, postData, saveForm) to reduce the time required to locate the interesting line of code.
submitForm() {
    this.projectForm.valid ? this.projectId ? this.updateData() : this.SaveData() : Object.values(this.projectForm.controls).forEach(t => {
        t.invalid && (t.markAsDirty(),
        t.updateValueAndValidity({
            onlySelf: !0
            }))
        }
    )
}
From the code above, it is clear that this method will:
- Validate the form and, if it is authentic,
- Call either
updateData()orsaveData()methods.
My assumption:
- If the project already exists, the
updateData()method will be called. - For new project creation, the
saveData()method will be called.
I will set the debug breakpoint at the saveData() method.
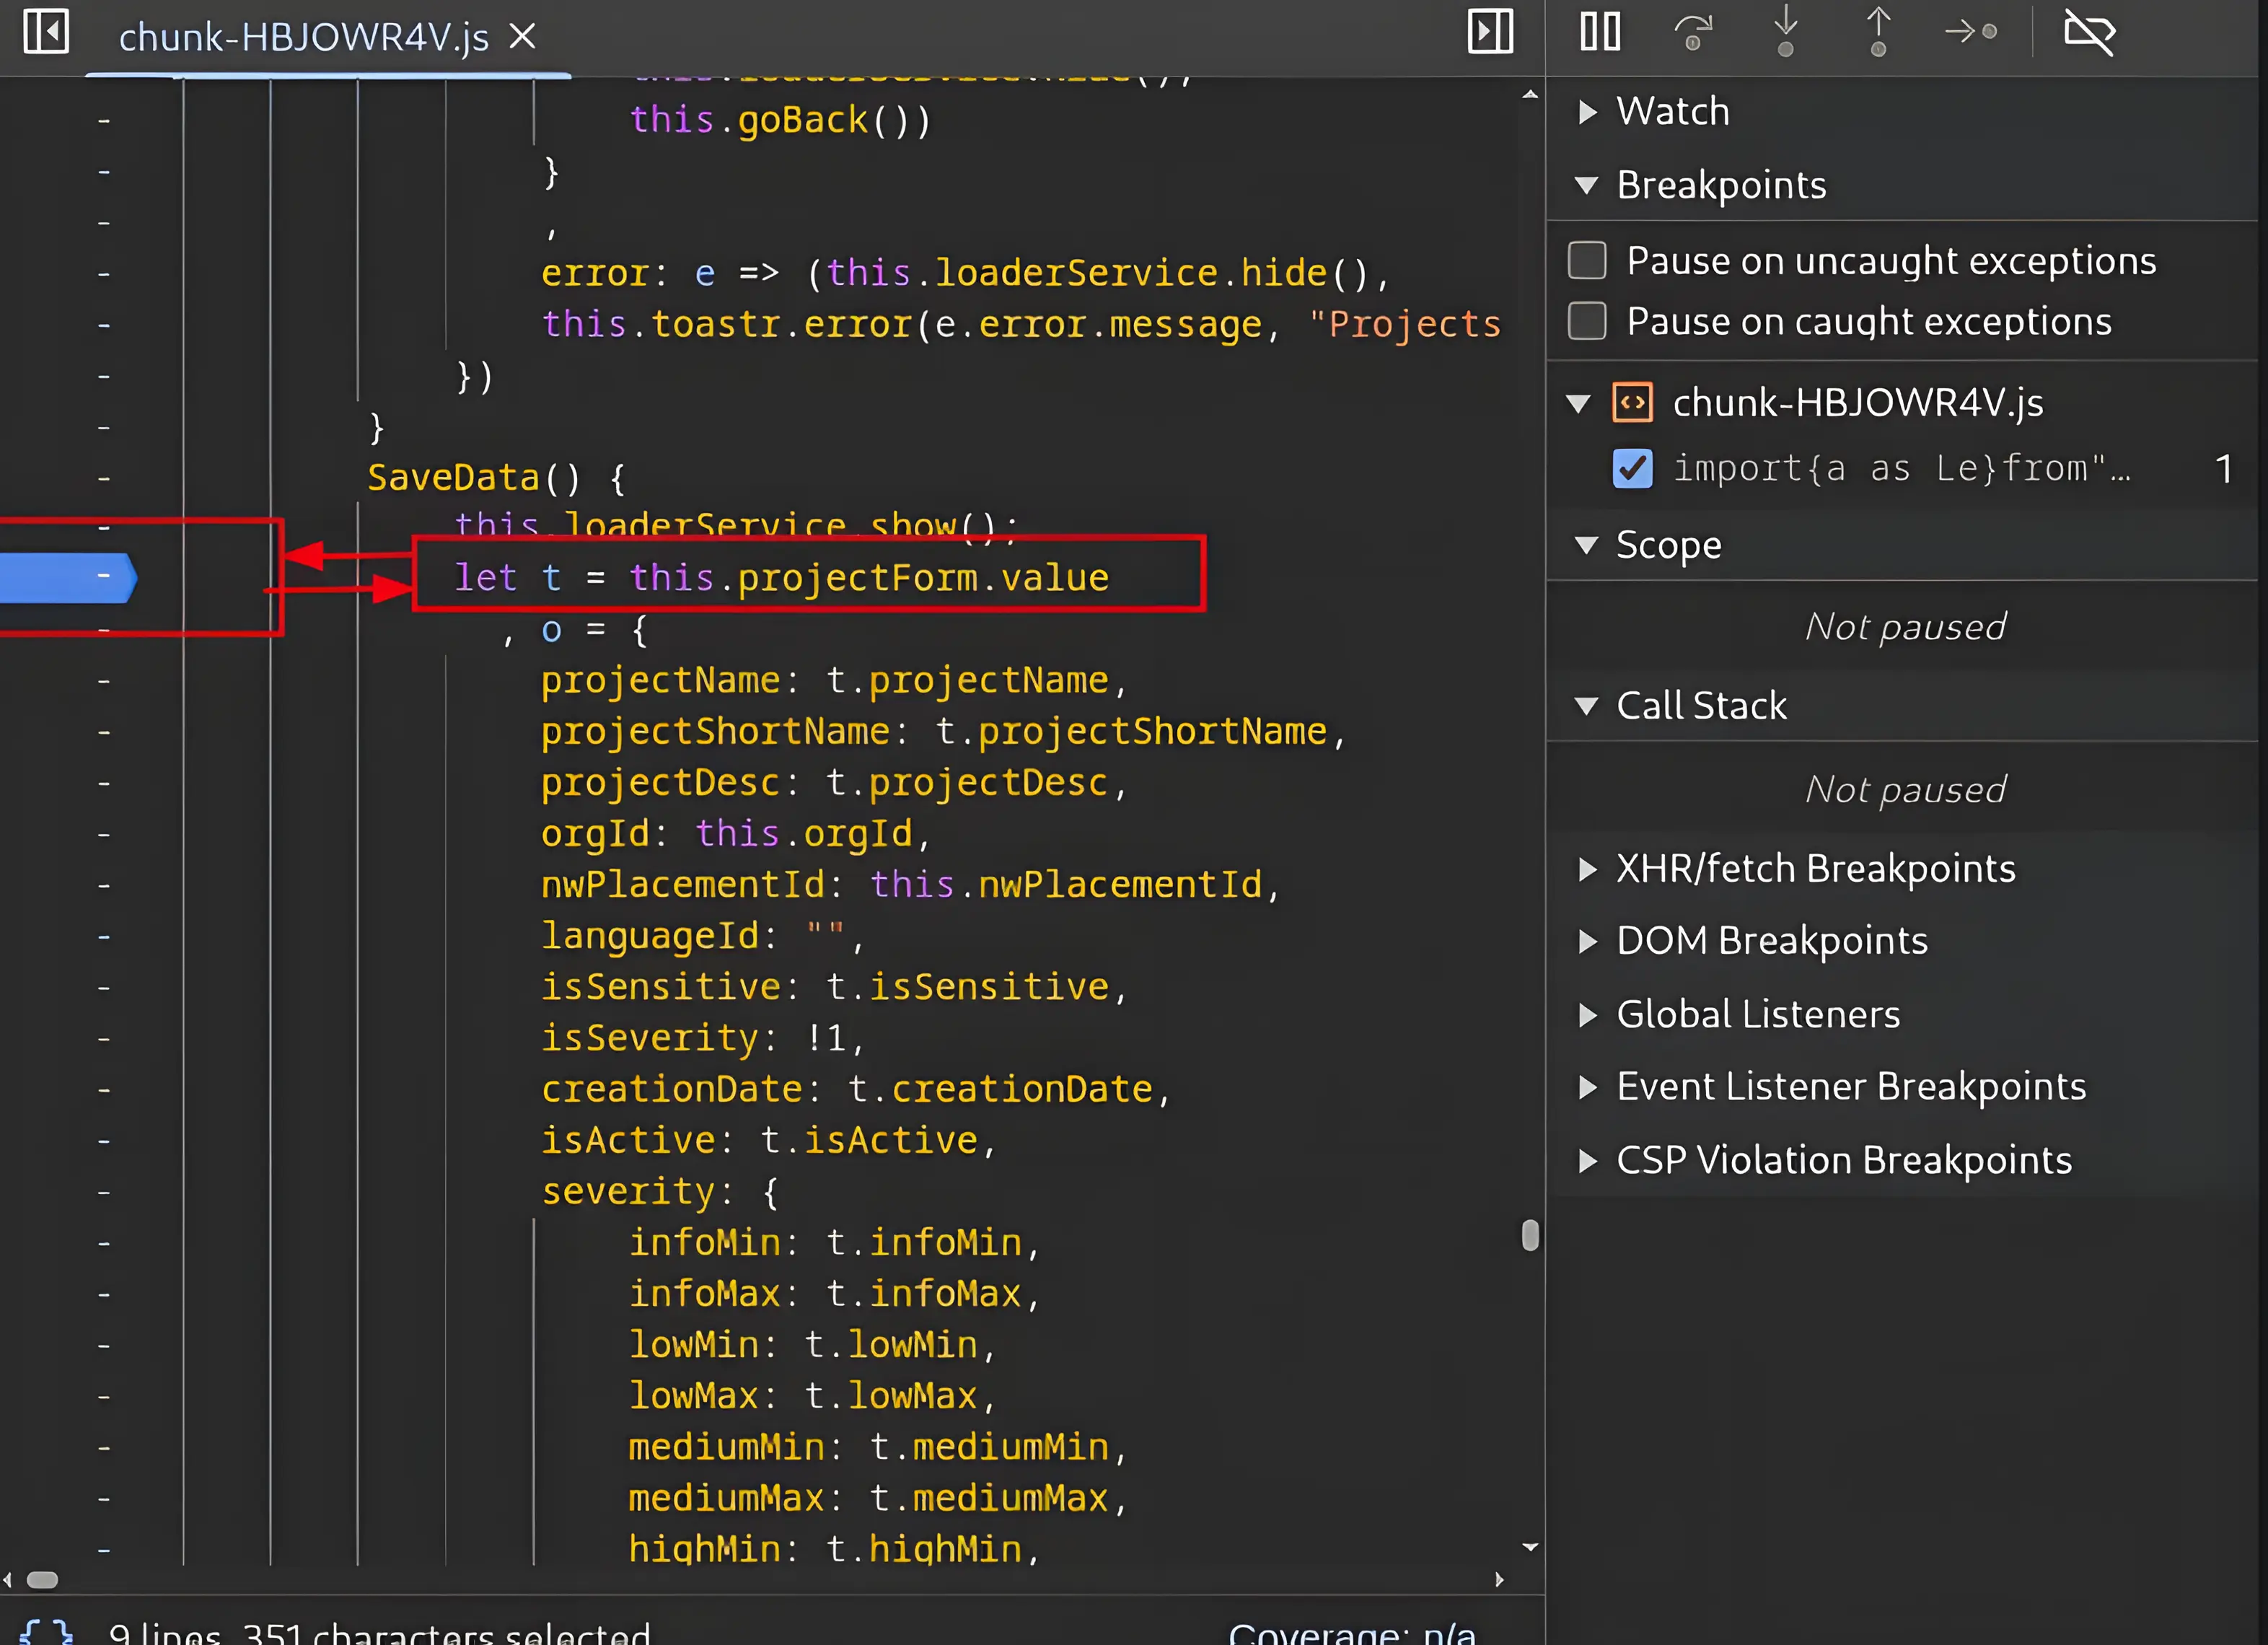
I have set the debug point at this line of code and will now manually submit the web application with random valid data to observe its behavior.
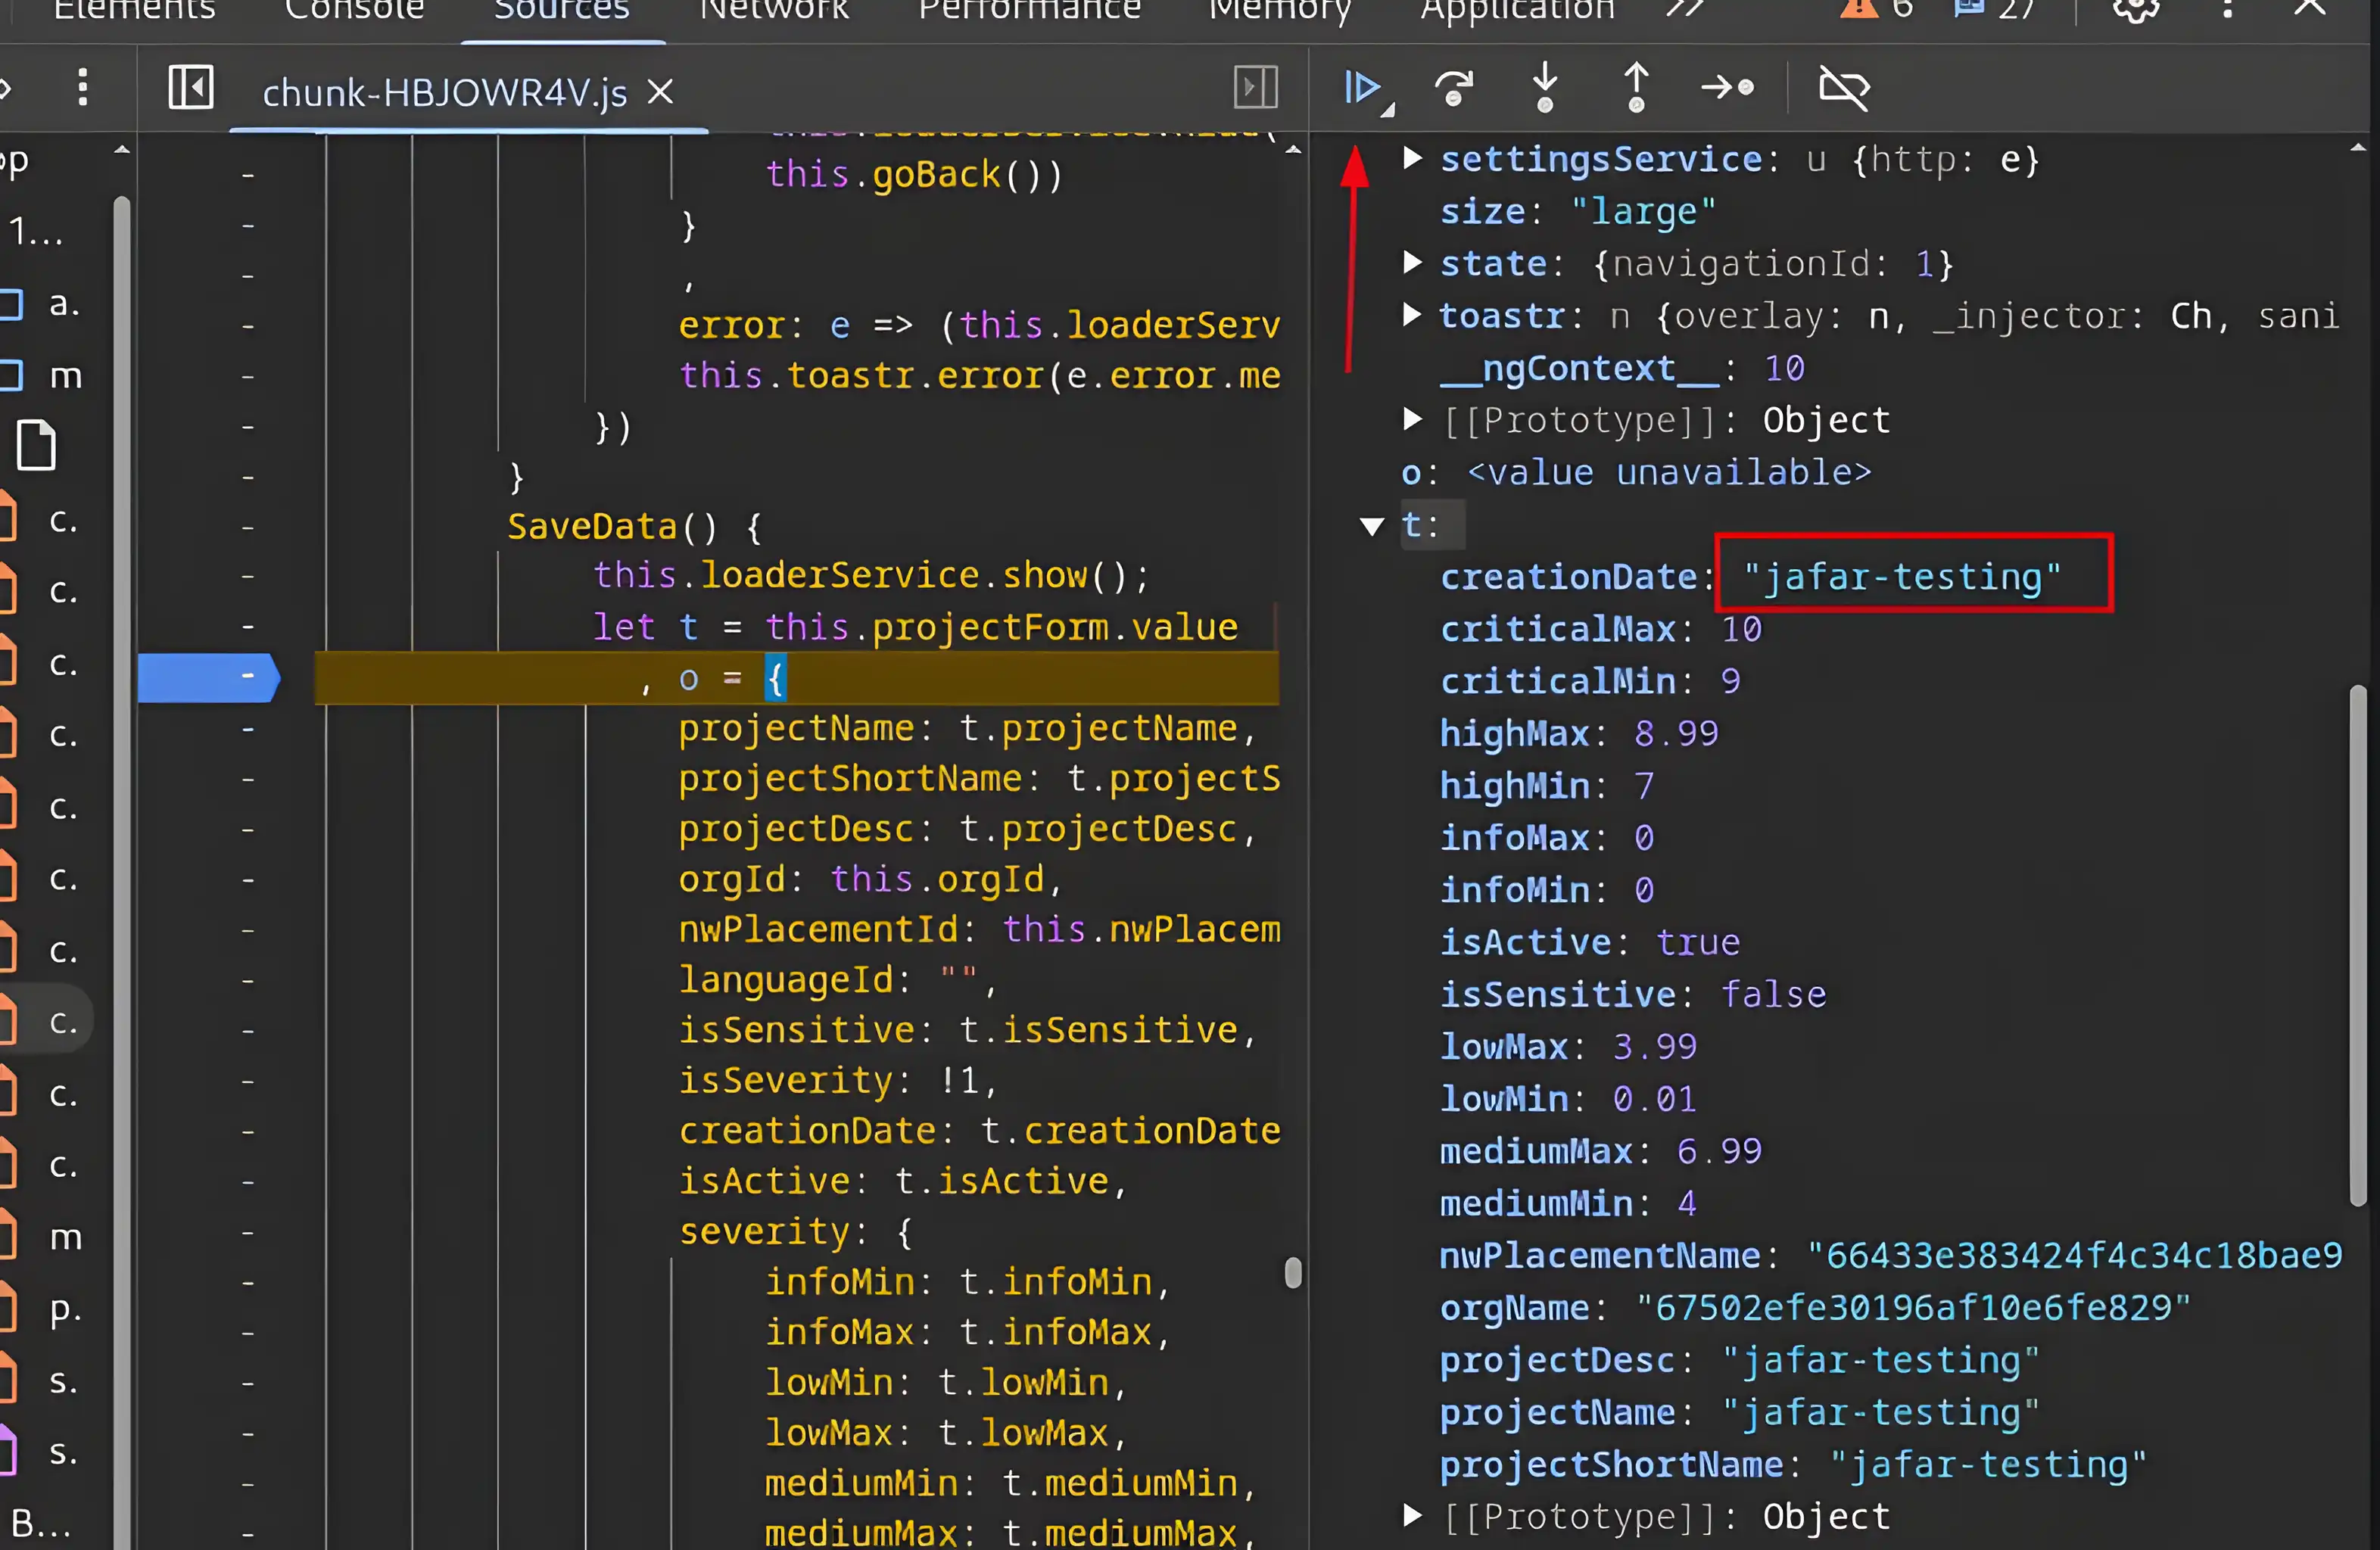
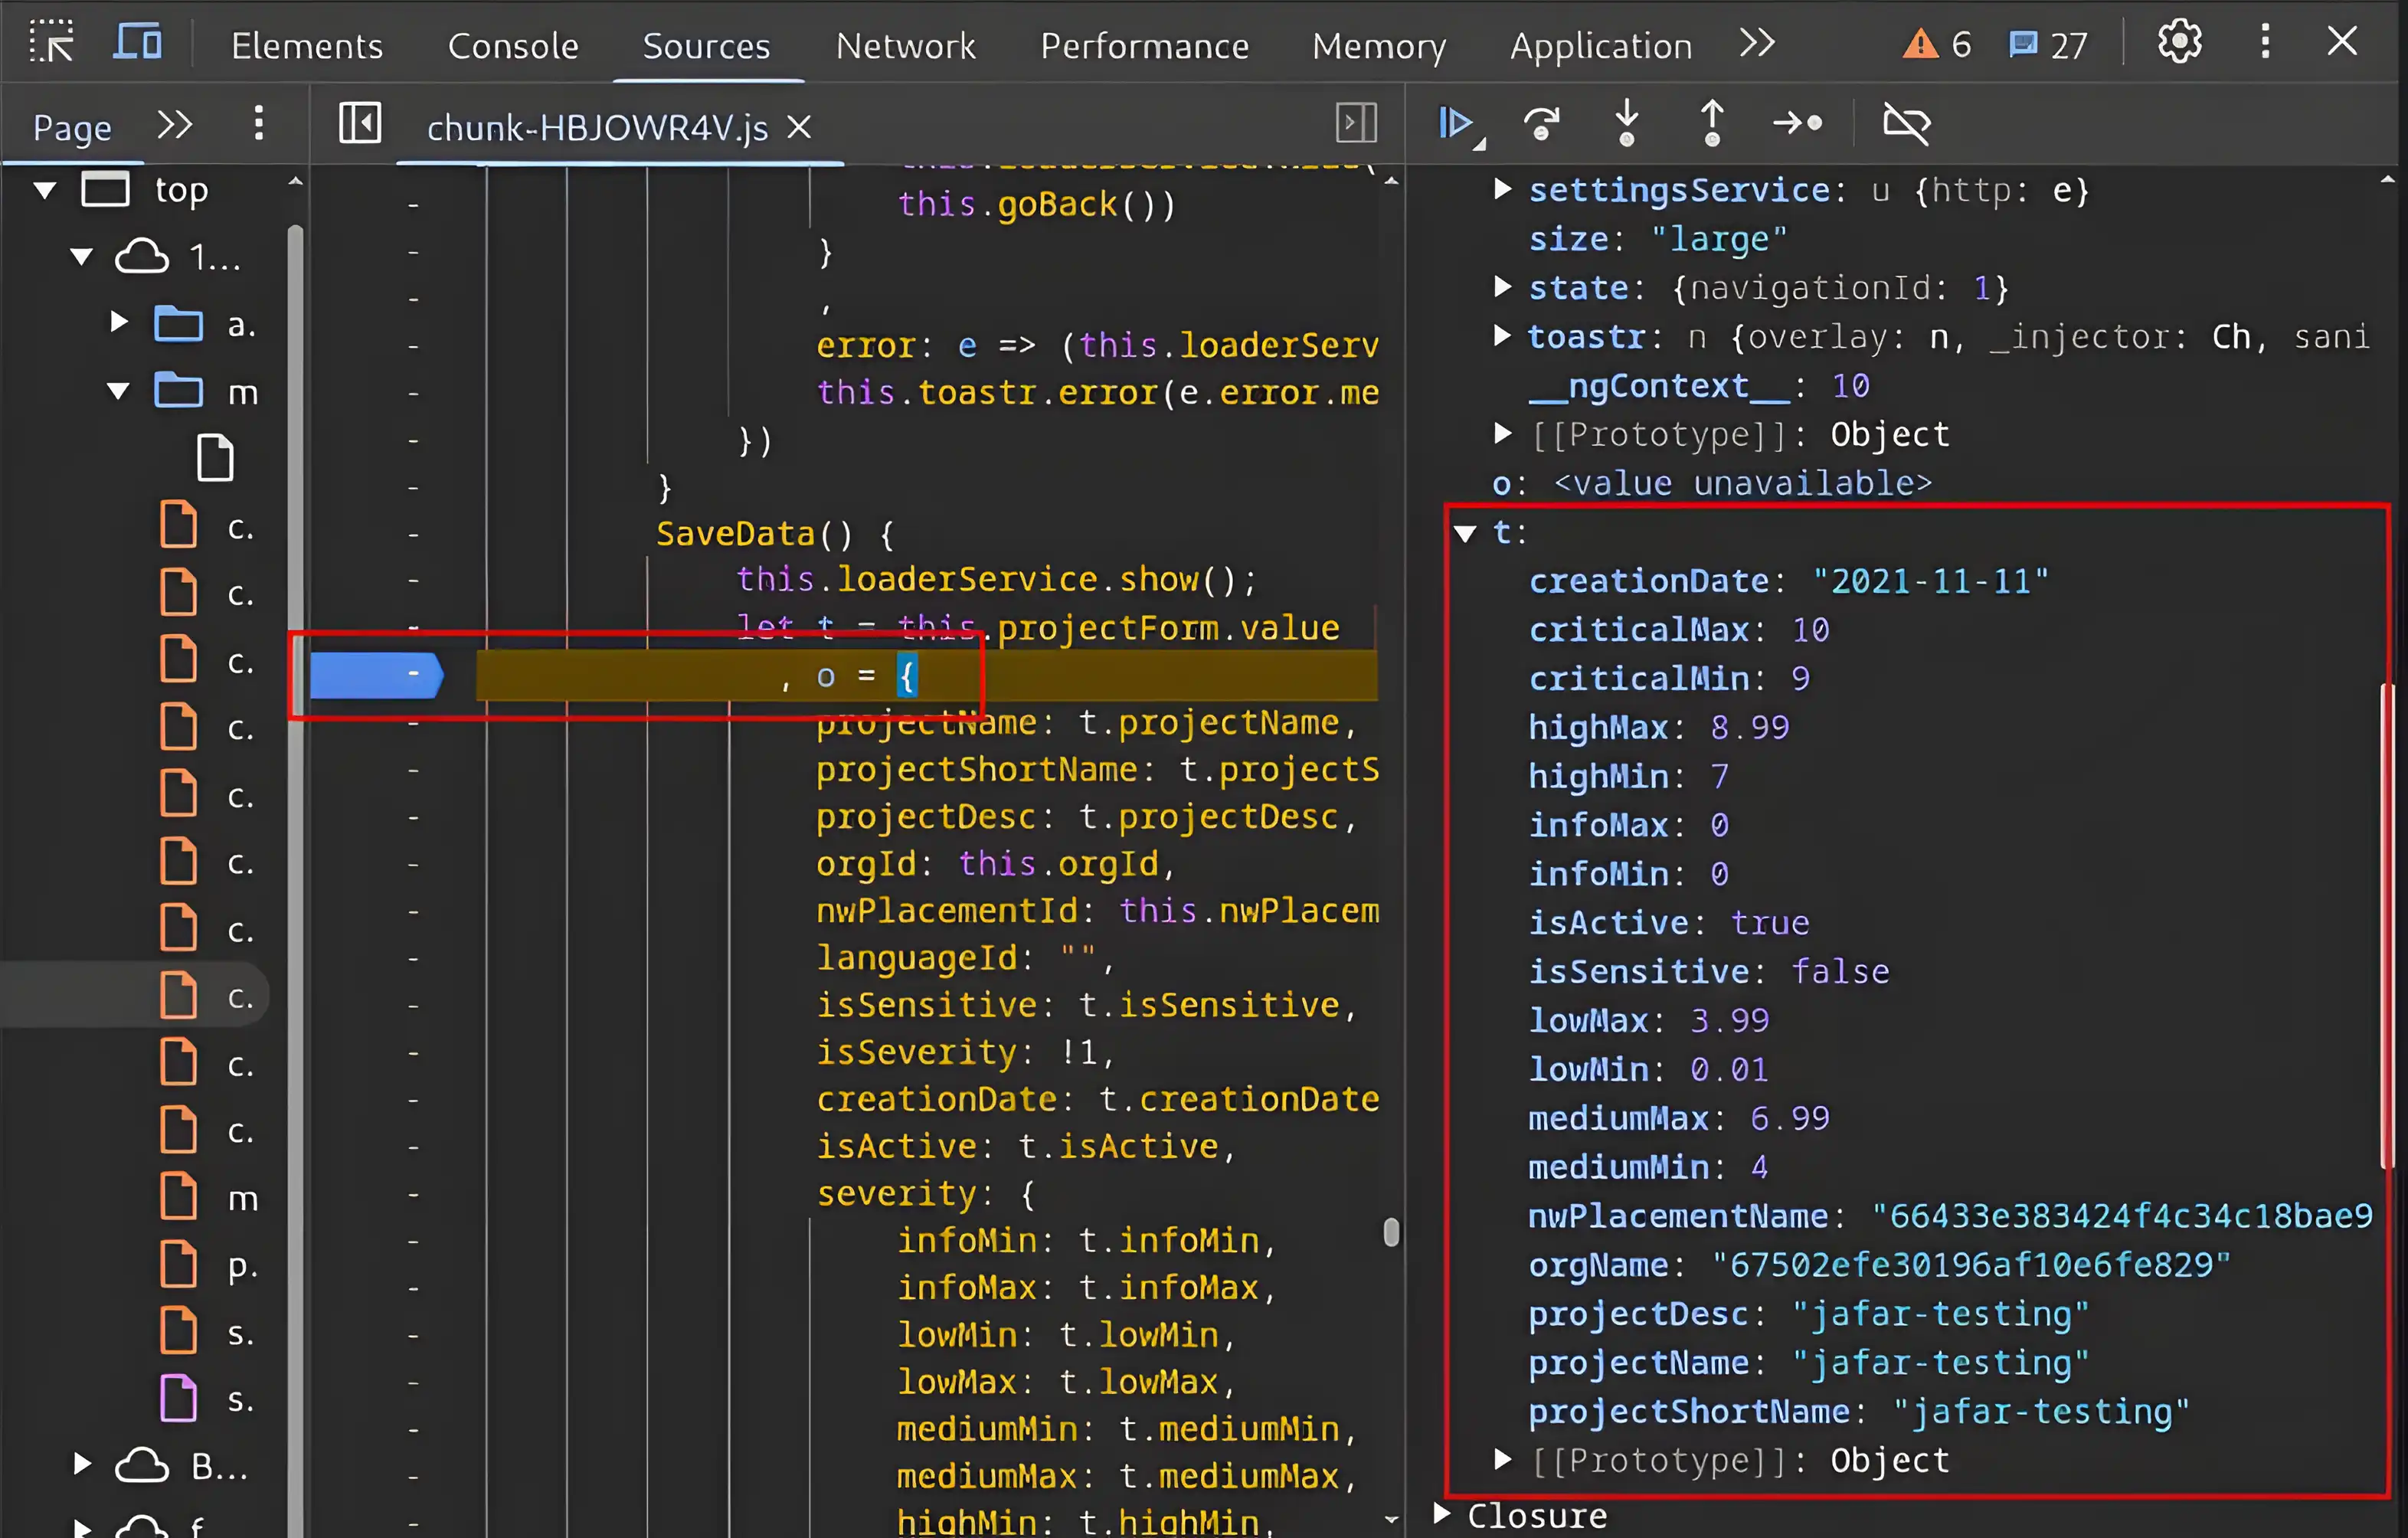
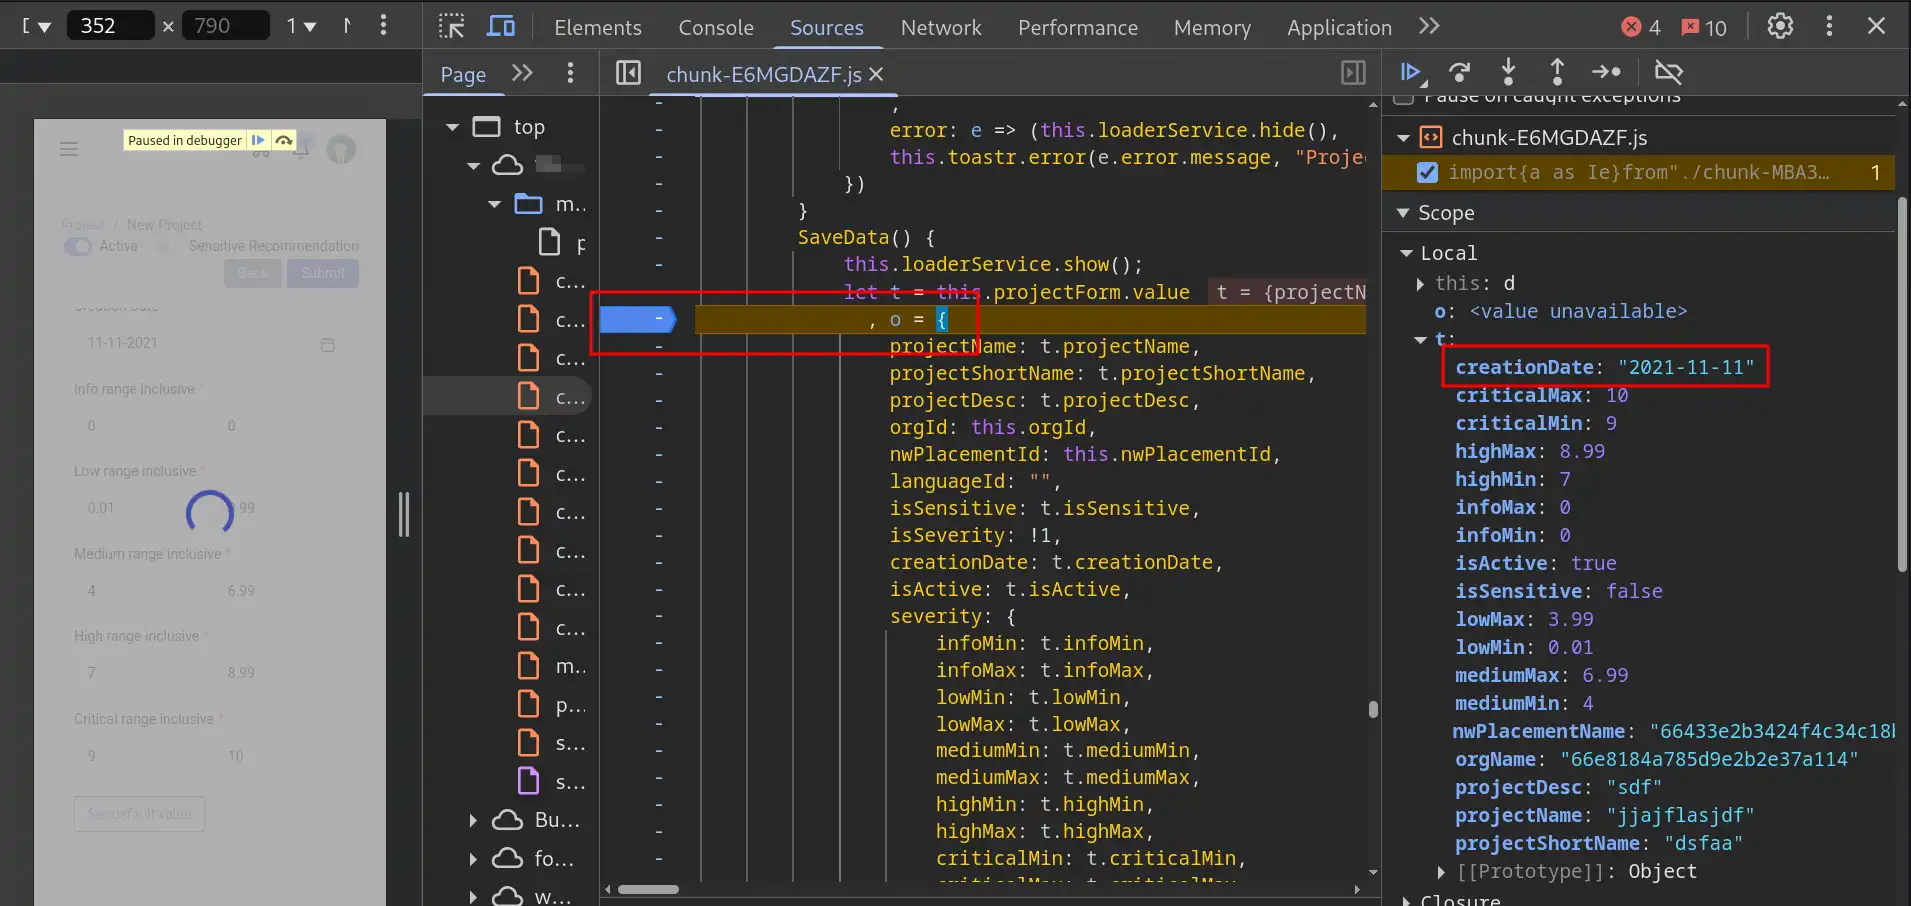
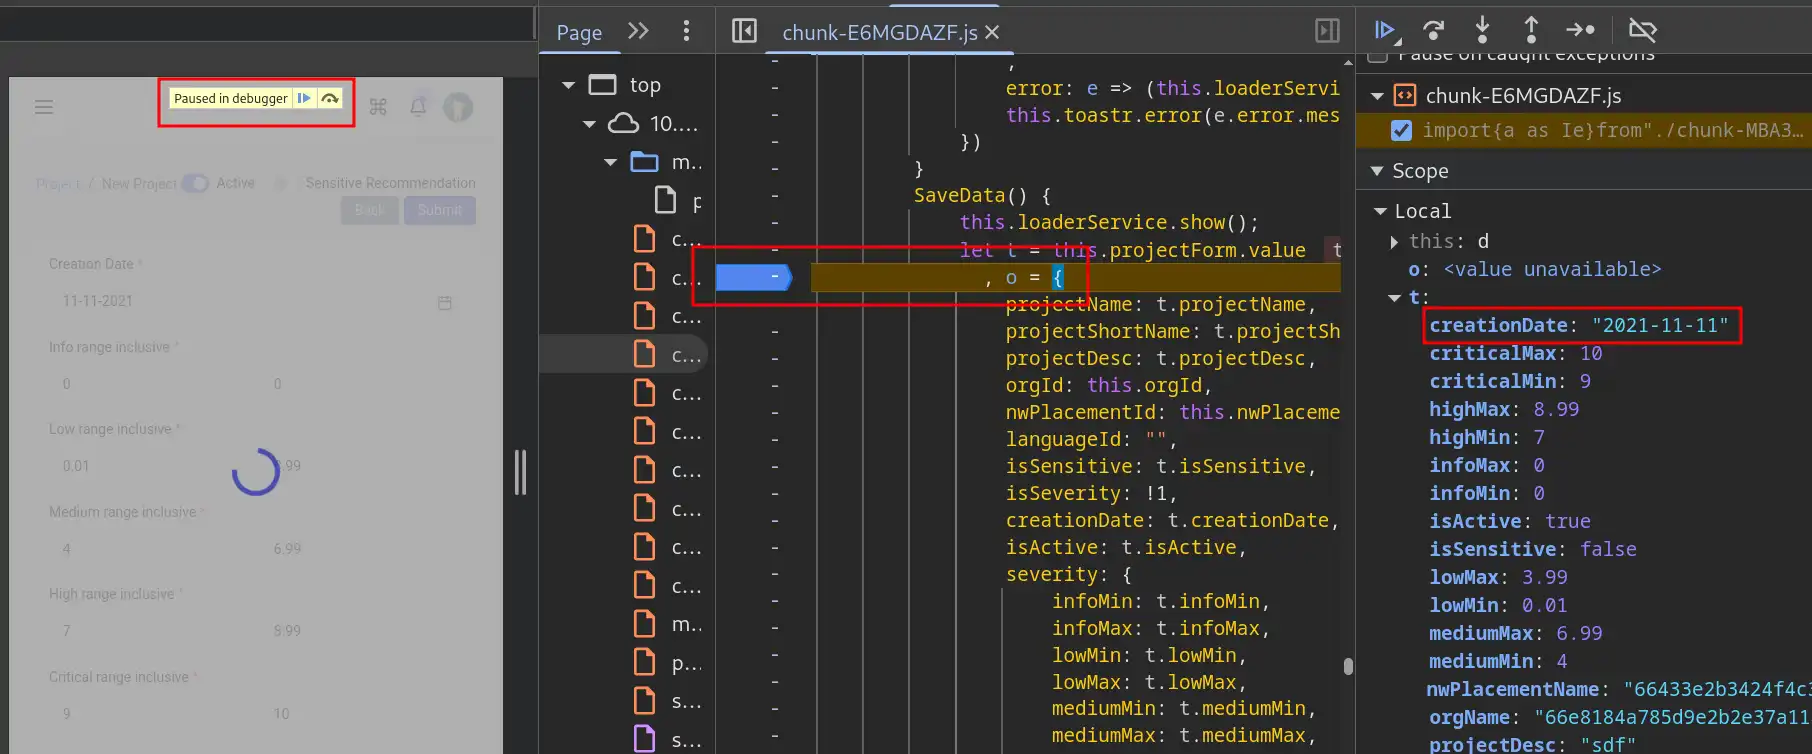
We got the result, but it isn’t satisfactory because the objects are too complex and this line of code is not immediately before the form is submitted. Let’s set the debug point to the next line to get less complex objects for fuzzing.

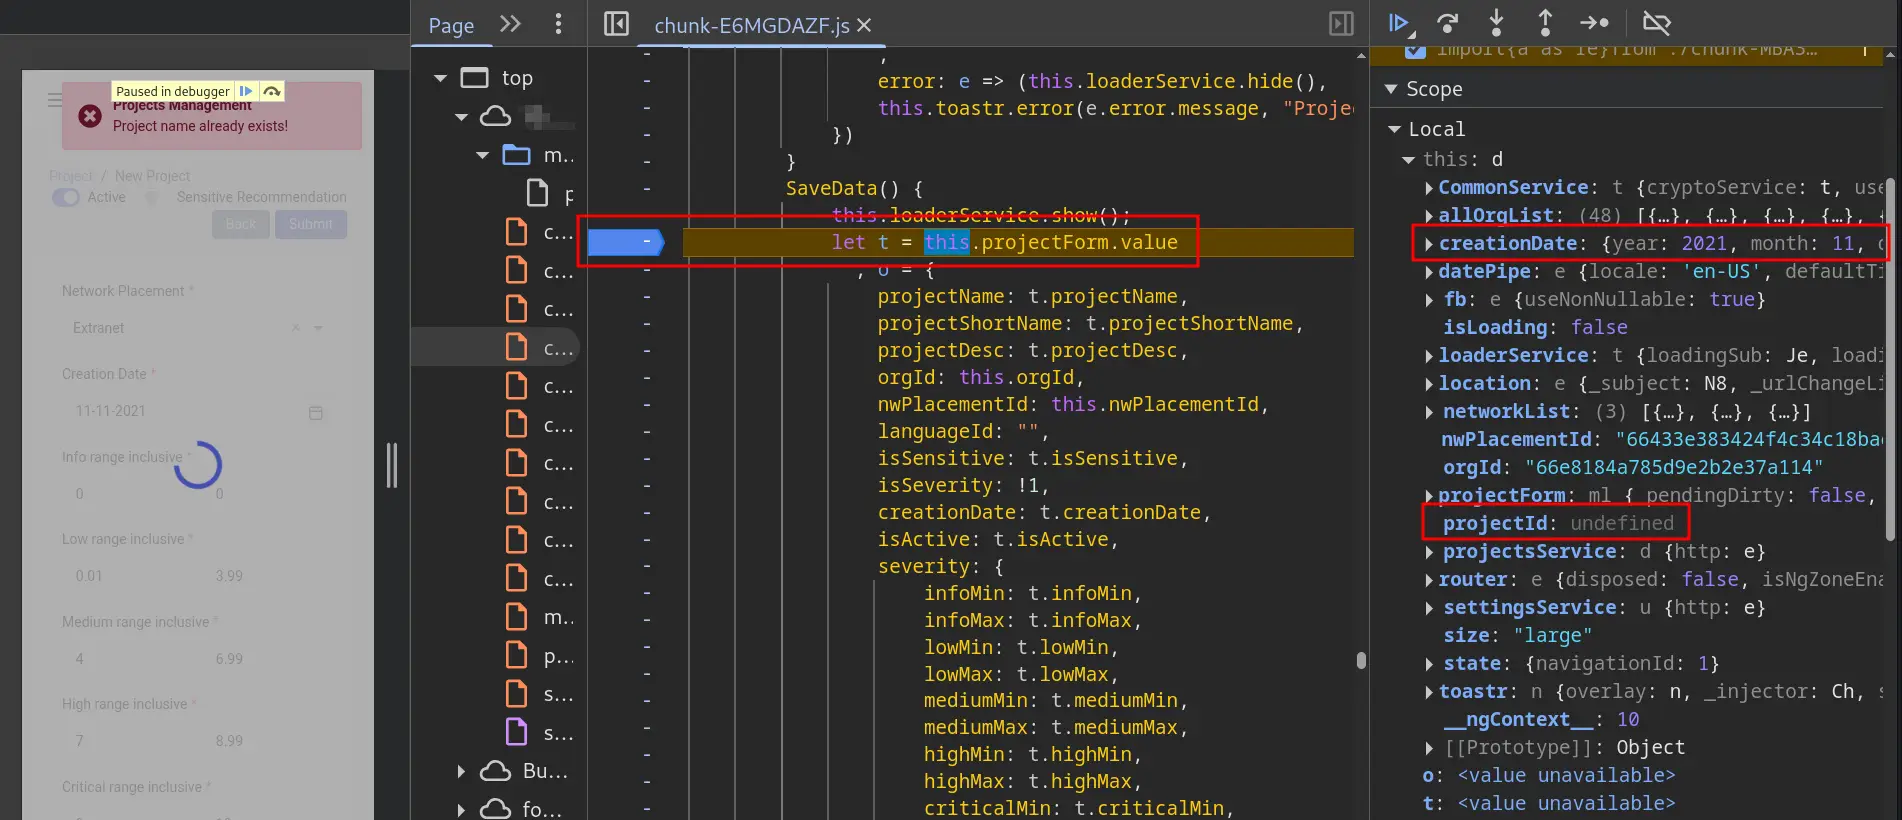
This one is much more promising — a true gem!. The object t, as shown above, contains all the properties present in the form that are being submitted to the backend server.
Why is this so important, you might ask? Well, because it allows us to modify these properties. For example, I can manually change the value of creationDate, which is supposed to be a date, to some malformed input. If the backend fails to properly validate it, the malformed data will be successfully submitted to the web application.
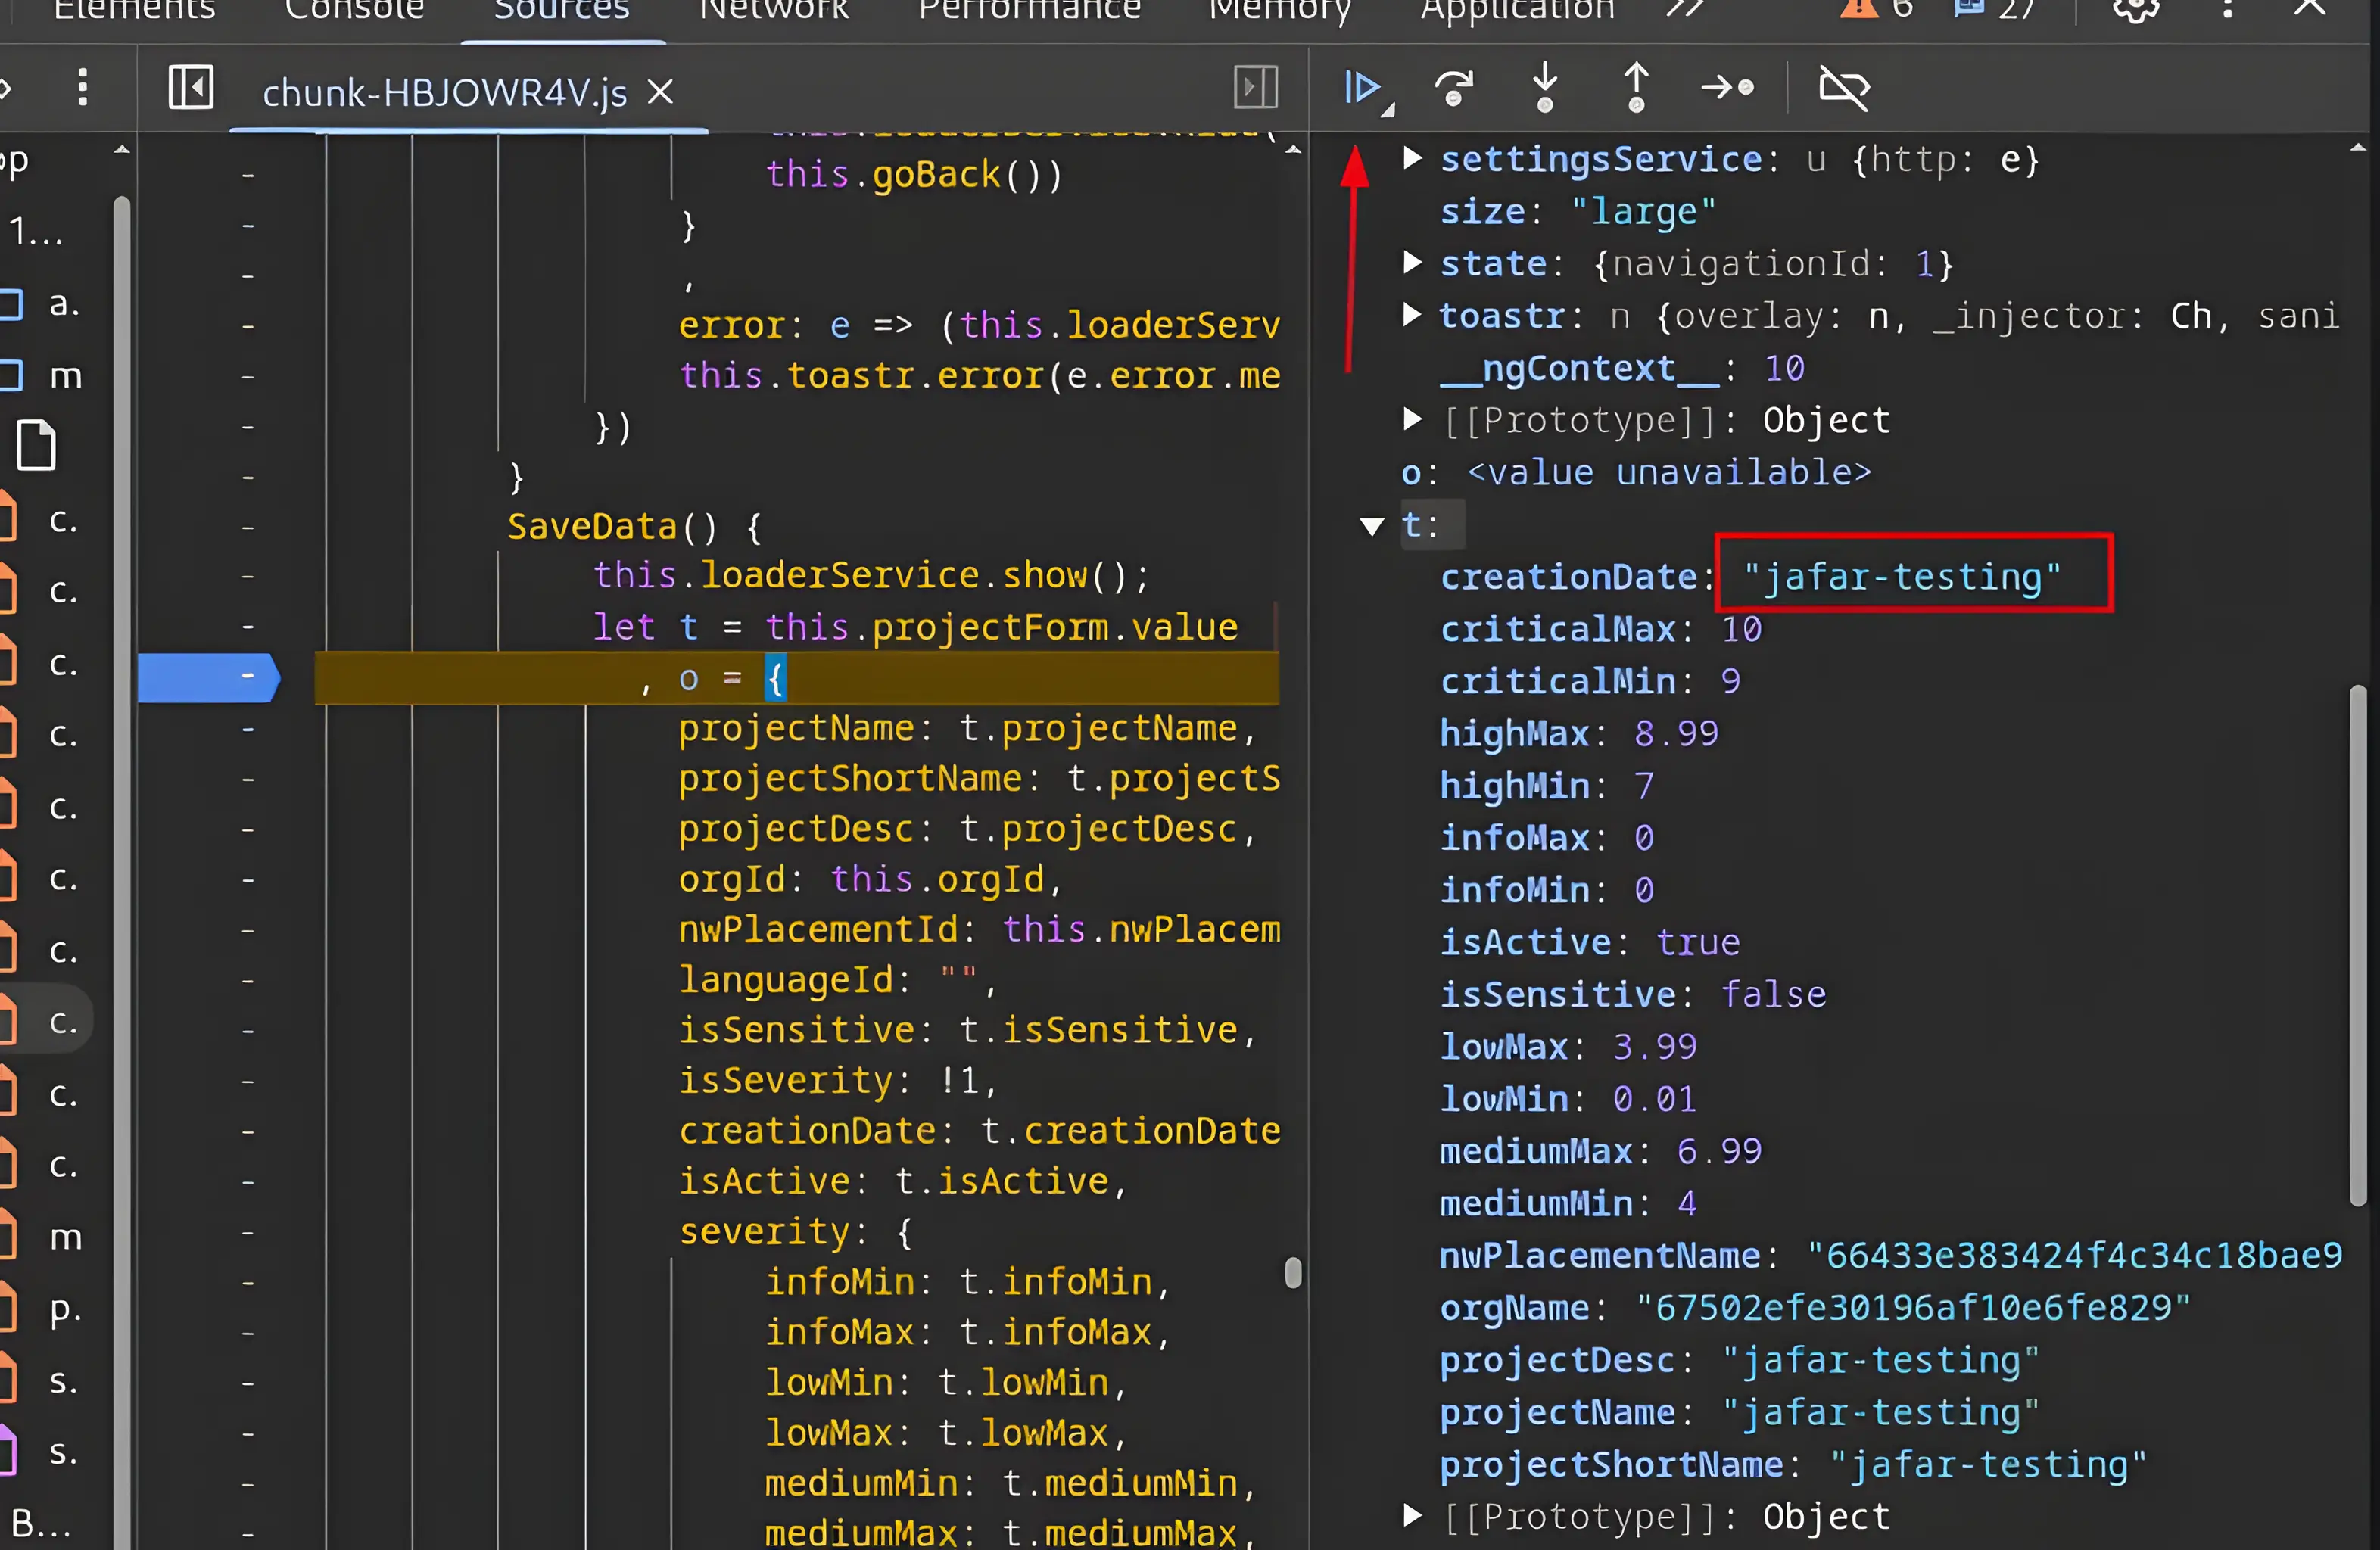
We got the error ->
But here’s the point: we successfully submitted the data, and although the error confirms that the backend has proper input validation, we still managed to bypass the front-end validation.
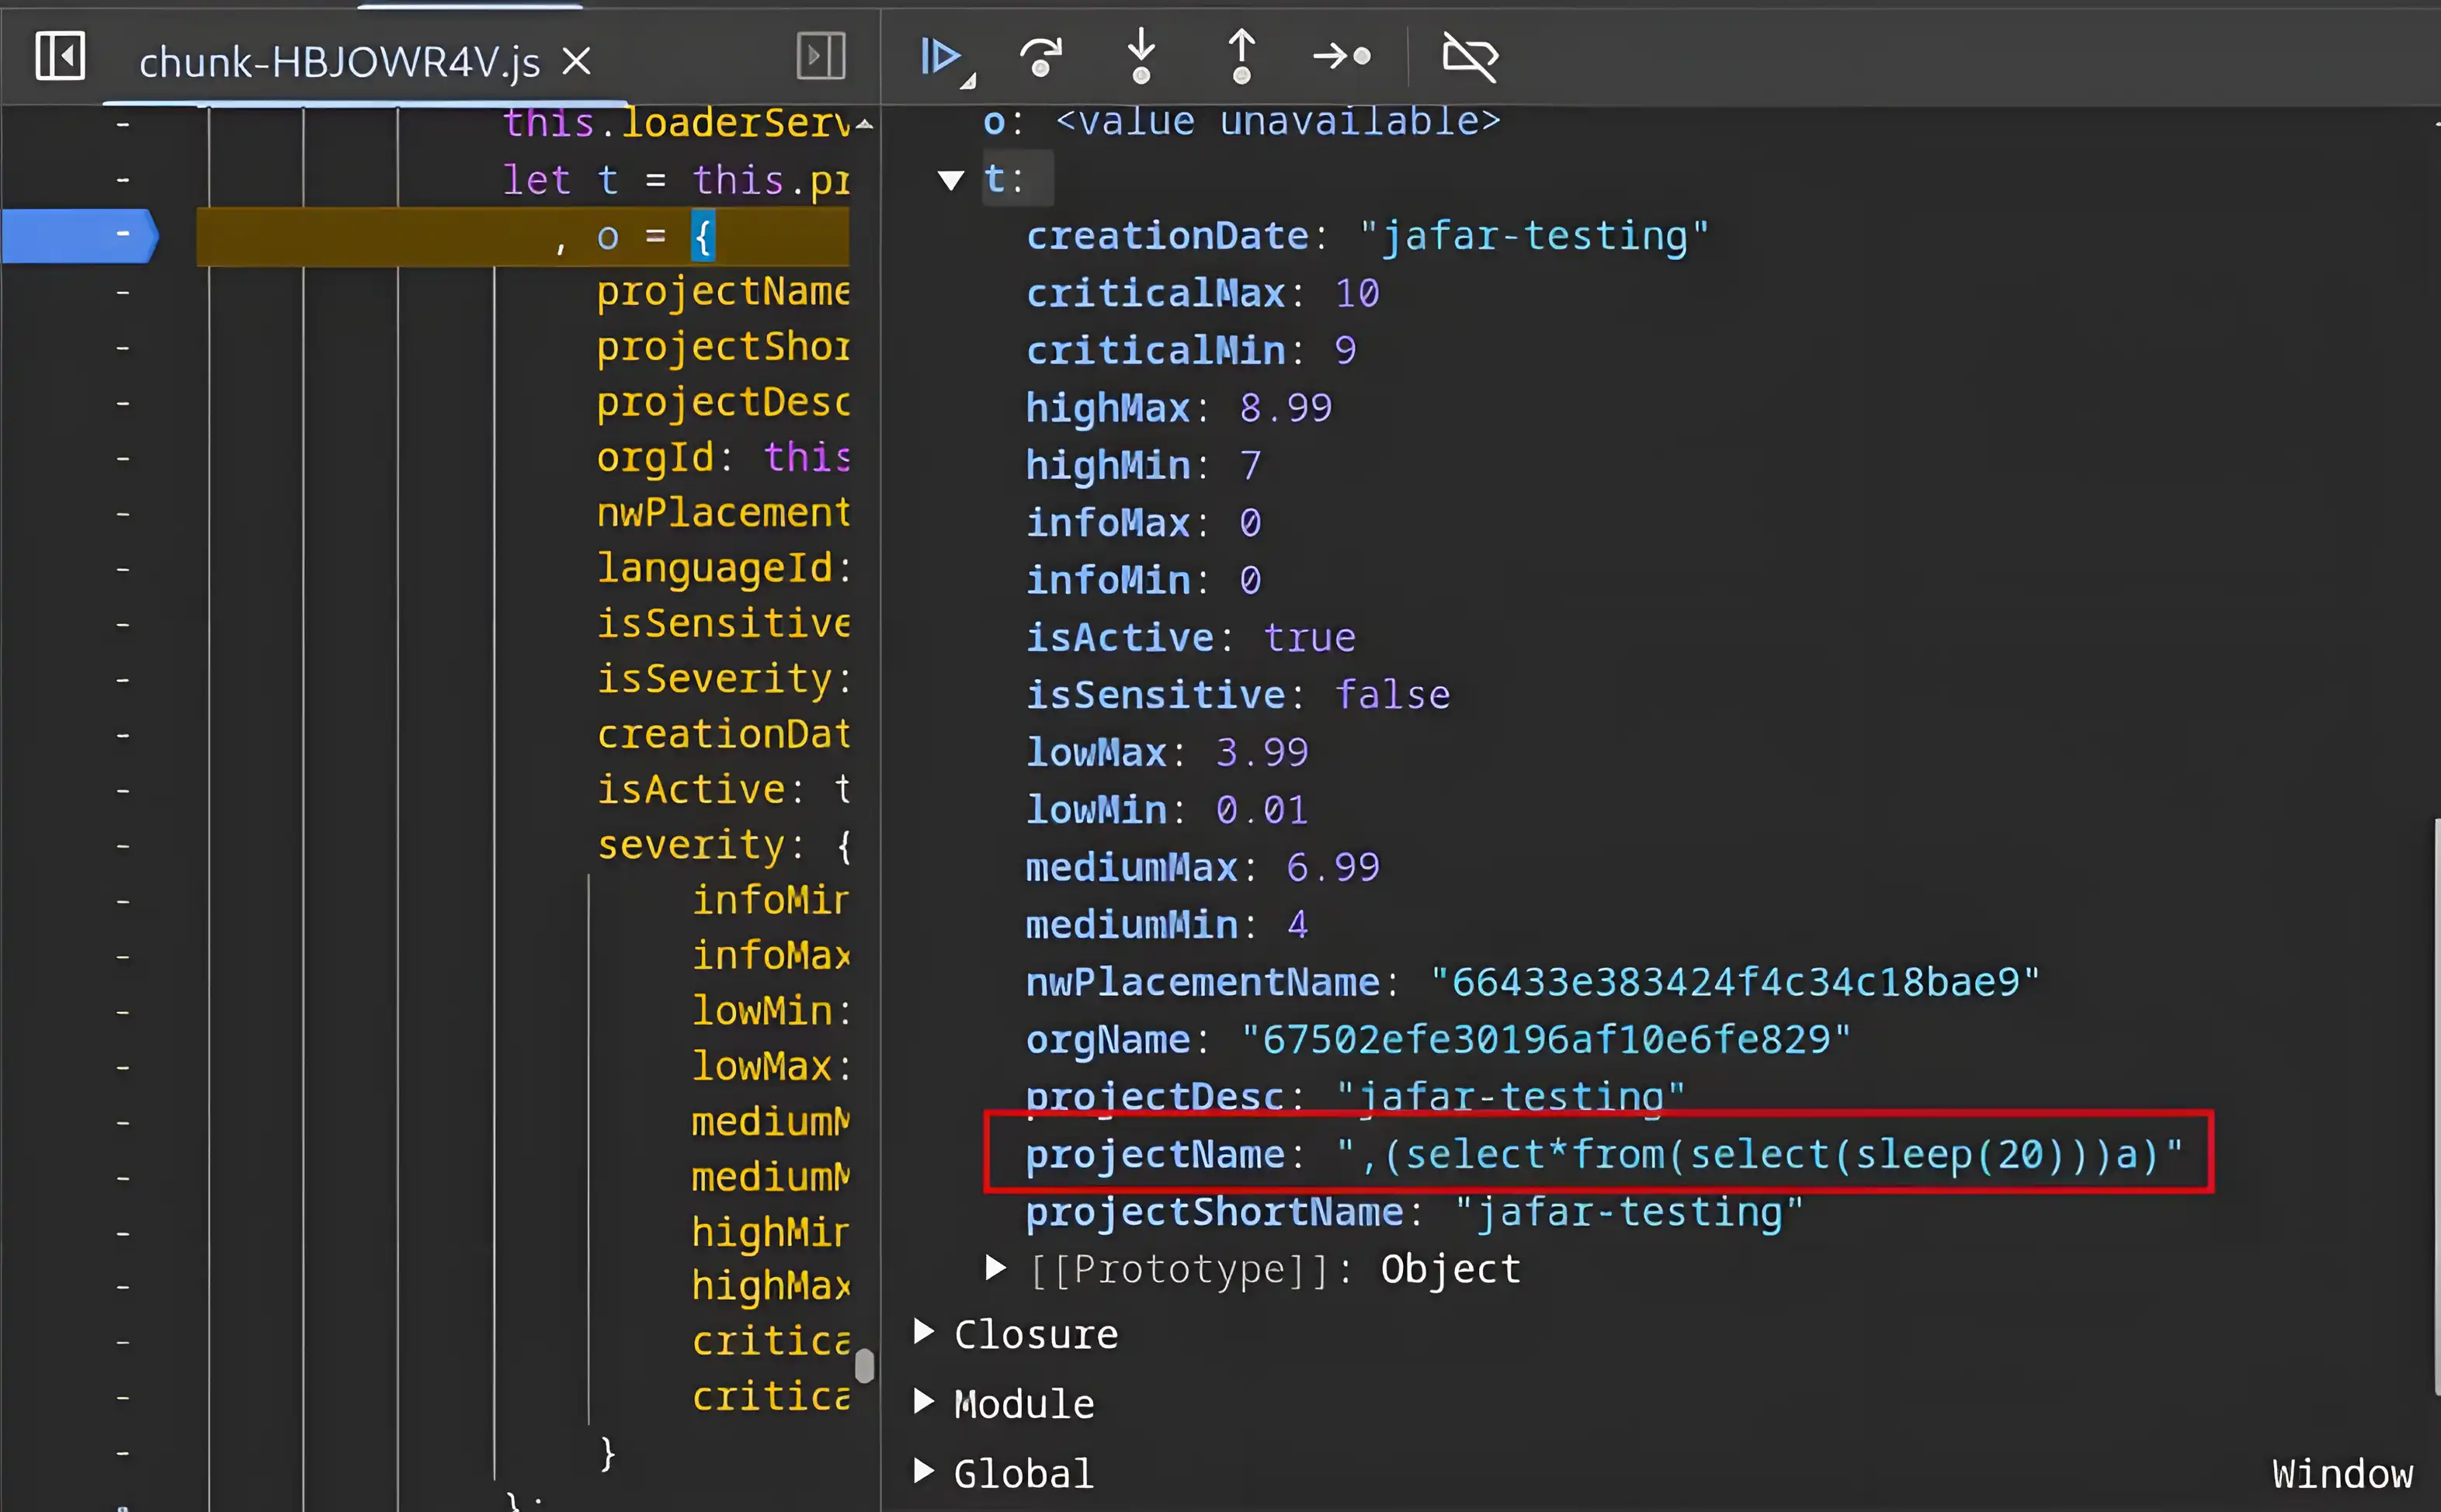
Let’s try setting a different property to the payload, as shown in the image above.
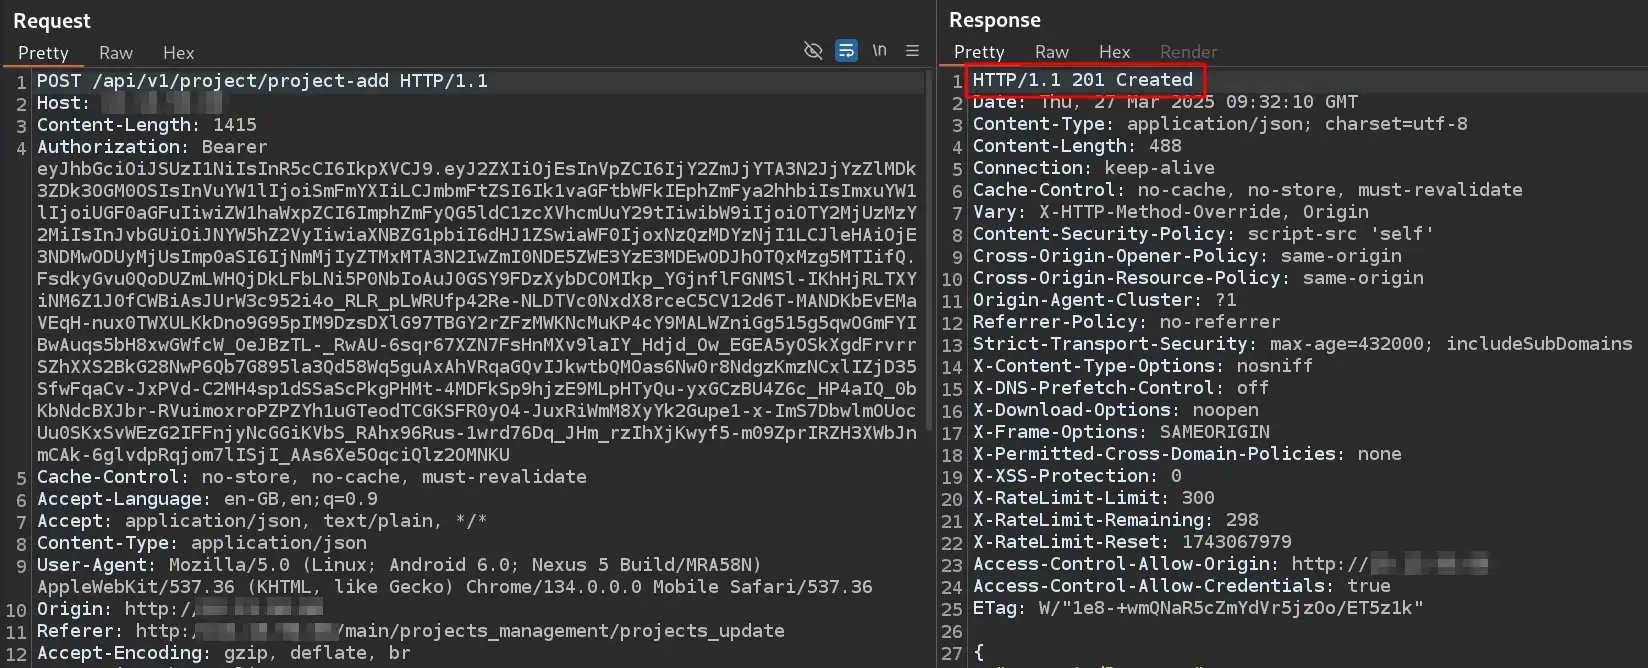
We received a successful response, which can also be observed in the front-end UI.
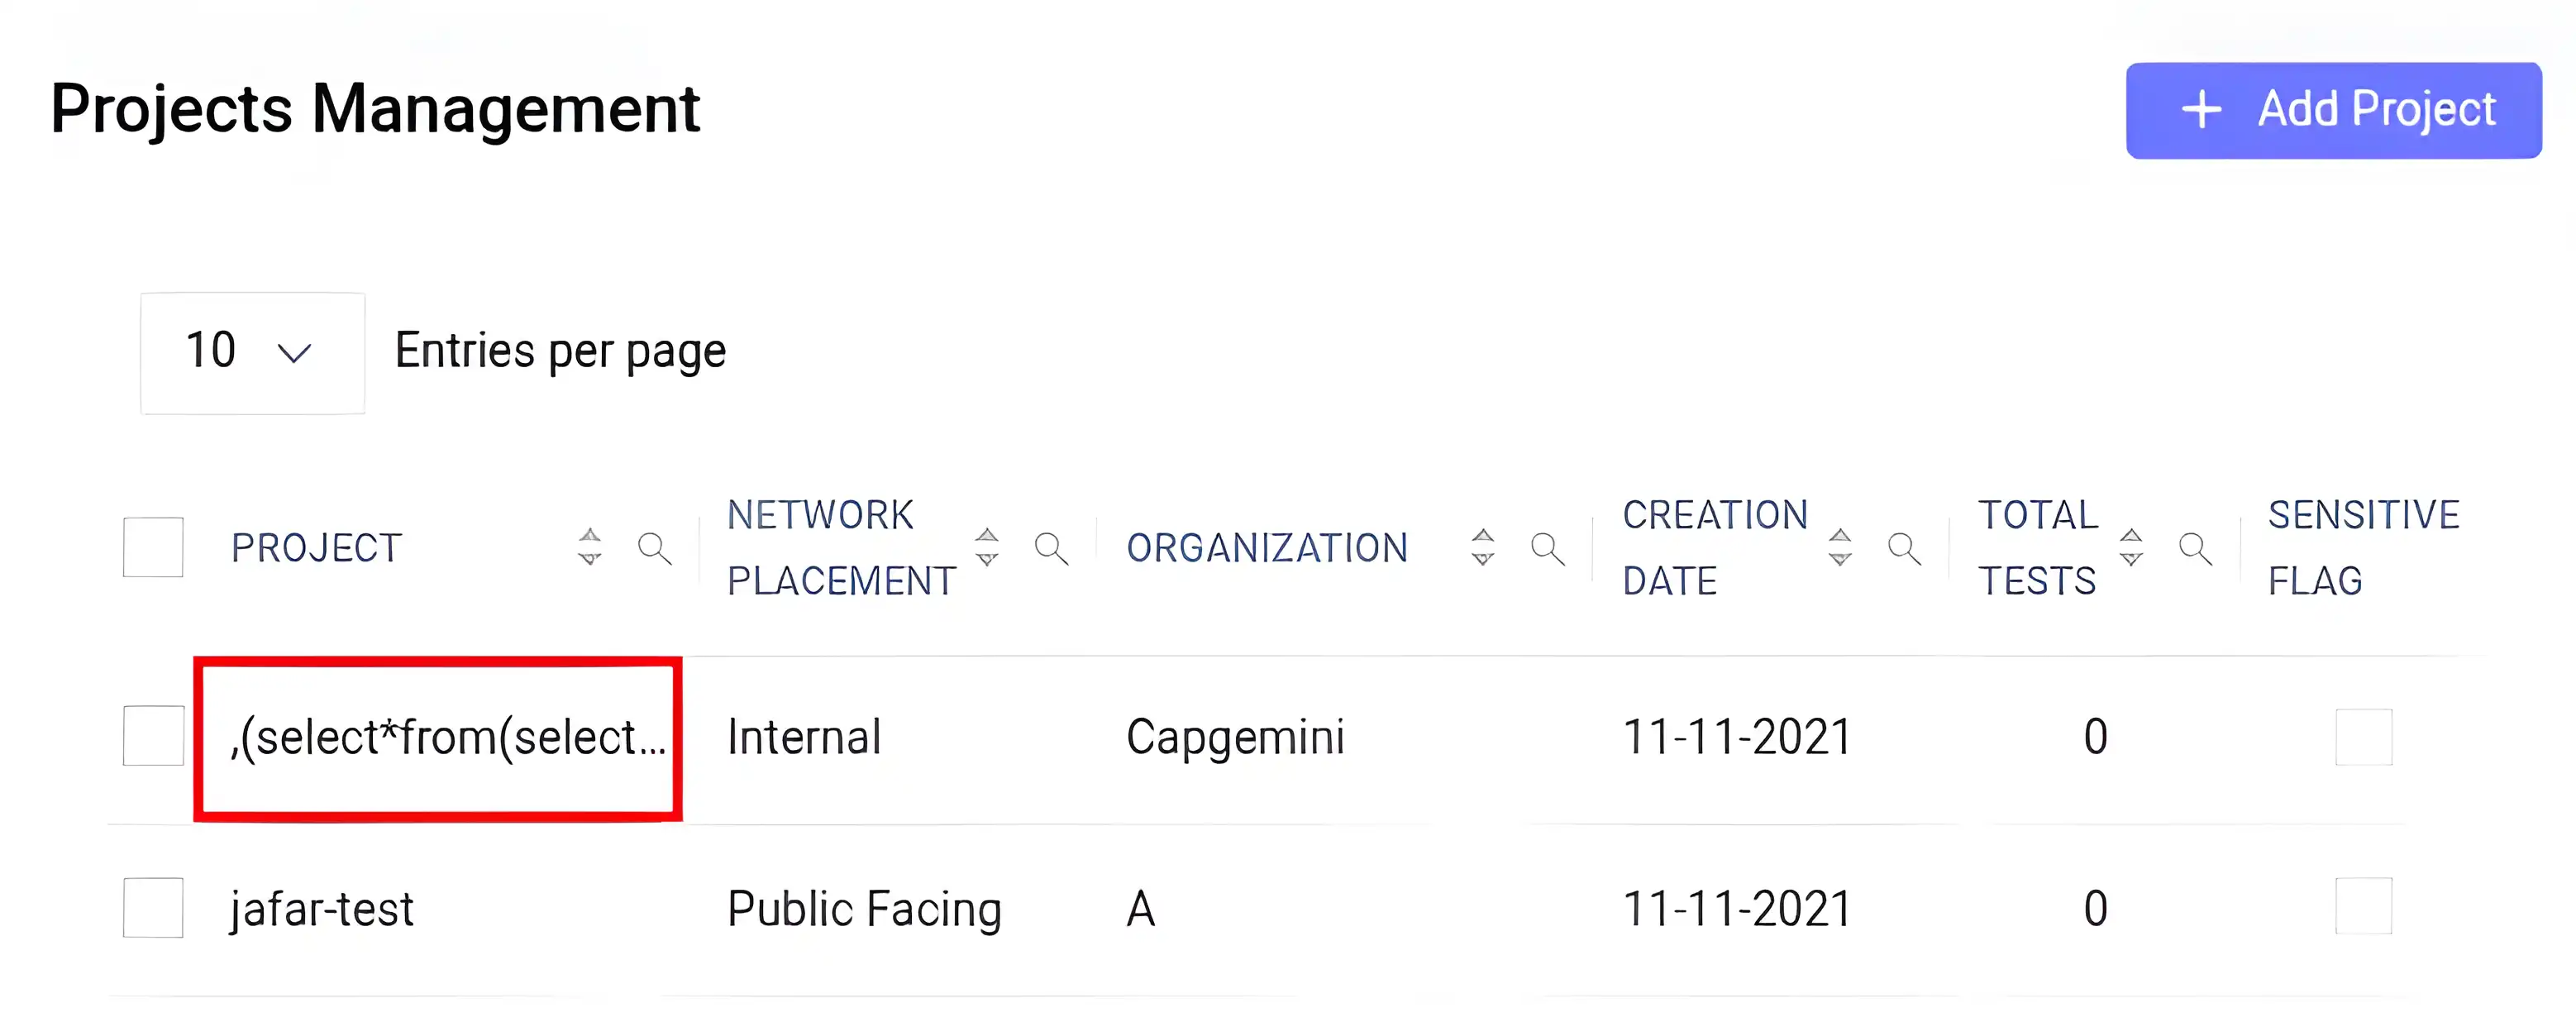
We have successfully bypassed the front-end and added a project with malformed payload as it’s name.
Automating This Manual Process of Debugging and Fuzzing
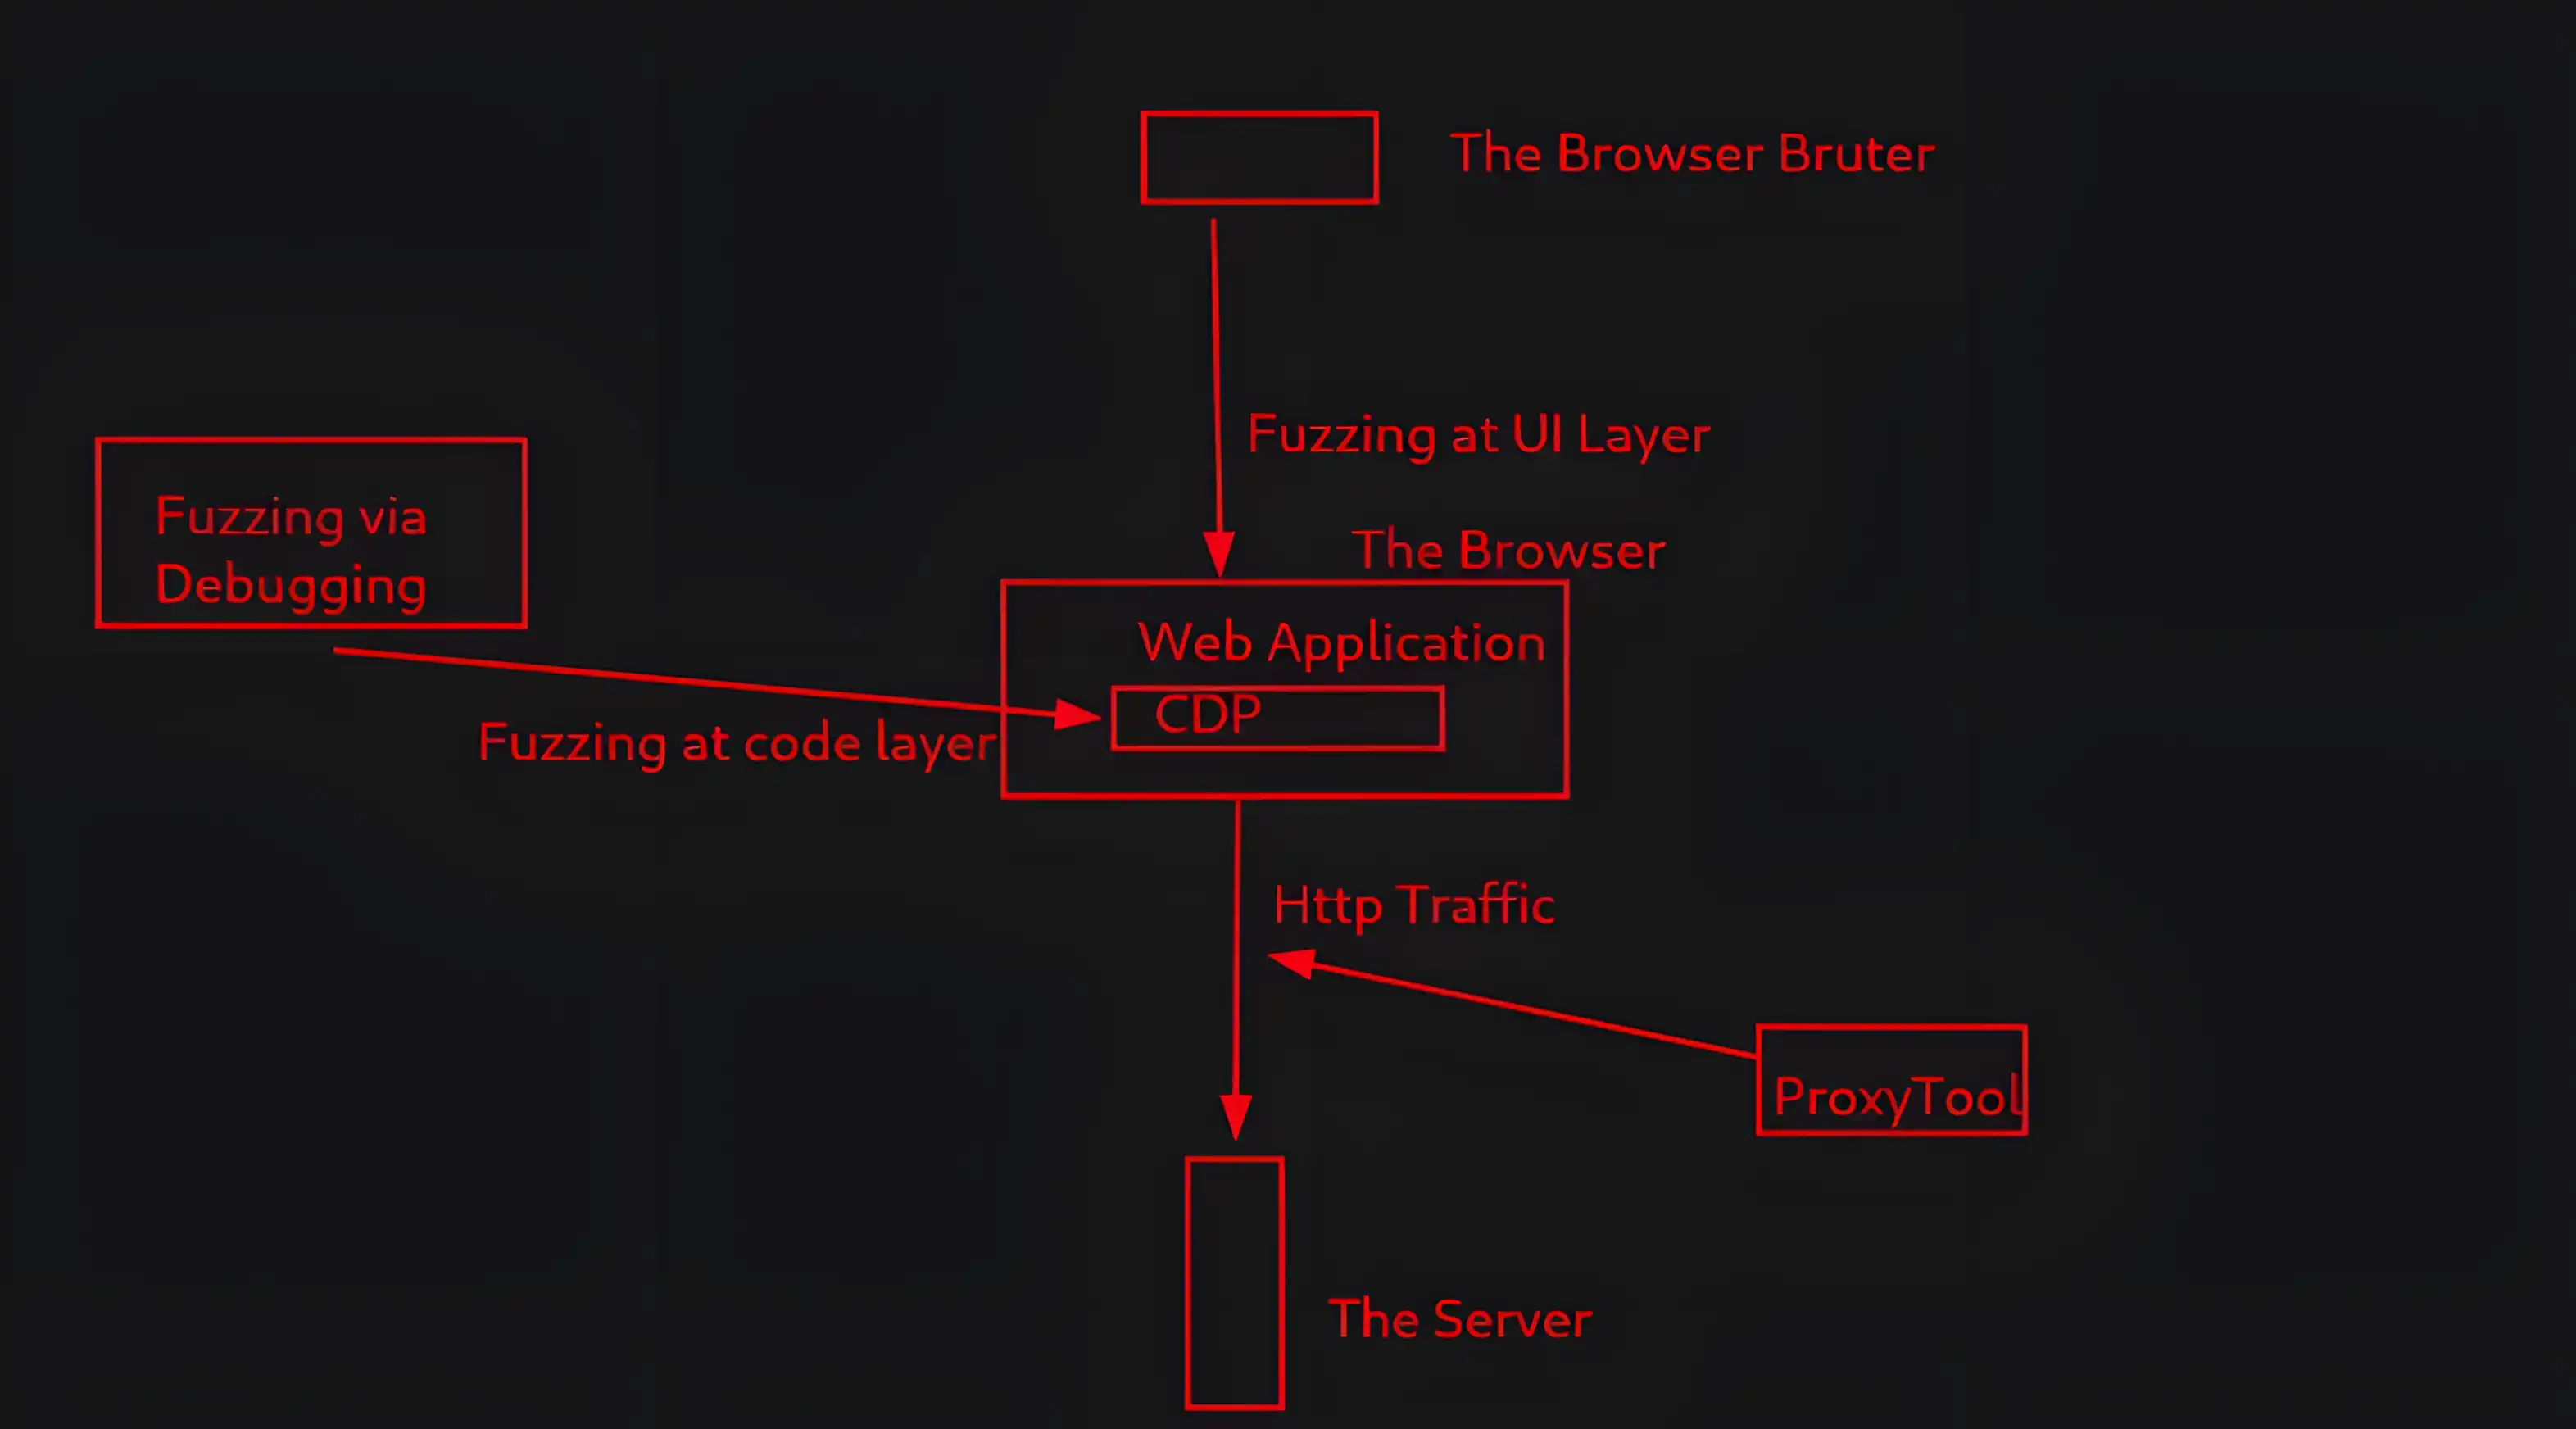
These are the exact steps we followed in the previous section. Browser Bruter’s fuzzing via the debugging module allows us to scale and automate the process.
To achieve this, we will use the Chrome DevTools Protocol (CDP). Browser Bruter will establish a connection with CDP and send various commands to it, performing the desired operations while the web application is stopped at a breakpoint.
1. Setting a Breakpoint Using --debug:
We have identified the file and the line of code (LOC) where we need to set the debug breakpoint. However, the challenge is that most files are minified and consist of single-line code, as shown in the image below.
It does not have a line number. However, we can easily overcome this by copying the file locally and replacing the original file with our local version, as shown below.
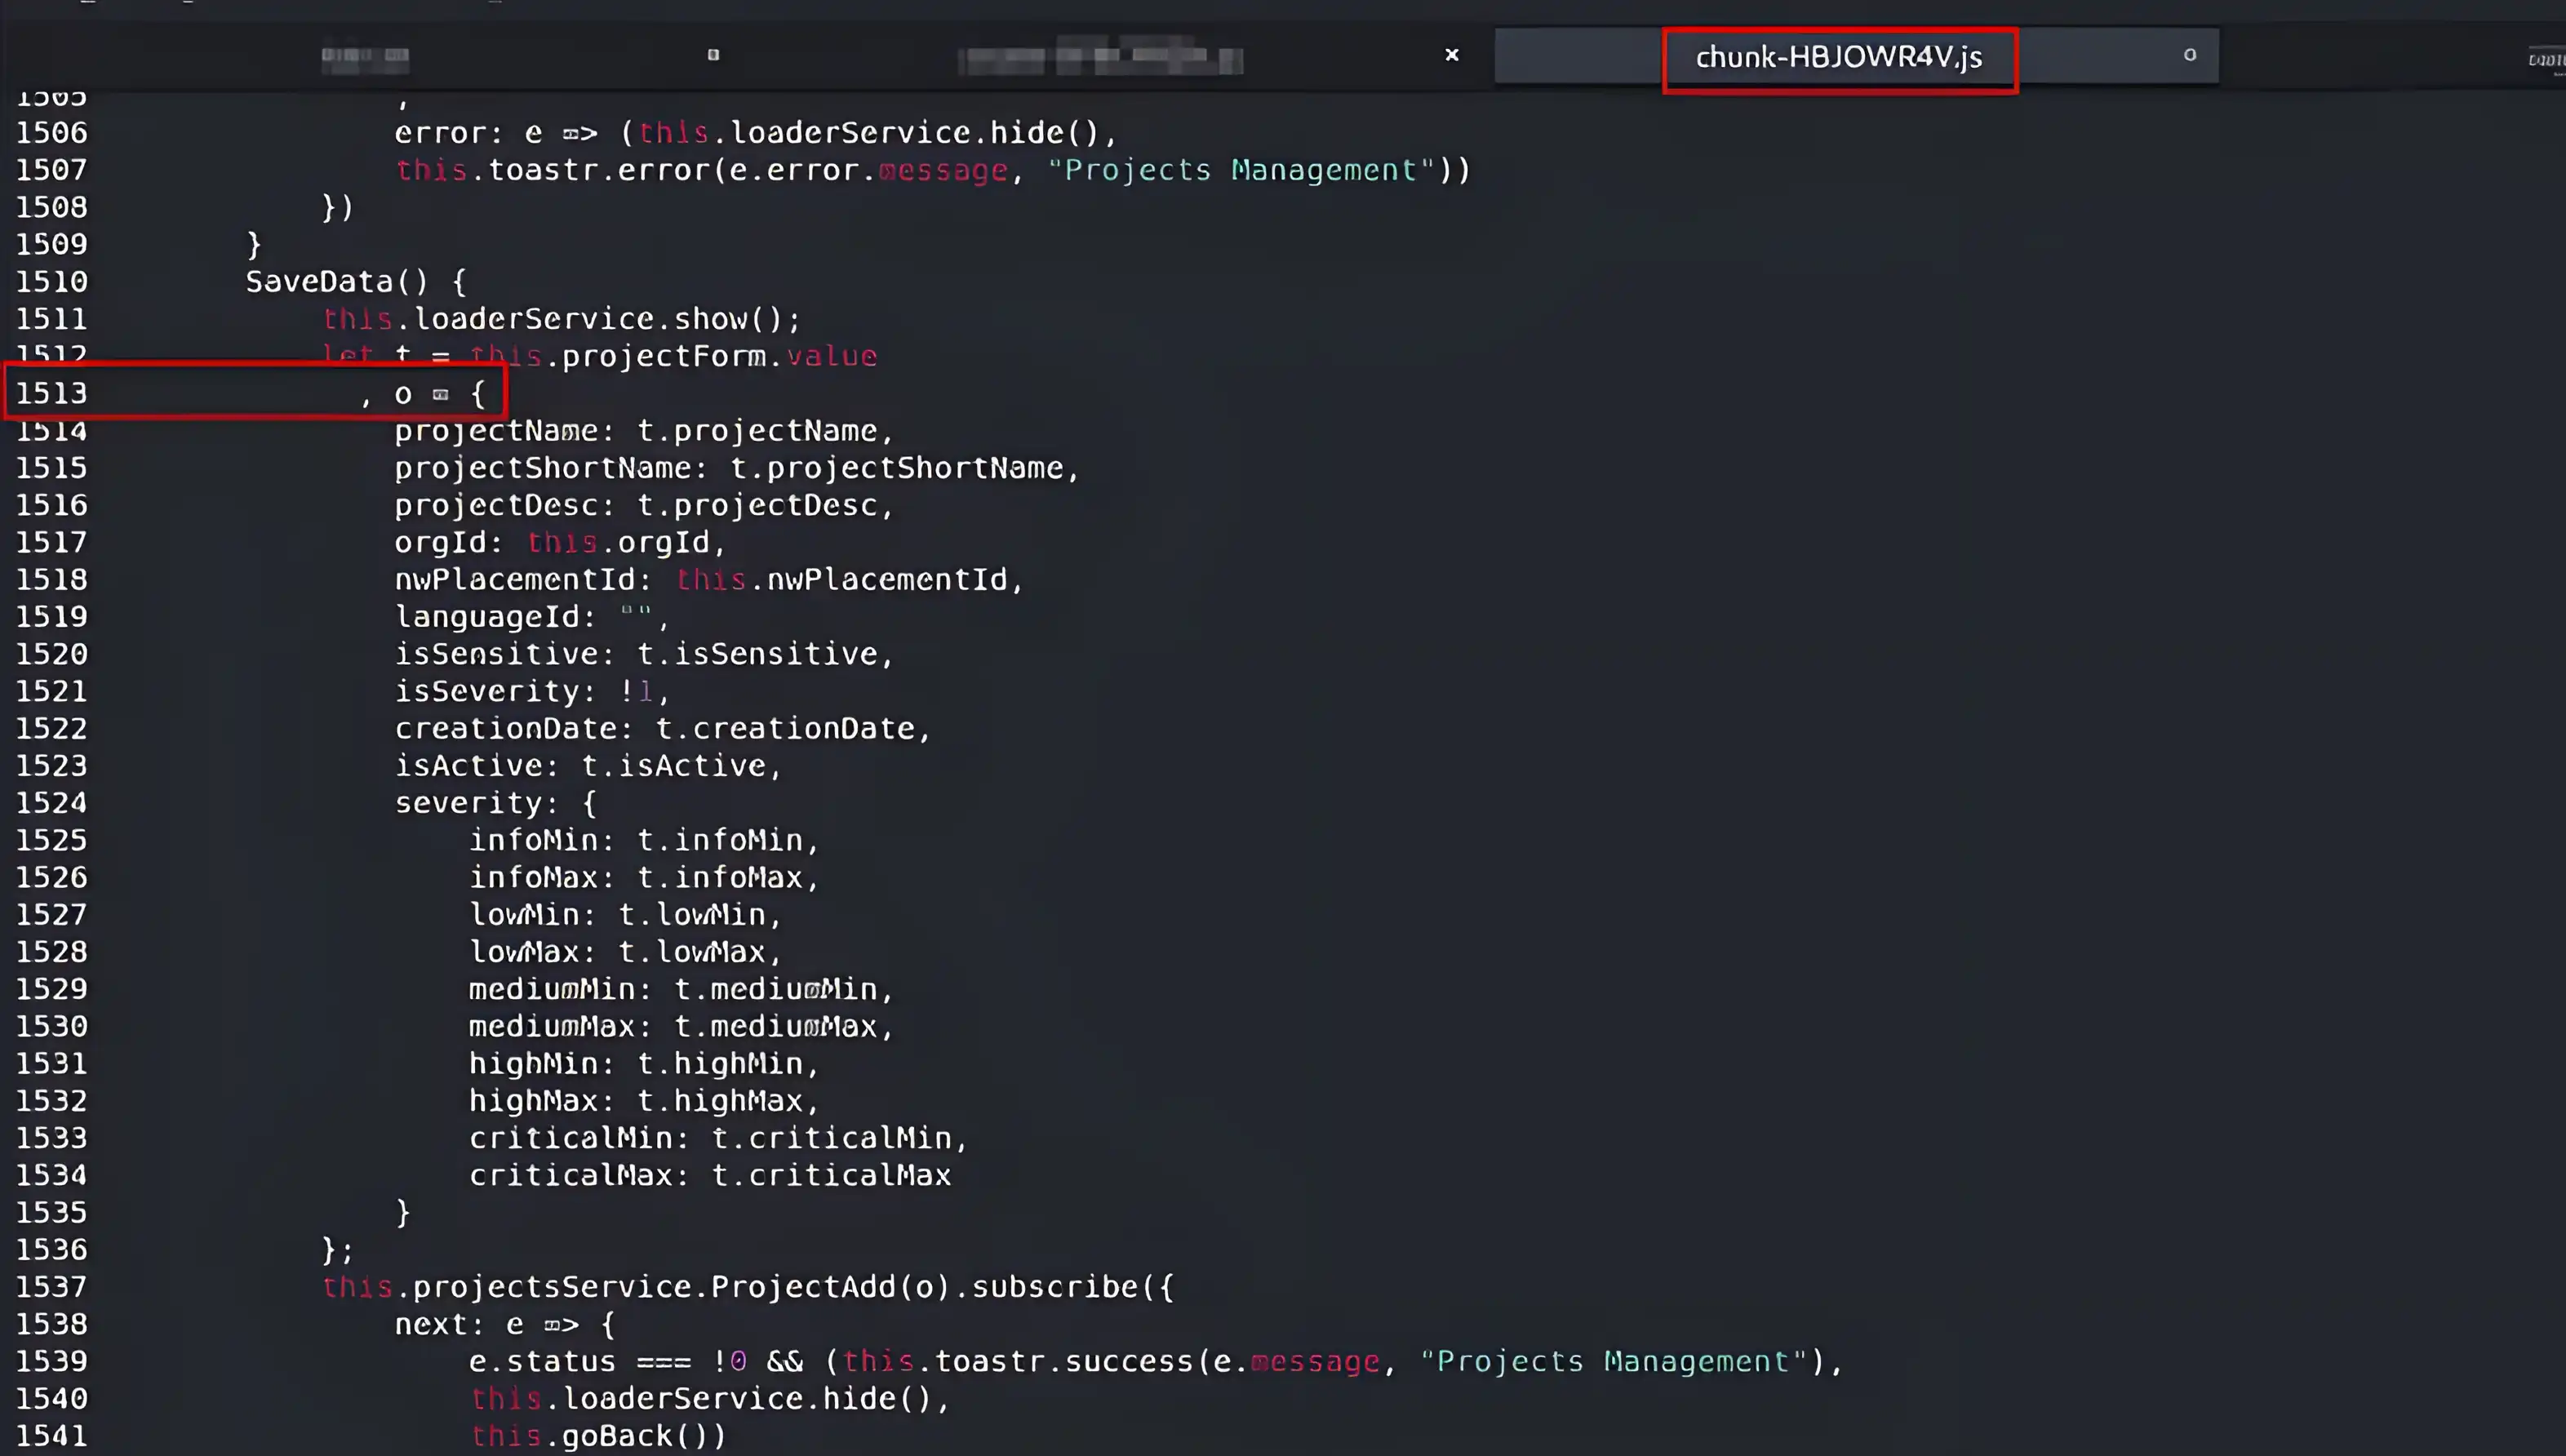
And now we have our line number. We can use the following option to replace the original file with our local version that includes the line number.
--replace-files "res/samples/js-files-with-no-input-validation/chunk-HBJOWR4V.js"++http://x.x.x.x/chunk-HBJOWR4V.js
With the line number settled, we will now set a debug breakpoint in this file using the --debug option, as shown below.
--debug URL,LOC

--debug http://x.x.x.x/chunk-HBJOWR4V.js,1513
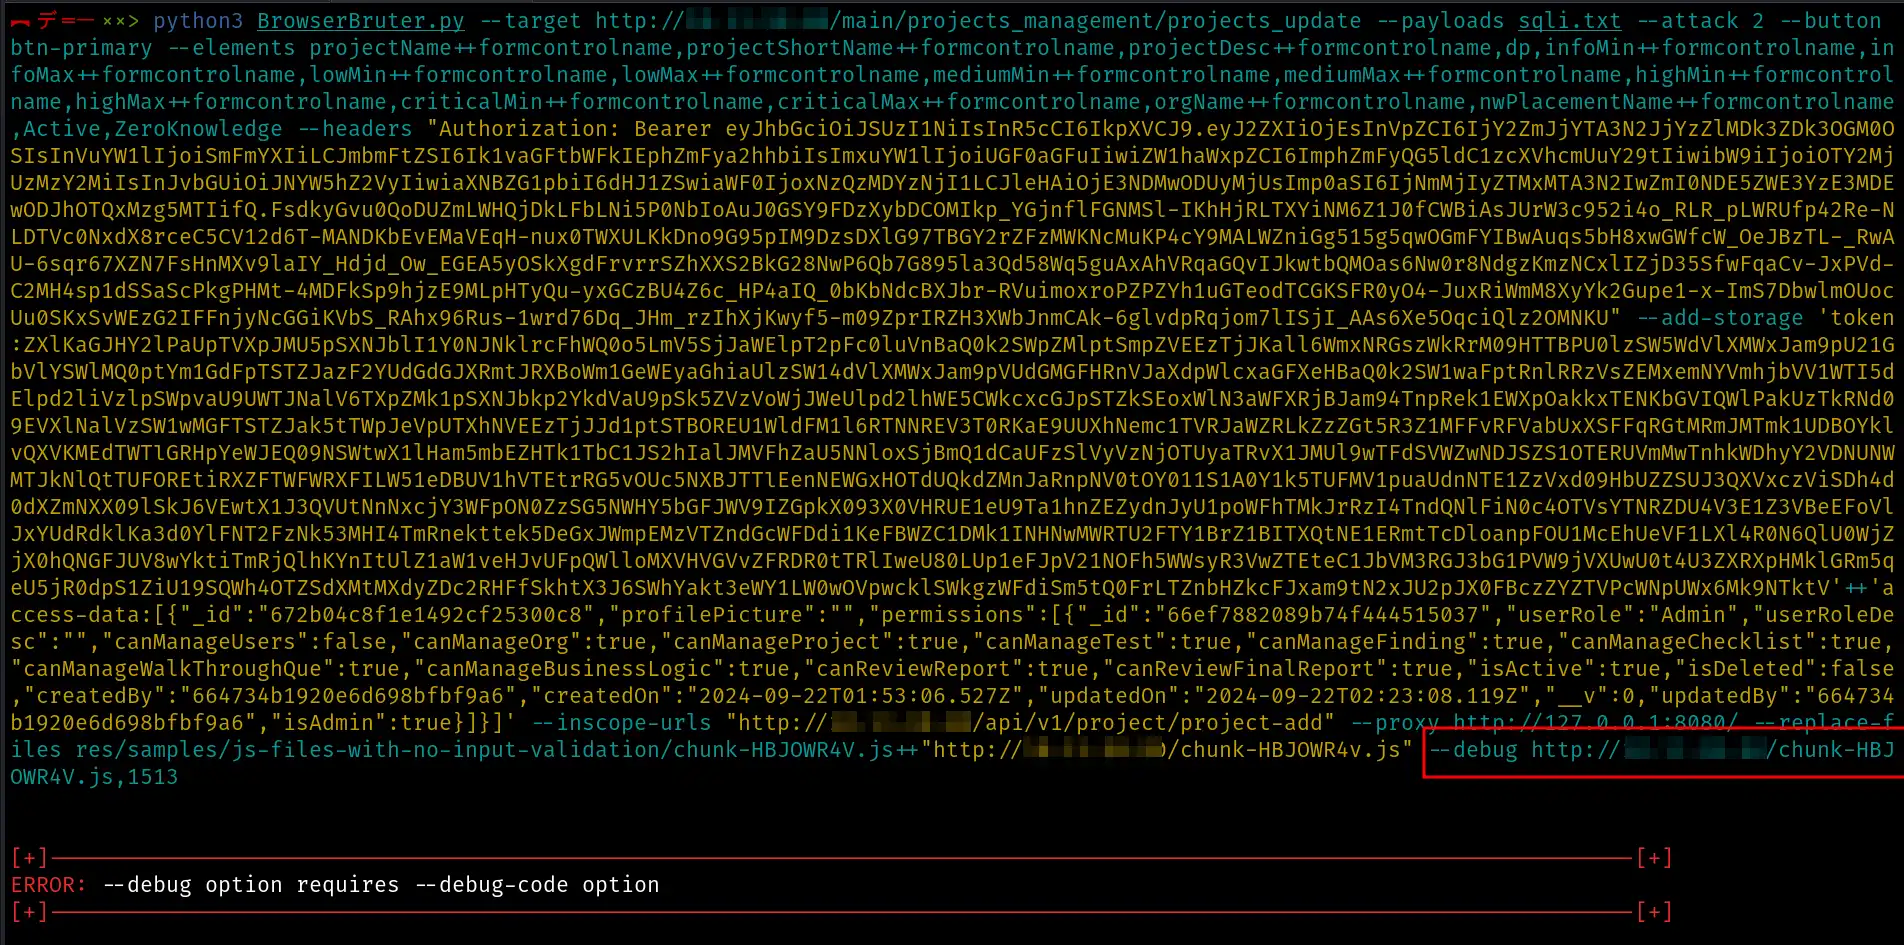
Let’s run the full command to observe the behavior of our attack.
We encountered an error because we haven’t provided any code to perform operations during debugging. To do so, we need to use the --debug-code option when applying the --debug switch.
2. Fuzzing Properties with the --debug-code Option
Before understanding how to use this switch, we first need to understand the interaction with CDP.
CDP is a WebSocket protocol. We can establish a connection with it and send various commands. For example, if Chromium or Chrome is running with CDP enabled, you can connect to it using wscat, as shown below.

From here, you can send various CDP commands to chromium using this connection. For example, to set debug breakpoint we can use following command:
{"id":2,"method":"Debugger.setBreakpointByUrl","params":{"lineNumber": 1513,"url": "http://x.x.x.x/chunk-HBJOWR4V.js,1513"}}

For the full list of commands, refer to the official CDP documentation: CDP Debugger Protocol.
Now, we need to develop a Python script that will send our JavaScript code to the web application, modifying the object’s properties during runtime. We can do this easily as shown below.
from time import sleep
import json

global_variable.current_payload = global_variable.current_payload.replace("'", "\\'")

js_code = f"CHANGEME = '{global_variable.current_payload}'"

eval_msg = {"id": 2, "method": "Runtime.evaluate", "params": {"expression": js_code}}

response = ws.send(json.dumps(eval_msg))

# Uncomment below line to print CDP response message
# print(response)

# Uncomment below line to make some delay
# sleep(1)
Whoa, that was a lot to take in. No worries, let me simplify it for you.
The code above is a template for battering ram fuzzing of web application properties using the debugging module. This template is available in the res/samples directory of BrowserBruter.
For now, the only line that matters in the above code is the following.
js_code = f"CHANGEME = '{global_variable.current_payload}'"
Here, we have to place the property/variable names in place CHANGEME as follows:
js_code = f"t['projectName'] = '{global_variable.current_payload}'"
But, Jafar, where did you get t['projectName'] from?
Glad you asked. We need to go back to the browser to understand this.
When the web application is paused by the debugger, we can still execute code in the console, as shown below.
What we are doing is setting the properties of a variable during runtime using JavaScript.
That’s where t['projectName'] comes from in the following line.
js_code = f"t['projectName'] = '{global_variable.current_payload}'"
And just like this property, let us add properties to above code as well.
js_code = f"t['projectName'] = '{global_variable.current_payload}'; t['projectDesc] = '{global_variable.current_payload}'; t['projectShortName] = '{global_variable.current_payload}';"
Now, we are fuzzing three properties of the object t, as shown in the code above.
However, there’s a small issue. Recall when I mentioned the following code.
submitForm() {
            this.projectForm.valid ? this.projectId ? this.updateData() : this.SaveData() : Object.values(this.projectForm.controls).forEach(t => {
                t.invalid && (t.markAsDirty(),
                t.updateValueAndValidity({
                    onlySelf: !0
                }))
            }
            )
        }
In the code above, the submitForm() method is called when we submit the form. If the form's value is valid, it calls the SaveData() method.
However, when we fuzz the application using BrowserBruter, the form values are invalid, so SaveData() is not called.
Note: This issue only occurs in this particular scenario. In most cases, such steps and issues won't arise. However, if they do,this demo will help.
To tackle this, we have several solutions:
- Use the
--filloption to populate the form with valid data. - Use the Automatic Navigation Handler to fill the form with valid data.
- Modify the JavaScript code to always call
SaveData(). - Set a breakpoint here as well and modify the value during runtime using the fuzzing via debugging module.
I will follow the third approach by altering the JavaScript as shown below.
submitForm() {
           this.SaveData();
        }
And save it as following:
And I will run the following command to unleash my debug kraken on the target web application.
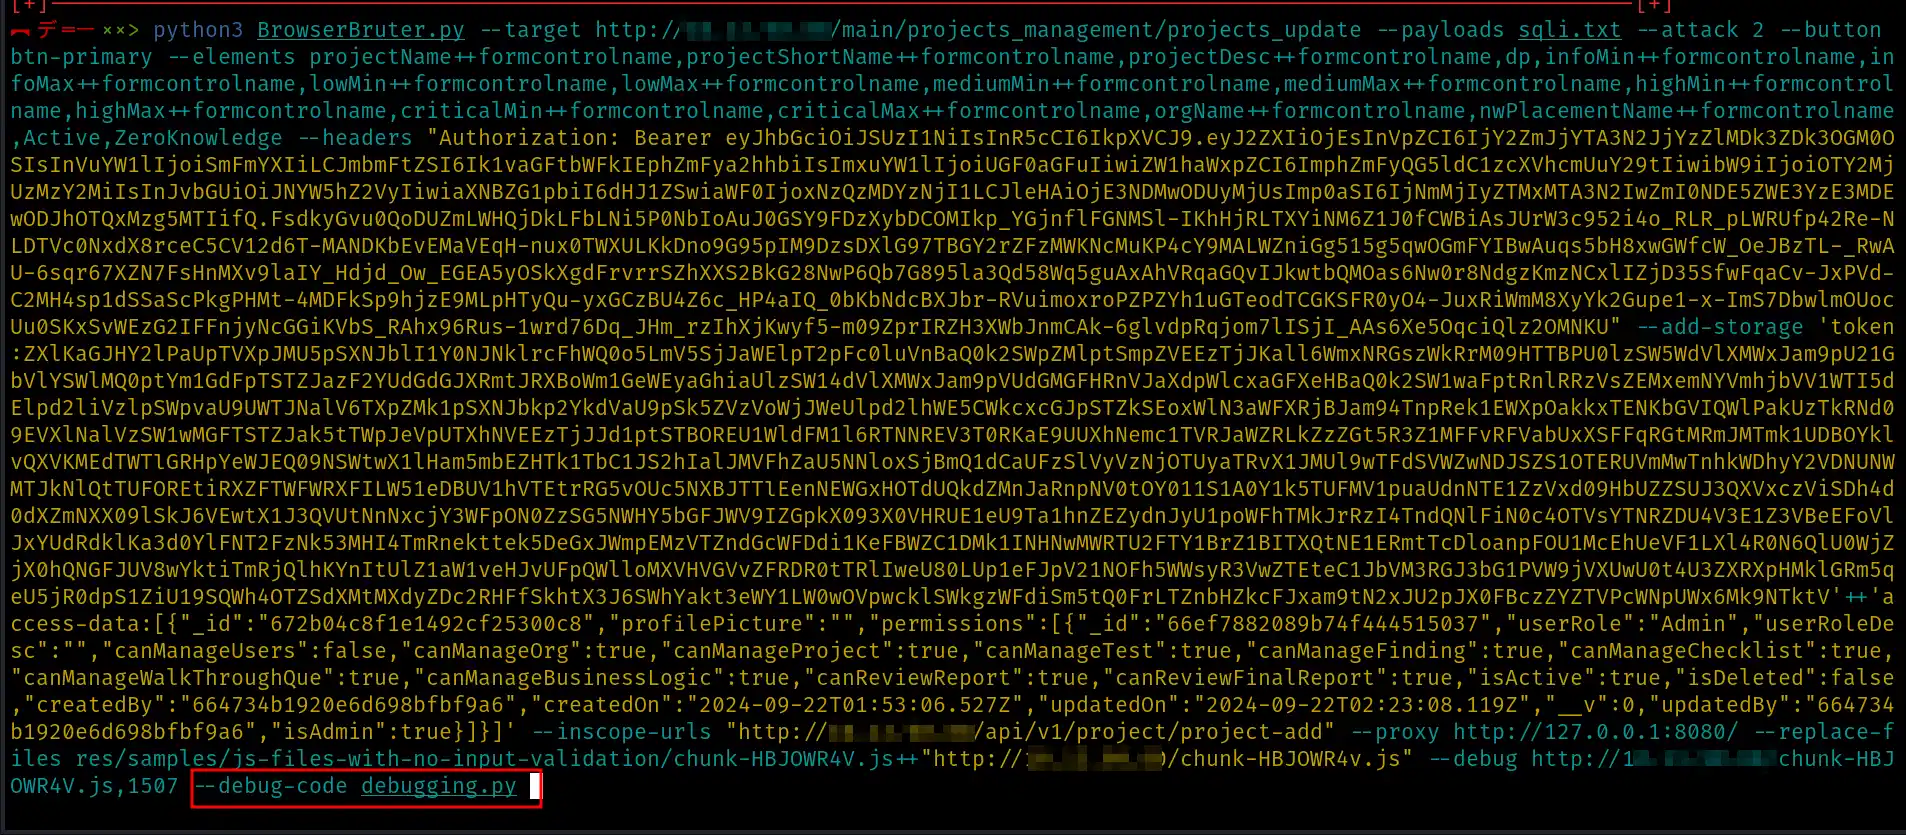
Following is our final command:
python3 BrowserBruter.py --target http://x.x.x.x/main/projects_management/projects_update --payloads sqli.txt --attack 2 --button btn-primary --elements dp,orgName++formcontrolname,nwPlacementName++formcontrolname --headers "Authorization: Bearer eyJhbGciOiJSUzI1NiIsInR5cCI6IkpXVCJ9.eyJ2ZXIiOjEsInVpZCI6IjY2ZmJjYTA3N2JjYzZlMDk3ZDk3OGM0OSIsInVuYW1lIjoiSmFmYXIiLCJmbmFtZSI6Ik1vaGFtbWFkIEphZmFya2hhbiIsImxuYW1lIjoiUGF0aGFuIiwiZW1haWxpZCI6ImphZmFyQG5ldC1zcXVhcmUuY29tIiwibW9iIjoiOTY2MjUzMzY2MiIsInJvbGUiOiJNYW5hZ2VyIiwiaXNBZG1pbiI6dHJ1ZSwiaWF0IjoxNzQyMzAzMzIzLCJleHAiOjE3NDIzMjQ5MjMsImp0aSI6ImU5NmZhY2YyNzYyZmNkMWUwYzExMTM1NDI5ZjdhZWNjOTE0Y2ZhYzYifQ.SVrMsL21qasbfQGvqPZFiau7Cp4f9hDysRyXW9ZaDaHk4Bc062UV3lvr_bhkec8Tdl9WLKxSdGRUwsDKcXt0Y-9VEnQPvv-vTAShCKCdaw6RxIPLcYxFCEUCgLbt-mREKo4KKtTmFAQaRp7etPr8XbqQk0Jc1oppUFteP--9xxkLJEr8Hkyp9fXQeb-RgvgRZn66fV2ocTVLisPDanOIRCtYURpUqmBk6-poXTrUxWJrqHFoHz23FSuYs_qzGhgl_5GAWWd7tuDsOiiUvLCR4aLIOVMmDRH52gwlSnhR8xGWAYxi7OqXra5mSYQ8X9zCeHddOC4GsxuNy8kZMB10qRHHwNgDAHqrjAo3x-75m64b37rcXhmKjMNpBcyxPZU7SpISLMhog-Y6ZgaHTDjFkXyx2TTz9lYBj7H48_TcB0D0Xnoe9CJ5be-rQgv9OAda-fl_w-bzA2m_CeJDqoAVz8PffZCnLvdBA8rbhfJHaq6cSGZfOPBlHlbxREcC7V8GAwr-uToMGrGDyDbq3Ri6aA6OptoWel3eldnzSk4nPwok_jCWfxUzN43bRLMC7W2ENoUfxQY3ps-Q8spKHR7Dz7BtucpMMjcdo2_XwKivEINlYEsIW8CqMbToDRpdF6vlKg_bSq2JZ6HjD98KIwwElFQdzHrPEaJgMHSeAP3OZNY" --add-storage 'token:ZXlKaGJHY2lPaUpTVXpJMU5pSXNJblI1Y0NJNklrcFhWQ0o5LmV5SjJaWElpT2pFc0luVnBaQ0k2SWpZMlptSmpZVEEzTjJKall6WmxNRGszWkRrM09HTTBPU0lzSW5WdVlXMWxJam9pU21GbVlYSWlMQ0ptYm1GdFpTSTZJazF2YUdGdGJXRmtJRXBoWm1GeWEyaGhiaUlzSW14dVlXMWxJam9pVUdGMGFHRnVJaXdpWlcxaGFXeHBaQ0k2SW1waFptRnlRRzVsZEMxemNYVmhjbVV1WTI5dElpd2liVzlpSWpvaU9UWTJNalV6TXpZMk1pSXNJbkp2YkdVaU9pSk5ZVzVoWjJWeUlpd2lhWE5CWkcxcGJpSTZkSEoxWlN3aWFXRjBJam94TnpReU16QXpNekl6TENKbGVIQWlPakUzTkRJek1qUTVNak1zSW1wMGFTSTZJbVU1Tm1aaFkyWXlOell5Wm1Oa01XVXdZekV4TVRNMU5ESTVaamRoWldOak9URTBZMlpoWXpZaWZRLlNWck1zTDIxcWFzYmZRR3ZxUFpGaWF1N0NwNGY5aER5c1J5WFc5WmFEYUhrNEJjMDYyVVYzbHZyX2Joa2VjOFRkbDlXTEt4U2RHUlV3c0RLY1h0MFktOVZFblFQdnYtdlRBU2hDS0NkYXc2UnhJUExjWXhGQ0VVQ2dMYnQtbVJFS280S0t0VG1GQVFhUnA3ZXRQcjhYYnFRazBKYzFvcHBVRnRlUC0tOXh4a0xKRXI4SGt5cDlmWFFlYi1SZ3ZnUlpuNjZmVjJvY1RWTGlzUERhbk9JUkN0WVVScFVxbUJrNi1wb1hUclV4V0pycUhGb0h6MjNGU3VZc19xekdoZ2xfNUdBV1dkN3R1RHNPaWlVdkxDUjRhTElPVk1tRFJINTJnd2xTbmhSOHhHV0FZeGk3T3FYcmE1bVNZUThYOXpDZUhkZE9DNEdzeHVOeThrWk1CMTBxUkhId05nREFIcXJqQW8zeC03NW02NGIzN3JjWGhtS2pNTnBCY3l4UFpVN1NwSVNMTWhvZy1ZNlpnYUhURGpGa1h5eDJUVHo5bFlCajdINDhfVGNCMEQwWG5vZTlDSjViZS1yUWd2OU9BZGEtZmxfdy1iekEybV9DZUpEcW9BVno4UGZmWkNuTHZkQkE4cmJoZkpIYXE2Y1NHWmZPUEJsSGxieFJFY0M3VjhHQXdyLXVUb01HckdEeURicTNSaTZhQTZPcHRvV2VsM2VsZG56U2s0blB3b2tfakNXZnhVek40M2JSTE1DN1cyRU5vVWZ4UVkzcHMtUThzcEtIUjdEejdCdHVjcE1NamNkbzJfWHdLaXZFSU5sWUVzSVc4Q3FNYlRvRFJwZEY2dmxLZ19iU3EySlo2SGpEOThLSXd3RWxGUWR6SHJQRWFKZ01IU2VBUDNPWk5Z'++'access-data:[{"_id":"672b04c8f1e1492cf25300c8","profilePicture":"","permissions":[{"_id":"66ef7882089b74f444515037","userRole":"Admin","userRoleDesc":"","canManageUsers":false,"canManageOrg":true,"canManageProject":true,"canManageTest":true,"canManageFinding":true,"canManageChecklist":true,"canManageWalkThroughQue":true,"canManageBusinessLogic":true,"canReviewReport":true,"canReviewFinalReport":true,"isActive":true,"isDeleted":false,"createdBy":"664734b1920e6d698bfbf9a6","createdOn":"2024-09-22T01:53:06.527Z","updatedOn":"2024-09-22T02:23:08.119Z","__v":0,"updatedBy":"664734b1920e6d698bfbf9a6","isAdmin":true}]}]' --inscope-urls "http://x.x.x.x/api/v1/project/project-add" --proxy http://127.0.0.1:8080/ --replace-files "res/samples/js-files-with-no-input-validation/chunk-HBJOWR4V.js"++http://x.x.x.x/chunk-HBJOWR4V.js --debug http://x.x.x.x/chunk-HBJOWR4V.js,1507 --debug-code debugging.py

We got our results, let’s quickly analyze them using ReportExplorer.

Well, unfortunately, we didn’t find any security issues with this application this time, but we fuzzed what is supposed to be unfuzzable. By building on this, you can fuzz the remaining properties as well.
This concludes the first part of our Fuzzing via Debugging journey. Keep in mind that this feature is still under development, and more automation capabilities are on the way.
In the next update, we’ll aim to develop a new option that automatically handles the --debug-code, so the user won't have to provide any code— all properties will be fuzzed automatically.
This Debug Kraken will continue to evolve into its final form, so stay tuned for more.
Keep fuzzing, keep hacking. Peace out x)
Download the Browser Bruter now -> https://github.com/netsquare/BrowserBruter/releases
Documentation -> https://net-square.com/browserbruter/
Contact
If you have any questions, suggestions, or feedback, feel free to connect with me on:
Github: https://github.com/zinja-coder
LinkedIn: https://www.linkedin.com/in/jafar-pathan/
Twitter: https://x.com/zinja_coder
About: https://zinja-coder.github.io/
Threads: jafar.khan.pathan_